8. Challenger Operator Manual
8.1. Introduction
8.1.1. About Challenger
Challenger is an OAuth 2.0-compatible address validation service.
By redirecting a user-agent to a Challenger service a client can
have Challenger validate that the user is able to receive messages
at a particular address and obtain that address via the /info
endpoint.
8.1.2. About this manual
This manual targets system administrators who want to install, operate or integrate a challenger service. To report issues or learn about known limitations, please check our bug tracker.
8.1.3. Architecture overview
The following picture gives an overview of the Challenger architecture and the main interactions:
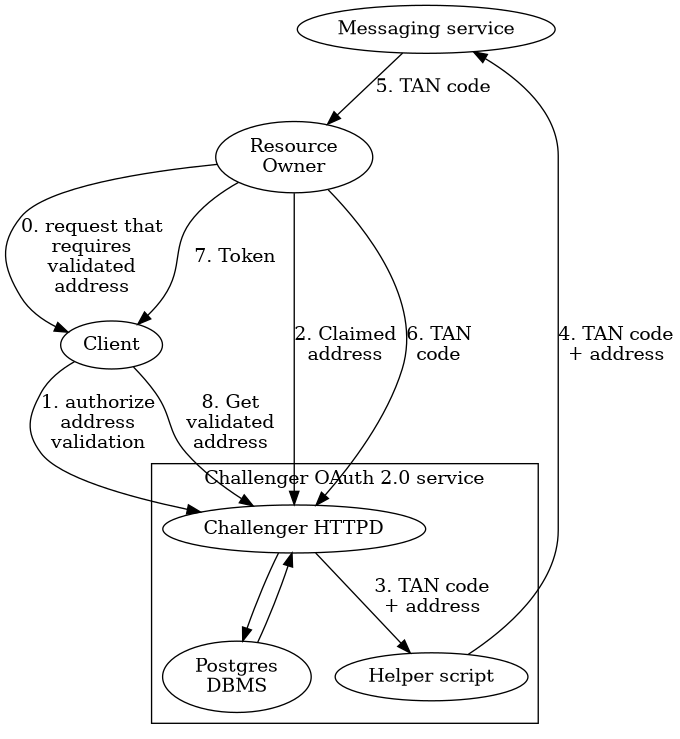
Here, the resource owner is a user that is in control of some address at a messaging service. This could be an e-mail account, a mobile phone number (for SMS), or a physical mail address (using the post office as the messaging service).
The resource owner makes some request that requires some client to be in need of address validation. The client is registered with the Challenger OAuth 2.0 service and first authorizes an address validation to be initiated. The client then redirects the resource owner to the Challenger service. In step (2), the resource owner submits the address that they claim to own.
The Challenger service then creates a TAN code and submits it to the given address via a configurable helper script that is specific to the type of address being validated. When the resource owner submits the correct TAN code in step (6), they are given a token that they can provide to the client. Using this token the client can then finally obtain the now validated address in step (8).
Address data, TAN codes and meta-data such as the number of failed attempts to submit a TAN code are recorded in a Postgres database by the Challenger service.
8.2. Installation
In this guide’s shell-session fragments, the command prompt shows two pieces of information:
Who is performing the command (
$uservsroot, and ending character$vs#).
8.2.1. Installing from source
The following instructions will show how to install libgnunetutil and the core GNU Taler libraries from source.
The package sources can be find in our download directory.
GNU Taler components version numbers follow the MAJOR.MINOR.MICRO format.
The general rule for compatibility is that MAJOR and MINOR must match.
Exceptions to this general rule are documented in the release notes.
For example, Challenger 1.3.0 should be compatible with Taler exchange 1.4.x
as the MAJOR version matches. A MAJOR version of 0 indicates experimental
development, and you are expected to always run all of the latest releases
together (no compatibility guarantees).
First, the following packages need to be installed before we can compile the backend:
“Sphinx RTD Theme” Python package aka
python3-sphinx-rtd-themeon Debian-based systems (for GNUnet documentation support, can be omitted if GNUnet is configured with--disable-documentation)libsqlite3 >= 3.16.2
GNU libunistring >= 0.9.3
libcurl >= 7.26 (or libgnurl >= 7.26)
libqrencode >= 4.0.0 (Taler merchant only)
GNU libgcrypt >= 1.6 (1.10 or later highly recommended)
libsodium >= 1.0
libargon2 >= 20171227
libjansson >= 2.7
PostgreSQL >= 15, including libpq
GNU libmicrohttpd >= 0.9.71
GNUnet >= 0.20 (from source tarball)
Python3 with
jinja2
If you are on Debian stable or later, the following command may help you install these dependencies:
# apt-get install \
  libqrencode-dev \
  libsqlite3-dev \
  libltdl-dev \
  libunistring-dev \
  libsodium-dev \
  libargon2-dev \
  libcurl4-gnutls-dev \
  libgcrypt20-dev \
  libjansson-dev \
  libpq-dev \
  libmicrohttpd-dev \
  python3-jinja2 \
  postgresql-15
Before you install GNUnet, you must download and install the dependencies mentioned in the previous section, otherwise the build may succeed, but could fail to export some of the tooling required by GNU Taler.
On Ubuntu, you also need to install pkg-config, for example:
$ apt-get install pkg-config
To install GNUnet, unpack the tarball and change into the resulting directory, then proceed as follows:
$ ./configure [--prefix=GNUNETPFX]
$ # Each dependency can be fetched from non standard locations via
$ # the '--with-<LIBNAME>' option. See './configure --help'.
$ make
# make install
# ldconfig
If you did not specify a prefix, GNUnet will install to /usr/local,
which requires you to run the last step as root.
The ldconfig command (also run as root) makes the
shared object libraries (.so files)
visible to the various installed programs.
Please note that unlike most packages, if you want to run the make check
command, you should run it only after having done make install. The
latter ensures that necessary binaries are copied to the right place.
In any case, if make check fails, please consider filing a
bug report with the Taler bug tracker.
There is no need to actually run a GNUnet peer or a Taler exchange to use Challenger – all Challenger needs from GNUnet and Taler are a number of headers and libraries!
After installing GNUnet, unpack the GNU Taler exchange tarball, change into the resulting directory, and proceed as follows:
$ ./configure [--prefix=EXCHANGEPFX] \
              [--with-gnunet=GNUNETPFX]
$ # Each dependency can be fetched from non standard locations via
$ # the '--with-<LIBNAME>' option. See './configure --help'.
$ make
# make install
If you did not specify a prefix, the exchange will install to /usr/local,
which requires you to run the last step as root. You have to specify
--with-gnunet=/usr/local if you installed GNUnet to /usr/local in the
previous step.
TBD.
Please note that unlike most packages, if you want to run the make check
command, you should run it only after having done make install. The
latter ensures that necessary binaries are copied to the right place.
In any case, if make check fails, please consider filing a
bug report with the Taler bug tracker.
8.2.2. Installing the Challenger binary packages on Debian
To install the GNU Taler Debian packages, first ensure that you have the right Debian distribution. At this time, the packages are built for Debian bookworm.
You need to add a file to import the GNU Taler packages. Typically,
this is done by adding a file /etc/apt/sources.list.d/taler.list that
looks like this:
deb [signed-by=/etc/apt/keyrings/taler-systems.gpg] https://deb.taler.net/apt/debian bookworm main
Next, you must import the Taler Systems SA public package signing key into your keyring and update the package lists:
# wget -O /etc/apt/keyrings/taler-systems.gpg \
    https://taler.net/taler-systems.gpg
# apt update
Note
You may want to verify the correctness of the Taler Systems SA key out-of-band.
Now your system is ready to install the official GNU Taler binary packages using apt.
To install the Challenger, you can now simply run:
# apt install challenger
Note that the package does not perform any configuration work except for setting up the various users and the systemd service scripts. You still must configure at least the database, HTTP reverse proxy (typically with TLS certificates) and the terms of service.
8.2.3. Installing the GNU Taler binary packages on Trisquel
To install the GNU Taler Trisquel packages, first ensure that you have the right Trisquel distribution. Packages are currently available for Trisquel GNU/Linux 10.0. Simply follow the same instructions provided for Ubuntu.
8.2.4. Installing the GNU Taler binary packages on Ubuntu
To install the GNU Taler Ubuntu packages, first ensure that you have
the right Ubuntu distribution. At this time, the packages are built for
Ubuntu Lunar and Ubuntu Jammy. Make sure to have universe in your
/etc/apt/sources.list (after main) as we depend on some packages
from Ubuntu universe.
A typical /etc/apt/sources.list.d/taler.list file for this setup
would look like this for Ubuntu Lunar:
deb [signed-by=/etc/apt/keyrings/taler-systems.gpg] https://deb.taler.net/apt/ubuntu/ lunar taler-lunar
For Ubuntu Mantic use this instead:
deb [signed-by=/etc/apt/keyrings/taler-systems.gpg] https://deb.taler.net/apt/ubuntu/ mantic taler-mantic
For Ubuntu Noble use this instead:
deb [signed-by=/etc/apt/keyrings/taler-systems.gpg] https://deb.taler.net/apt/ubuntu/ noble taler-noble
Next, you must import the Taler Systems SA public package signing key into your keyring and update the package lists:
# wget -O /etc/apt/keyrings/taler-systems.gpg \
    https://taler.net/taler-systems.gpg
# apt update
Note
You may want to verify the correctness of the Taler Systems key out-of-band.
Now your system is ready to install the official GNU Taler binary packages using apt.
To install the Taler exchange, you can now simply run:
# apt install challenger
Note that the package does not perform any configuration work except for setting up the various users and the systemd service scripts. You still must configure at least the database, HTTP reverse proxy (typically with TLS certificates), and the terms of service.
8.2.5. Services, users, groups and file system hierarchy
The challenger package will use several system users to compartmentalize different parts of the system:
challenger-httpd: runs the HTTP daemon with the core business logic.postgres: runs the PostgreSQL database (from postgresql package).www-data: runs the frontend HTTPS service with the TLS keys (from nginx package).
The package will deploy a systemd service files in
/usr/lib/systemd/system/ for Challenger:
challenger-httpd.service: the Challenger logic with the public REST API.
8.3. Configuration Fundamentals
This chapter provides fundamental details about the exchange configuration.
The configuration for all Taler components uses a single configuration file
as entry point: /etc/challenger/challenger.conf.
System defaults are automatically loaded from files in
/usr/share/challenger/config.d. These default files should never be modified.
The default configuration challenger.conf configuration file also includes all
configuration files in /etc/challenger/conf.d.
To view the entire configuration annotated with the source of each configuration option, you
can use the challenger-config helper:
[root@exchange-online]# challenger-config --diagnostics
< ... annotated, full configuration ... >
Warning
While challenger-config also supports rewriting configuration files, we strongly
recommend to edit configuration files manually, as challenger-config does not
preserve comments and, by default, rewrites /etc/challenger/challenger.conf.
8.3.1. Configuration format
All GNU Taler components are designed to possibly share the same configuration files. When installing a GNU Taler component, the installation deploys default values in configuration files located at ${prefix}/share/taler/config.d/ where ${prefix} is the installation prefix. Different components must be installed to the same prefix.
In order to override these defaults, the user can write a custom configuration
file and either pass it to the component at execution time using the -c
option, or name it taler.conf and place it under $HOME/.config/ which is where
components will look by default. Note that the systemd service files pass -c
/etc/taler/taler.conf, thus making /etc/taler/taler.conf
the primary location for the configuration.
A config file is a text file containing sections, and each section contains maps options to their values. Configuration files follow basically the INI syntax:
[section1]
value1 = string
value2 = 23

[section2]
value21 = string
value22 = /path22
Comments start with a hash (#). Throughout the configuration, it is
possible to use $-substitution for options relating to names of files or
directories. It is also possible to provide defaults values for those
variables that are unset, by using the following syntax:
${VAR:-default}. There are two ways a user can set the value
of $-prefixable variables:
by defining them under a
[paths]section:[paths] TALER_DEPLOYMENT_SHARED = ${HOME}/shared-data .. [section-x] path-x = ${TALER_DEPLOYMENT_SHARED}/x
or by setting them in the environment:
$ export VAR=/x
The configuration loader will give precedence to variables set under
[path] over environment variables.
The utility taler-config, which gets installed along with the exchange,
can be used get and set configuration values without directly editing the
configuration file. The option -f is particularly useful to resolve
pathnames, when they use several levels of $-expanded variables. See
taler-config --help.
The repository git://git.taler.net/deployment contains example code
for generating configuration files under deployment/netzbon/.
8.3.2. Fundamental Setup: Address validation
Each challenger service is designed to validate one type of address. Possible address types include:
phone numbers (via SMS)
e-mail addresses (via SMTP)
mail addresses (via postal service)
In principle, additional types of addresses can easily be added by extending the respective HTML and programs to send challenges to the new address type.
To make different types of address validations possible, the Challenger configuration contains two configuration options.
The
ADDRESS_TYPEconfiguration option informs Challenger about the type of address it is expected to validate. It is returned as part of the OAuth 2.0/infoendpoint to the client, and is typically also used when deciding how to render the HTML form for address entry that is shown to the user.The
AUTH_COMMANDconfiguration option specifies which command Challenger should run to send a challenge to an address. The actual address is given to this subcommand as the first argument ($1), while the text with the challenge is passed to standard input. The subcommand should terminate with a status code of 0 on success.
 [challenger]
 ADDRESS_TYPE = email
 AUTH_COMMAND = challenger-send-email.sh
 # ... rest of file ...
Challenger comes with AUTH_COMMAND shell scripts for sending e-mail, SMS
and postal mail. Note that for SMS and postal mail the Challenger scripts uses
third party services to actually send the SMS or print and mail the postal
mail. These third parties naturally charge money for their services, and thus
the Challenger administrator will need to add the respective credentials to
the SMS and postal mail scripts before they can function. In any case, these
scripts should be primarily seen as examples on how to write authentication
commands.
Note
We strongly welcome contributions for additional scripts with alternative providers or for new types of addresses.
8.3.3. Legal conditions for using the service
The service has well-known API endpoints to return its legal conditions to the user in various languages and various formats. This section describes how to setup and configure the legal conditions.
8.3.4. Terms of Service
The service has an endpoint “/terms” to return the terms of service (in legal language) of the service operator. Client software show these terms of service to the user when the user is first interacting with the service. Terms of service are optional for experimental deployments, if none are configured, the service will return a simple statement saying that there are no terms of service available.
To configure the terms of service response, there are two options in the configuration file for the service:
TERMS_ETAG: The current “Etag” to return for the terms of service. This value must be changed whenever the terms of service are updated. A common value to use would be a version number. Note that if you change theTERMS_ETAG, you MUST also provide the respective files inTERMS_DIR(see below).TERMS_DIR: The directory that contains the terms of service. The files in the directory must be readable to the service process.
8.3.5. Privacy Policy
The service has an endpoint “/pp” to return the terms privacy policy (in legal language) of the service operator. Clients should show the privacy policy to the user when the user explicitly asks for it, but it should not be shown by default. Privacy policies are optional for experimental deployments, if none are configured, the service will return a simple statement saying that there is no privacy policy available.
To configure the privacy policy response, there are two options in the configuration file for the service:
PRIVACY_ETAG: The current “Etag” to return for the privacy policy. This value must be changed whenever the privacy policy is updated. A common value to use would be a version number. Note that if you change thePRIVACY_ETAG, you MUST also provide the respective files inPRIVACY_DIR(see below).PRIVACY_DIR: The directory that contains the privacy policy. The files in the directory must be readable to the service process.
8.3.6. Legal policies directory layout
The TERMS_DIR and PRIVACY_DIR directory structures must follow a
particular layout. You may use the same directory for both the terms of
service and the privacy policy, as long as you use different ETAGs. Inside of
the directory, there should be sub-directories using two-letter language codes
like “en”, “de”, or “jp”. Each of these directories would then hold
translations of the current terms of service into the respective language.
Empty directories are permitted in case translations are not available.
Then, inside each language directory, files with the name of the value set as
the TERMS_ETAG or PRIVACY_ETAG must be provided. The extension of each
of the files should be typical for the respective mime type. The set of
supported mime types is currently hard-coded in the service, and includes
“.epub”, “.html”, “.md”, “.pdf” and “.txt” files. If other files are present,
the service may show a warning on startup.
8.3.6.1. Example
A sample file structure for a TERMS_ETAG of “tos-v0” would be:
TERMS_DIR/en/tos-v0.txt
TERMS_DIR/en/tos-v0.html
TERMS_DIR/en/tos-v0.pdf
TERMS_DIR/en/tos-v0.epub
TERMS_DIR/en/tos-v0.md
TERMS_DIR/de/tos-v0.txt
TERMS_DIR/de/tos-v0.html
TERMS_DIR/de/tos-v0.pdf
TERMS_DIR/de/tos-v0.epub
TERMS_DIR/de/tos-v0.md
If the user requests an HTML format with language preferences “fr” followed by
“en”, the service would return TERMS_DIR/en/tos-v0.html lacking a version in
French.
8.3.7. Generating the Legal Terms
The taler-terms-generator script can be used to generate directories with
terms of service and privacy policies in multiple languages and all required
data formats from a single source file in .rst format and GNU gettext
translations in .po format.
To use the tool, you need to first write your legal conditions in English in
reStructuredText (rst). You should find a templates in
$PREFIX/share/terms/*.rst where $PREFIX is the location where you
installed the service to. Whenever you make substantive changes to the legal
terms, you must use a fresh filename and change the respective ETAG. The
resulting file must be called $ETAG.rst and the first line of the file should be the title of the document.
Once you have written the $ETAG.rst file in English, you can
generate the first set of outputs:
$ taler-terms-generator -i $ETAG
Afterwards, you should find the terms in various formats for all configured
languages (initially only English) in $PREFIX/share/terms/. The generator
has a few options which are documented in its man page.
8.3.8. Adding translations
Translations must be available in subdirectories
locale/$LANGUAGE/LC_MESSAGES/$ETAG.po.
To start translating, you first need to add a new
language:
$ taler-terms-generator -i $ETAG -l $LANGUAGE
Here, $LANGUAGE should be a two-letter language
code like de or fr. The command will generate
a file locale/$LANGUAGE/LC_MESSAGES/$ETAG.po
which contains each English sentence or paragraph
in the original document and an initially empty
translation. Translators should update the .po
file. Afterwards, simply re-run
$ taler-terms-generator -i $ETAG
to make the current translation(s) available to the service.
Note
You must restart the service whenever adding or updating legal documents or their translations.
8.3.9. Updating legal documents
When making minor changes without legal implications, edit the .rst file,
then re-run the step to add a new language for each existing translation to
produce an updated .po file. Translate the sentences that have changed and
finally run the generator (without -l) on the ETAG (-i $ETAG) to
create the final files.
When making major changes with legal implications, you should first rename (or
copy) the existing .rst file and the associated translation files to a new
unique name. Afterwards, make the major changes, update the .po files,
complete the translations and re-create the final files. Finally, do not
forget to update the ETAG configuration option to the new name and to
restart the service.
8.3.10. Database Configuration
The access credentials for the Challenger database are configured in
/etc/challenger/challenger.conf. Currently, only PostgreSQL is
supported as a database backend.
Note
The challenger-dbconfig tool can be used to automate the database
setup. When using the Debian/Ubuntu packages, the user should already have
been created, so you can just run the tool without any arguments and should
have a working database configuration. Subsequently, you should still run
taler-challenger-dbinit as the challenger-httpd user to
initialize the database schema.
To create a database for Challenger on the local system, run:
[root@exchange-online]# su - postgres
[postgres@exchange-online]# createuser challenger-httpd
[postgres@exchange-online]# createdb -O challenger-httpd challenger
[postgres@exchange-online]# exit
This will create a challenger database owned by the taler-httpd user.
We will use that user later to perform database maintenance operations.
Assuming the above database setup, the database credentials to configure in the configuration file would simply be:
[challenger]
DB = postgres

[challenger-postgres]
CONFIG = postgres:///challenger
If the database is run on a different host, please follow the instructions from the PostgreSQL manual for configuring remote access.
After configuring the database credentials, the Challenger database needs to be initialized with the following command:
[root@exchange-online]# sudo -u challenger-httpd challenger-dbinit
Note
To run this command, the user must have CREATE TABLE, CREATE
INDEX, ALTER TABLE and (in the future possibly even) DROP TABLE
permissions. Those permissions are only required for this step (which may
have to be repeated when upgrading a deployment). Afterwards, during
normal operation, permissions to CREATE or ALTER tables are not
required by Challenger and thus should not be granted. For more
information, see challenger-dbinit(1).
8.4. Deployment
This chapter describes how to deploy Challenger once the basic installation and configuration are completed.
8.4.1. Serving
The Challenger can serve HTTP over both TCP and UNIX domain socket.
The following options are to be configured in the section [challenger]:
SERVE: Must be set totcpto serve HTTP over TCP, orunixto serve HTTP over a UNIX domain socket.PORT: Set to the TCP port to listen on ifSERVEistcp.UNIXPATH: Set to the UNIX domain socket path to listen on ifSERVEisunix.UNIXPATH_MODE: Number giving the mode with the access permission maskfor the
UNIXPATH(i.e. 660 =rw-rw---). Make sure to set it in such a way that your reverse proxy has permissions to access the UNIX domain socket. The default (660) assumes that the reverse proxy is a member of the group under which the exchange HTTP server is running.
8.4.2. Reverse Proxy Setup
By default, the challenger-httpd service listens for HTTP connections
on a UNIX domain socket. To make the service publicly available, a reverse
proxy such as nginx should be used. You must configure the reverse proxy
to use TLS as this is required by OAuth 2.0.
The challenger package ships with a sample configuration that can be
enabled in nginx:
[root@exchange-online]# vim /etc/nginx/sites-available/challenger
< ... customize configuration ... >
[root@exchange-online]# ln -s /etc/nginx/sites-available/challenger \
                              /etc/nginx/sites-enabled/challenger
[root@exchange-online]# systemctl reload nginx
8.4.3. Launching Challenger
A running exchange requires starting the following processes:
challenger-httpd(needs database access)
The processes should be started via a hypervisor like
systemd or gnunet-arm that automatically re-starts them should they
have terminated unexpectedly. Furthermore, the hypervisor
should periodically re-start the service (say once per hour)
to limit Postgres database memory utilization.
Note
The challenger-httpd does not ship with HTTPS enabled by default.
It must thus be run behind an HTTPS reverse proxy that performs
TLS termination on the same system. Thus, it would typically be configured
to listen on a UNIX domain socket.
Given proper packaging, all of the above are realized via a simple systemd target. This enables Challenger to be properly started using a simple command:
# systemctl start challenger-httpd.service
8.4.5. OAuth 2.0 integration
When integrating Challenger into an OAuth 2.0 process, you need to provide the
three options from the previous section, but also the authorization, token and
info endpoints. For Challenger, these are /authorize, /token and
/info. However, the /authorize endpoint is special, as it is actually
/authorize/$NONCE where $NONCE is a nonce that must be first requested
by the client using the /setup/$CLIENT_ID endpoint!
Note
This extra step prevents user-agents from (ab)using the Challenger service to send challenges to addresses even when there is no authorized client that desires address validation. This is an important feature as address validation could be expensive.
Thus, to generate the authorization URL, a client must first POST to
/setup/$CLIENT_ID using their client secret in an Authorization: Bearer $SECRET
HTTP header to obtain a fresh $NONCE.
In the GNU Taler exchange configuration, this is indicated by appending
#setup to the KYC_OAUTH2_AUTHORIZE_URL endpoint. Be careful to quote
the URL, as # is otherwise interpreted as the beginning of a comment by
the configuration file syntax:
[kyc-provider-example-oauth2]
LOGIC = oauth2
# (generic options omitted)
KYC_OAUTH2_AUTHORIZE_URL = "https://challenger.example.com/authorize#setup"
KYC_OAUTH2_TOKEN_URL = "https://challenger.example.com/token"
KYC_OAUTH2_INFO_URL = "https://challenger.example.com/info"
KYC_OAUTH2_CLIENT_ID = 1
KYC_OAUTH2_CLIENT_SECRET = "$SECRET"
8.4.6. Database management
Note
We advise to make good backups before experimenting with the database.
To update the Challenger database after upgrading to a newer
version of Challenger, you should simply re-run challenger-dbinit.
Without further options, this command is expected to preserve
all data and only migrate the existing database to the latest
schema:
$ challenger-dbinit
To delete stale data from the Challenger database, you can use garbage collection:
$ challenger-dbinit --garbagecollect
The Challenger database can be re-initialized using:
$ challenger-dbinit --reset
However, running this command will result in all data in the database being lost.
8.5. Template Customization
The Challenger service comes with various HTML templates that are shown to
guide users through the process. Challenger uses C implementation of mustache as the templating engine. This section
describes the various templates. In general, the templates must be installed
to the share/challenger/templates/ directory. The file names must be of
the form $NAME.$LANG.must where $NAME is the name of the template and
$LANG is the 2-letter language code of the template. English templates
must exist and will be used as a fallback. If the browser (user-agent) has
provided language preferences in the HTTP header and the respective language
exists, the correct language will be automatically served.
The following subsections give details about each of the templates. The
subsection title is the $NAME of the respective template.
8.5.1. enter-$ADDRESS_TYPE-form
These templates are used to ask the user to enter the address that challenger
is expected to validate. Here, $ADDRESS_TYPE will be replaced by the
ADDRESS_TYPE configuration option in the [challenger] section of the
configuration file. Typical values include address (for physical mailing
addresses), phone (for mobile phone numbers) and email (for email
addresses). For testing, file (where the TAN code is written into a local
file) is also supported.
The template is instantiated using the following information:
restrictions: Object; map of keys (names of the fields of the address to be entered by the user) to objects with a “regex” (string) containing an extended Posix regular expression for allowed address field values, and a “hint”/”hint_i18n” giving a human-readable explanation to display if the value entered by the user does not match the regex. Keys that are not mapped to such an object have no restriction on the value provided by the user. See “ADDRESS_RESTRICTIONS” in the challenger configuration.
fix_address: boolean; indicates if the given address cannot be changed anymore, the form should be read-only if set to true.
nonce: String; unique value identifying the challenge, should be shown to the user so that they can recognize it when they receive the TAN code
last_address: Object; form values from the previous submission if available, details depend on the
ADDRESS_TYPE, should be used to pre-populate the formchanges_left: Integer; number of times the address can still be changed, may or may not be shown to the user
8.5.2. enter-tan-form
This page should generate the HTML form for the user to enter the TAN code that they received at the respective address.
The template is instantiated using the following information:
nonce: String; unique value identifying the challenge, should be shown to the user so that they can match it to the TAN code they received
attempts_left: Integer; how many more attempts are allowed, might be shown to the user, highlighting might be appropriate for low values such as 1 or 2 (the form will never be used if the value is zero)
address: Object; the address that is being validated, might be shown or not
transmitted: boolean; true if we just retransmitted the challenge, false if we sent a challenge recently and thus refused to transmit it again this time; might make a useful hint to the user
next_tx_time: String; timestamp explaining when we would re-transmit the challenge the next time (at the earliest) if requested by the user
8.5.3. invalid-pin
The user has provided an invalid TAN code (HTTP 403 Forbidden).
The template is instantiated using the following information:
ec: Integer; numeric Taler error code, should be shown to indicate the error compactly for reporting to developers
hint: String; human-readable Taler error code, should be shown for the user to understand the error
addresses_left: Integer; how many times is the user still allowed to change the address; if 0, the user should not be shown a link to jump to the address entry form
pin_transmissions_left: Integer; how many times might the PIN still be retransmitted
auth_attempts_left: Integer; how many times might the user still try entering the PIN code
exhausted: Bool; if true, the PIN was not even evaluated as the user previously exhausted the number of attempts
no_challenge: Bool; if true, the PIN was not even evaluated as no challenge was ever issued (the user must have skipped the step of providing their address first!)
If both pin_transmissions_left and auth_attempts_left are zero, the link to re-enter the PIN should be hidden and the user should only be allowed to specify a different address. The form will never be generated if all three values are zero. (Thus there is always at least one valid choice when the form is shown.)
8.5.4. validation-unknown
The user has tried to access a validation process that is not known to the backend (HTTP 404 Not Found).
The template is instantiated using the following information:
ec: Integer; numeric Taler error code, should be shown to indicate the error compactly for reporting to developers
hint: String; human-readable Taler error code, should be shown for the user to understand the error
detail: String; optional, extended human-readable text provided to elaborate on the error, should be shown to provide additional context
8.5.5. invalid-request
The request of the client is invalid (HTTP 400 Bad Request).
The template is instantiated using the following information:
ec: Integer; numeric Taler error code, should be shown to indicate the error compactly for reporting to developers
hint: String; human-readable Taler error code, should be shown for the user to understand the error
detail: String; optional, extended human-readable text provided to elaborate on the error, should be shown to provide additional context
8.5.6. internal-error
The service experienced an internal error (HTTP 500 Internal Server Error).
The template is instantiated using the following information:
ec: Integer; numeric Taler error code, should be shown to indicate the error compactly for reporting to developers
hint: String; human-readable Taler error code, should be shown for the user to understand the error
detail: String; optional, extended human-readable text provided to elaborate on the error, should be shown to provide additional context