5.4. Regional Currency Automated Setup Manual#
This manual describes how to setup a regional currency using a script that largely automates the process. If you want to do a custom setup you can follow the custom setup manual.
5.4.1. Architecture#
There are several key components needed to operate a regional currency based on GNU Taler and LibEuFin technology:
LibEuFin Nexus: is responsible to drive the master (fiat) bank account both to learn about incoming payments and to send fiat cash-out payments
LibEuFin Bank: offers basic banking operations, e.g. wire transfers, Taler withdrawals, account management, cash-out’s
Taler exchange: server side of Taler operations.
Taler wallet: client side of Taler operations.
Taler merchant backend: abstracts Taler details to the shops.
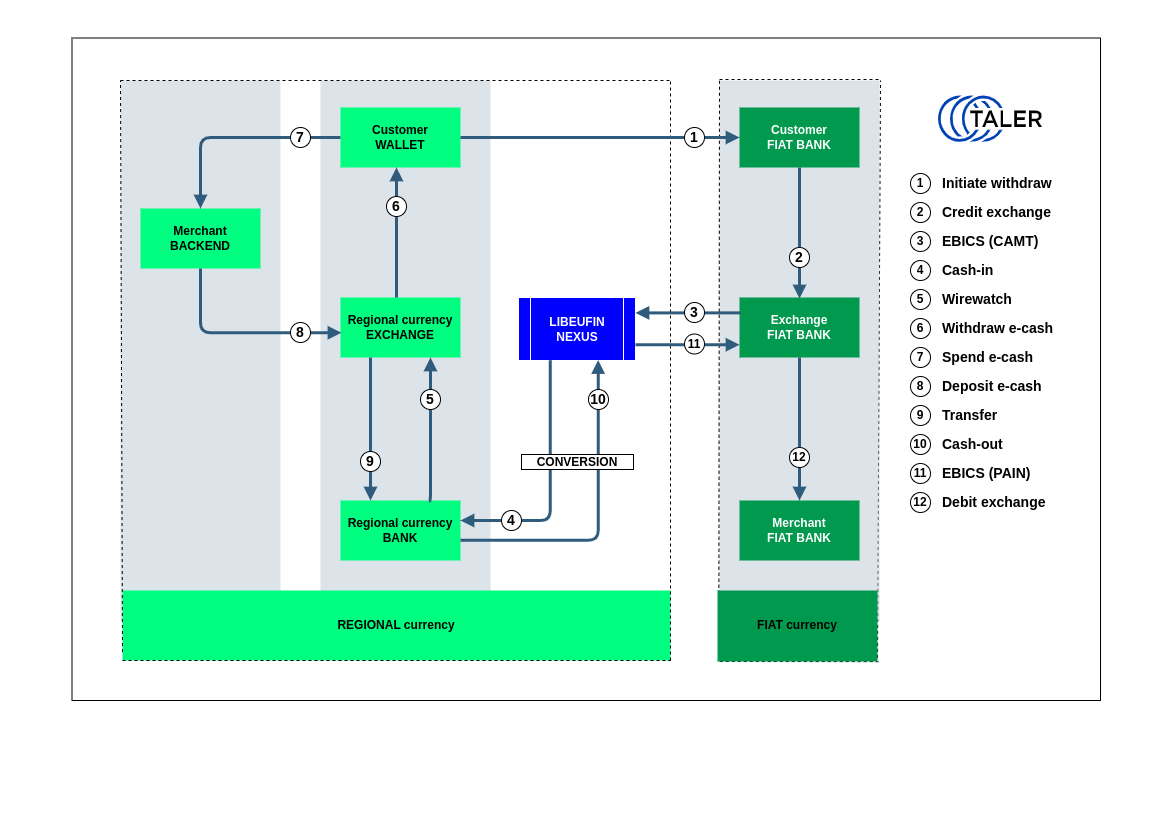
In this model, the regional currency is backed by the fiat currency and users are offered two operations: cash-in to create regional currency starting from fiat money, and cash-out to convert regional currency into fiat currency.
The design assumes that one single unit of regional currency is always backed by one single unit of fiat currency.
5.4.1.1. Cash-in#
One fundamental entity to create the regional currency is the master bank account. The master bank account is hosted at one fiat bank and whenever it receives a valid fiat payment of N units, it triggers the creation of N units of regional currency. Such trigger causes the admin bank account at the regional bank to wire the N units of regional currency to the Taler exchange (regional) bank account. At this point, the Taler exchange is ready to issue the regional coins to the Taler wallet that proves to own them.
Note
Valid fiat payments are those with a Taler-relevant subject that should be generated by a Taler wallet.
5.4.1.2. Cash-out#
Once a regional bank user confirms a cash-out operation of N units, the system sends a regional payment of N units to the admin bank account. This latter triggers then a fiat payment of N units to the fiat bank account owned by the user who initiated the cash-out.
5.4.2. Guided Automated Setup#
5.4.2.1. Prerequisites#
For this manual, we assume that the system is deployed on a contemporary Debian GNU/Linux Bookworm or Ubuntu Mantic system using the binary packages provided. Furthermore, you should run the process on a system with one or more globally reachable IP address(es) and with various DNS names already pointing to these IPs.
5.4.2.2. Preparing the required subdomain names#
The GNU Taler program needs to have three subdomains pointing to your server IP address, in order to let NGINX to accommodate each component. These are “bank”, “exchange” and “backend”, this said, you need to have a registered top level domain name, where you can create type (A) entries, as subdomains pointing to your own server public IP address. A very good advice when creating these subdomains, and if your domain panel lets you specify the TTL (time to live) figure, is to specify a very low value (such as 300), so in case of future changes, its value (the IP address), will be propagated quickly.
Once you have added the three required subdomains in your domain control panel, you have to make sure as well, these subdomains have propagated over the Internet correctly, and they are currently publicly available.
You can check this from your terminal very easily with the “ping” command, as this:
$ ping -c1 bank.$DOMAIN_NAME
$ ping -c1 exchange.$DOMAIN_NAME
$ ping -c1 backend.$DOMAIN_NAME
You can also use this tool for the same purpose, and to check the propagation status.
Warning
Take into account some hosting providers providing virtualized servers (VPS or VDS) can enable by default the firewall program “UFW”, blocking by default the port number 443. So you have to either disable this firewall program, or open to this 443 port number to allow https.
Now you are ready to go with the next step.
5.4.2.3. Obtaining the Scripts#
First, download the deployment scripts via Git:
# apt update && apt install git
$ git clone git://git.taler.net/taler-deployment
5.4.2.4. Running the Guided Configuration#
Navigate into the regional-currency/ directory and run main.sh as root:
$ cd taler-deployment/regional-currency/
# ./main.sh
The script will start by installing the required packages and then asking you fundamental questions about the desired setup, in particular:
Wether to encrypt, when stored on disk, sensible configurations such as the admin password.
The name of the regional currency. It must have 3 to 11 letters.
Whether to setup the regional currency to be backed by a fiat currency. You’ll need a bank account at a fiat currency bank offering an online banking protocol supported by LibEuFin Nexus. If you answer
y, you will also need to provide the following information:The ISO code of the fiat currency. Use ‘CHF’ or ‘EUR’.
The IBAN of the fiat bank account.
The BIC of the fiat bank account.
The legal name of the fiat bank account.
The name of the regional currency bank. It will be shown to business users when they interact with the system.
The DNS domain name of your setup (i.e: domain.tld). The installer will create by itself all the needed subdomains for your domain name, as (
bank.$DOMAIN_NAME,exchange.$DOMAIN_NAMEandbackend.$DOMAIN_NAME). But, these subdomain names as explained before, must have been added beforehand to your DNS domain control panel, and they must be pointing to the IP address of the server on which you are running the installation (before you execute the installer).Whether to use TLS or not. You should answer
yin most cases.Whether to setup SMS two-factor authentication using Telesign, multi-factor authentication is strongly recommended, especially when regional currency can be converted to fiat currency. This requires a Customer ID and an API Key. You should answer
yin most cases.The admin password for the bank. Be absolutely sure to enter a very, very long and high-entropy password, preferably using the autogenerated one.
Whether to generate terms of service (ToS) for the exchange from default templates.
Whether to generate a privacy policy for the exchange from default templates.
The information you entered as well as the generated bank admin password will
be stored in a file called config/user.conf. If you run the script in
the future again (for example, to upgrade the installation), you will not be asked
these questions a second time.
After answering all of the questions, the actual installation will start. The scripts will download and configure various packages, which may take some time. Grab a coffee.
Note
At this point, the setup is NOT connected to any fiat bank account! The next steps must always be done manually!
5.4.2.5. Running the script again from scratch#
If for some reason your installation doesn’t work because you have answered erroneously some of the interactive questions, or you just want to reset the current installation and to re-deploy the script again for having its latest changes, you will have to proceed as follows:
In brief, you need to wipe completely the “content” of the file config/user.conf, this doesn’t mean to remove the file itself, but only its content. Even though you can do this manually by editing the file manually with your preferred text editor, you can also do this in one single command.
# rm config/user.conf
Note
In future versions of the program when executed for the second time, the program itself will show an option to offer wiping the content of this config/user.conf file, automatically.
5.4.2.6. Multi-factor authentication#
The script allows you to configure multi-factor authentication via SMS using Telesign as a provider. You can also configure multi-factor authentication via email or use providers other than Telesign for SMS. You will need to configure these channels manually as described in multi-factor authentication.
If you choose not to back your regional currency with a fiat currency, you can stop here.
5.4.2.7. Web-based Configuration#
By default, the regional currency conversion rates are 1:1. You can change the conversion rates and the admin debt limit via the bank’s web interface as the admin user.
5.4.2.8. Connecting to a Fiat Bank: the EBICS setup#
To complete the conversion setup, you have to set up an EBICS subscriber using the fiat bank account you specified during the automated setup.
When you sign up for an EBICS-enabled bank account, the bank will provide you
with various credentials. Those must be provided in the
/etc/libeufin/libeufin-nexus.conf configuration file.
Note
As legacy transactions in that bank account would likely confuse the system, it is advisable to use a fresh bank account with an empty transaction history.
If this is not possible, use the IGNORE_TRANSACTIONS_BEFORE configuration to ignore old transactions.
The following snippet shows the mandatory configuration values:
[nexus-ebics]
# Bank
HOST_BASE_URL = https://ebics.postfinance.ch/ebics/ebics.aspx
BANK_DIALECT = postfinance

# EBICS IDs
HOST_ID = PFEBICS
USER_ID = PFC00563
PARTNER_ID = PFC00563
Warning
This combination of HOST_ID, USER_ID and PARTNER_ID must never be used by another instance of libeufin-nexus or by other EBICS clients, otherwise data will be lost.
5.4.2.8.1. Reuse existing client keys#
If you have client keys from a previous EBICS setup you can copy the JSON file to /var/lib/libeufin-nexus/client-ebics-keys.json.
Make sure this file is accessible to the user running libeufin-nexus, you should run:
$ chown libeufin-nexus:libeufin-nexus /var/lib/libeufin-nexus/client-ebics-keys.json
5.4.2.8.2. Create new client keys#
Run the following command to start the EBICS setup process:
$ sudo -u libeufin-nexus libeufin-nexus ebics-setup
If the previous command failed when running EBICS INI with an error code of
EBICS_INVALID_USER_OR_USER_STATE, you need to confirm your keys to your bank to
activate your account.
To that end, the previous run should have left a PDF document that you can
print, sign and send to the bank. Look for the message that looks like PDF
file with keys created at '/tmp/libeufin-nexus-keys-$TIMESTAMP.pdf'.
Once the bank has received and processed this document you can continue.
5.4.2.8.3. Get bank keys#
Run the following command to finish the EBICS setup process:
$ sudo -u libeufin-nexus libeufin-nexus ebics-setup
The EBICS setup is finished once the bank keys have been accepted.
5.4.2.9. Configuring the Exchange for Conversion#
In our automated setup the second account is automatically set up correctly
without fees or special restrictions. However, various additional
restrictions and options could be configured. Details are explained in
the regional conversion setup section for the
manual setup and in the the manpage of taler-exchange-offline.
5.4.3. System ON!#
The last step is to enable libeufin-nexus to import incoming bank transactions (cash in) and to trigger outgoing bank transactions (cash out).
First, check that libeufin-nexus is correctly configured by running the following commands:
# sudo -u libeufin-nexus libeufin-nexus ebics-setup
# sudo -u libeufin-nexus libeufin-nexus ebics-fetch --transient
# sudo -u libeufin-nexus libeufin-nexus ebics-submit --transient
If you have old transactions after the date YYYY-MM-DD that you wish to import into the database, run the following command:
# sudo -u libeufin-nexus libeufin-nexus ebics-fetch --transientt --pinned-start YYYY-MM-DD
None of those commands should fail. If they all work, you can enable the services:
# systemctl enable --now libeufin-nexus.target
Now that we know that libeufin-nexus is working correctly, we still need to check that communication with your bank is working properly. We will test this later, at the end of the manual. The system should only be considered functional after a successful cash in and cash out.
5.4.4. Configuring exchange terms#
You can use your own terms of service and privacy policy. You can use the default templates in /usr/share/taler/terms as a guide.
Assuming you have custom terms of service and privacy policy rst teamplte files at TOS_PATH and PRIVACY_PATH, the following commands generate the terms files:
# taler-terms-generator -i "$TOS_PATH"
# taler-terms-generator -i "$PRIVACY_PATH"
You now have to specify the terms file names in the exchange config:
# TERMS_ETAG="$(basename "$TOS_PATH" .rst)"
# PRIVACY_ETAG="$(basename "$PRIVACY_PATH" .rst)"
[exchange]
TERMS_ETAG=${TERMS_ETAG}
PRIVACY_ETAG=${PRIVACY_ETAG}
Make sure to restart taler-exchange after changing these configuration options:
# systemctl restart taler-exchange.target
5.4.4.1. Installing Updates#
The standard procedure for installing updates is to:
First, make a backup (!)
Stop Taler services
Install new version
Upgrade databases
Start Taler services
The “upgrade.sh” script in the “regional-currency/” folder of “deployment.git” shows how to do the above steps except for the backup. For the backup, all critical bits of data will be in the Postgresql databases. Thus, we recommend following the database manual on making backups.