14. Auditor Operator Manual#
14.1. Introduction#
This manual is an early draft that still needs significant editing work to become readable.
14.1.1. About GNU Taler#
GNU Taler is an open protocol for an electronic payment system with a free software reference implementation. GNU Taler offers secure, fast and easy payment processing using well understood cryptographic techniques. GNU Taler allows customers to remain anonymous, while ensuring that merchants can be held accountable by governments. Hence, GNU Taler is compatible with anti-money-laundering (AML) and know-your-customer (KYC) regulation, as well as data protection regulation (such as GDPR).
14.1.2. About this manual#
This tutorial targets exchange operators, auditors and governments who want to run the auditor to verify that a GNU Taler exchange is operating correctly.
14.1.3. Organizational prerequisites#
Operating a GNU Taler auditor means that you (henceforth: auditor) have a business relationship with (or regulatory authority over) a GNU Taler exchange operator (henceforth: exchange). Your objective is to verify that the exchange is operating correctly, and if not to alert the exchange, the state or even the public about any misbehavior to limit financial losses to other parties.
To perform this duty, you will need at least (read-only) access to the bank transactions of the exchange, as well as a continuously synchronized replica of the exchange’s database. The general assumption for running the auditor is that this is done on a separate system controlled by the auditor. After all, the goal is to detect nefarious activity of the exchange operator, which cannot be effectively done on a machine controlled by the exchange operator.
For this, every auditor needs to operate a PostgreSQL database. The data collected will include sensitive information about Taler users, including withdrawals made by consumers and income received by merchants. As a result, the auditor is expected to provide high confidentiality for the database. In general, the auditor does not have to offer high-availability: the exchange operator can continue operations without the auditor, and the auditor can catch up with it later when the auditor’s systems are restored. However, of course any downtime would provide a window of opportunity for fraud and should thus be minimized. Finally, the auditor’s copy of the exchange’s database can be useful as a backup to the exchange in case the exchange experiences a loss of its own copies. Thus, business agreements between auditor and exchanges may include availability requirements as well.
Then, with the software provided, auditors can verify the cryptographic proofs collected by the exchange and detect if any improper bank transactions have been made. There are additional tasks which an auditor should perform. While this manual only focuses on the audit of the exchange’s database and wire transfers with the existing tools, a proper auditor should also perform the following tasks:
security audit of the source code
audit of the operational procedures of the exchange
audit of the physical security of the deployment
background check of the individuals operating the exchange
verification that the exchange properly implements the
/linkprotocol (feature yet to be implemented in common Taler wallets)verification that the exchange properly reports coins issued during the refresh protocol (by irregularly refreshing coins withdrawn by the auditor and comparing against the exchange’s database — the code required to support this is not yet implemented)
14.1.4. Architecture overview#
Taler is a pure payment system, not a new crypto-currency. As such, it operates in a traditional banking context. In particular, this means that in order to receive funds via Taler, the merchant must have a regular bank account, and payments can be executed in ordinary currencies such as USD or EUR. Similarly, the exchange must interact with a bank. The bank of the exchange holds the exchange’s funds in an escrow account. As a result, exchanges operate in a regulated environment, and auditors provide a crucial oversight function.
Auditors should generally be independent third parties that verify that the exchange operates correctly. However, an exchange is likely to also run the auditing logic, as it is also used to calculate the exchange’s profits, risk and liabilities. Furthermore, it’s usually a good idea to not only rely on third parties to verify one’s own work.
The Taler software stack for an auditor consists of the following components:
DBMS: PostgreSQL
The auditor requires a DBMS to store a local copy of the transaction history for the Taler exchange, as well as for its own internal bookkeeping and checkpointing. The DBMS is assumed to be able to assure the auditor of the database invariants (foreign key, uniqueness, length restrictions). Should the exported data from the exchange fail to be imported due to constraint violations, this is an immediate serious concern that must be addressed manually. The software only verifies the content of a well-formed exchange database (well-formed with respect to SQL). For now, the GNU Taler reference implementation only supports PostgreSQL, but the code could be easily extended to support another DBMS.
The auditor Web service
The auditor is expected to provide a public Web service. At this REST API, merchants can (probabilistically) provide deposit confirmations, allowing the auditor to detect if an exchange is underreporting deposits.
In the future, the Web service should be extended to allow customers and merchants to automatically upload cryptographic proof of other violations of the specification by the exchange. However, for now it is assumed that the respective cryptographic proofs are reported and verified manually — as with a well-behaved exchange this should obviously be a rare event.
The main binary of this component is the
taler-auditor-httpd.The (main) auditor
The main auditor logic checks the various signatures, totals up the amounts and checks for arithmetic inconsistencies. It also computes the expected bank balance, revenue and risk exposure of the exchange operator. The main script of this component is the
taler-auditor. This script invokes several helper binaries sequentially. Production users may want to modify the script to run those binaries in parallel, possibly using different privileges (as only thetaler-helper-auditor-wireneeds access to the wire gateway).The
taler-helper-auditor-wireauditor verifies that the bank transactions performed by the exchange were done properly. This component must have access to the bank account of the exchange, as well as to a copy of the exchange’s database.The
taler-auditorscript invokes the various helpers, each generating a JSON report. It then invokes thetaler-helper-auditor-render.pyscript to combine those JSON files with a Jinja2 template into a LaTeX report. Finally,pdflatexis used to generate a PDF report.The resulting report includes performance data, reports on hard violations (resulting in financial losses) and reports on soft violations (such as the exchange not performing certain operations in a timely fashion). The report also includes figures on the losses of violations. Careful reading of the report is required, as not every detail in the report is necessarily indicative of a problem.
14.2. Installation#
14.2.1. Installing from source#
Please install the following packages before proceeding with the exchange compilation.
Python3 module
jinja2
“Sphinx RTD Theme” Python package aka
python3-sphinx-rtd-themeon Debian-based systems (for GNUnet documentation support, can be omitted if GNUnet is configured with--disable-documentation)libsqlite3 >= 3.16.2
GNU libunistring >= 0.9.3
libcurl >= 7.26 (or libgnurl >= 7.26)
libqrencode >= 4.0.0 (Taler merchant only)
GNU libgcrypt >= 1.6 (1.10 or later highly recommended)
libsodium >= 1.0
libargon2 >= 20171227
libjansson >= 2.7
PostgreSQL >= 15, including libpq
GNU libmicrohttpd >= 0.9.71
GNUnet >= 0.25.2 (from source tarball)
Python3 with
jinja2
If you are on Debian stable or later, the following command may help you install these dependencies:
# apt-get install \
  libqrencode-dev \
  libsqlite3-dev \
  libltdl-dev \
  libunistring-dev \
  libsodium-dev \
  libargon2-dev \
  libcurl4-gnutls-dev \
  libgcrypt20-dev \
  libjansson-dev \
  libpq-dev \
  libmicrohttpd-dev \
  python3-jinja2 \
  postgresql-15
GNU Taler exchange (from download directory, see release announcement)
Except for the last two, these are available in most GNU/Linux distributions and should just be installed using the respective package manager.
The following instructions will show how to install libgnunetutil and the exchange (which includes the code for the auditor).
Before you install GNUnet, you must download and install the dependencies mentioned in the previous section, otherwise the build may succeed, but could fail to export some of the tooling required by GNU Taler.
On Ubuntu, you also need to install pkg-config, for example:
$ apt-get install pkg-config
To install GNUnet, unpack the tarball and change into the resulting directory, then proceed as follows:
$ ./configure [--prefix=GNUNETPFX]
$ # Each dependency can be fetched from non standard locations via
$ # the '--with-<LIBNAME>' option. See './configure --help'.
$ make
# make install
# ldconfig
If you did not specify a prefix, GNUnet will install to /usr/local,
which requires you to run the last step as root.
The ldconfig command (also run as root) makes the
shared object libraries (.so files)
visible to the various installed programs.
After installing GNUnet, unpack the GNU Taler exchange tarball, change into the resulting directory, and proceed as follows:
$ ./configure [--prefix=EXCHANGEPFX] \
              [--with-gnunet=GNUNETPFX]
$ # Each dependency can be fetched from non standard locations via
$ # the '--with-<LIBNAME>' option. See './configure --help'.
$ make
# make install
If you did not specify a prefix, the exchange will install to /usr/local,
which requires you to run the last step as root. You have to specify
--with-gnunet=/usr/local if you installed GNUnet to /usr/local in the
previous step.
Please note that unlike most packages, if you want to run the make check
command, you should run it only after having done make install. The
latter ensures that necessary binaries are copied to the right place.
In any case, if make check fails, please consider filing a
bug report with the Taler bug tracker.
14.2.2. Installing the GNU Taler binary packages on Debian#
To install the GNU Taler Debian packages, first ensure that you have the right Debian distribution. At this time, the packages are built for Debian trixie.
You need to add a file to import the GNU Taler packages. Typically,
this is done by adding a file /etc/apt/sources.list.d/taler.list that
looks like this:
deb [signed-by=/etc/apt/keyrings/taler-systems.gpg] https://deb.taler.net/apt/debian trixie main
Next, you must import the Taler Systems SA public package signing key into your keyring and update the package lists:
# wget -O /etc/apt/keyrings/taler-systems.gpg \
    https://taler.net/taler-systems.gpg
# apt update
Note
You may want to verify the correctness of the Taler Systems SA key out-of-band.
Now your system is ready to install the official GNU Taler binary packages using apt.
To install the Taler auditor, you can now simply run:
# apt install -t sid taler-auditor
For the auditor, you must manually configure access to the exchange database, the HTTP reverse proxy (typically with TLS certificates) and offline signing.
Sample configuration files for the HTTP reverse proxy can be found in
/etc/taler-auditor/.
14.2.3. Installing the GNU Taler binary packages on Ubuntu#
To install the GNU Taler Ubuntu packages, first ensure that you have
the right Ubuntu distribution. At this time, the packages are built for
Ubuntu Lunar and Ubuntu Jammy. Make sure to have universe in your
/etc/apt/sources.list.d/ubuntu.sources (after main)
as we depend on some packages from Ubuntu universe.
A typical /etc/apt/sources.list.d/taler.list file for this setup
would look like this for Ubuntu Noble:
deb [signed-by=/etc/apt/keyrings/taler-systems.gpg] https://deb.taler.net/apt/ubuntu/ noble main
Next, you must import the Taler Systems SA public package signing key into your keyring and update the package lists:
# wget -O /etc/apt/keyrings/taler-systems.gpg \
    https://taler.net/taler-systems.gpg
# apt update
Note
You may want to verify the correctness of the Taler Systems key out-of-band.
Now your system is ready to install the official GNU Taler binary packages using apt.
To install the Taler exchange, you can now simply run:
# apt install -t focal-fossa taler-auditor
For the auditor, you must manually configure access to the exchange database, the HTTP reverse proxy (typically with TLS certificates) and offline signing.
Sample configuration files for the HTTP reverse proxy can be found in
/etc/taler-auditor/.
14.3. System setup#
14.3.1. UNIX accounts#
For maximum security, you should setup multiple different users (possibly on different machines) to run Taler auditor components. While it is possible to skip some of these entirely, or to run all of them as the same user, this is not recommended for security. The recommended set of users includes:
auditor — runs the main auditing process and HTTP backend
sync — synchronizes the ingres database with the production database
helper — runs taler-auditor-offline download and upload commands
auditor-ingres — imports database from exchange production system
auditor-wire — imports wire transfer data from bank production system
offline — manages the offline key, on a separate offline machine
It is suggested that you setup the first five users on the target system(s) using:
# add-user --disabled-password $USERNAME
Additionally, there are two canonical system users of relevance (which your distribution would typically create for you):
www-data — runs the HTTPS frontend (usually nginx or Apache)
postgres — runs the PostgreSQL database
14.3.2. Databases and users#
We recommend using the following databases for the auditor:
exchange-ingres — synchronized exchange database over the network
exchange-production — local copy of exchange database with trusted schema
auditor — auditor production database with current state of the audit
libeufin — local state of the auditor-wire tool for the bank transfer data import
As the postgres user, you can create these databases using:
# As the 'postgres' user:
$ createdb -O auditor-ingres exchange-ingres
$ createdb -O sync exchange-production
$ createdb -O auditor auditor
$ createdb -O auditor-wire libeufin
This will ensure that the correct users have write-access to their respective database. Next, you need to grant read-only access to some users to databases owned by other users:
# As the 'auditor-ingres' user:
$ echo 'GRANT SELECT ON ALL TABLES IN SCHEMA public TO sync;' | psql exchange-ingres
# As the 'sync' user:
$ echo 'GRANT SELECT ON ALL TABLES IN SCHEMA public TO auditor;' | psql exchange-production
# As the 'auditor-wire' user:
$ echo 'GRANT SELECT ON ALL TABLES IN SCHEMA public TO auditor;' | psql libeufin
14.4. Configuration#
The auditor’s configuration works the same way as the configuration of other Taler components. This section discusses configuration options related to the auditor.
14.4.1. Configuration format#
All GNU Taler components are designed to possibly share the same configuration files. When installing a GNU Taler component, the installation deploys default values in configuration files located at ${prefix}/share/taler/config.d/ where ${prefix} is the installation prefix. Different components must be installed to the same prefix.
In order to override these defaults, the user can write a custom configuration
file and either pass it to the component at execution time using the -c
option, or name it taler.conf and place it under $HOME/.config/ which is where
components will look by default. Note that the systemd service files pass -c
/etc/taler/taler.conf, thus making /etc/taler/taler.conf
the primary location for the configuration.
A config file is a text file containing sections, and each section contains maps options to their values. Configuration files follow basically the INI syntax:
[section1]
value1 = string
value2 = 23

[section2]
value21 = string
value22 = /path22
Comments start with a hash (#). Throughout the configuration, it is
possible to use $-substitution for options relating to names of files or
directories. It is also possible to provide defaults values for those
variables that are unset, by using the following syntax:
${VAR:-default}. There are two ways a user can set the value
of $-prefixable variables:
by defining them under a
[paths]section:[paths] TALER_DEPLOYMENT_SHARED = ${HOME}/shared-data .. [section-x] path-x = ${TALER_DEPLOYMENT_SHARED}/x
or by setting them in the environment:
$ export VAR=/x
The configuration loader will give precedence to variables set under
[path] over environment variables.
The utility taler-config, which gets installed along with the exchange,
can be used get and set configuration values without directly editing the
configuration file. The option -f is particularly useful to resolve
pathnames, when they use several levels of $-expanded variables. See
taler-config --help.
The repository git://git.taler.net/deployment contains example code
for generating configuration files under deployment/netzbon/.
14.4.2. Initial configuration#
You need to tell the Taler auditor configuration where the REST API of the auditor will be available to the public:
# Both for the 'offline' *and* the 'auditor' user:
[auditor]
BASE_URL = https://auditor.example.com/
The helper user that is used to download information from the exchange
needs to know details about the exchange. Similarly, the offline user
needs to check signatures signed with the exchange’s offline key. Hence, you
need to obtain the MASTER_PUBLIC_KEY from the exchange operator (they need
to run taler-exchange-offline setup) and the REST endpoint of the exchange
and configure these:
# As the 'helper' and 'offline' users:
[exchange]
BASE_URL = https://exchange.example.com/
MASTER_PUBLIC_KEY = $SOMELONGBASE32VALUEHERE
14.4.3. Keys#
The auditor works with one signing key to certify that it is auditing a particular exchange’s denomination keys. This key can and should be kept offline (and backed up adequately). As with the exchange’s offline key, it is only used for a few cryptographic signatures and thus the respective code can be run on modest hardware, like a Raspberry Pi.
The following values are to be configured in the section [auditor]:
AUDITOR_PRIV_FILE: Path to the auditor’s private key file.
Note that the default value here should be fine and there is no clear
need to change it. What you do need to do as the offine user
is to extract the public key:
# As the 'offline' user:
$ taler-auditor-offline setup
This public key must then be provided in the configuration file
of the auditor user in the [auditor]] configuration section:
PUBLIC_KEY: Public key of the auditor, in Base32 encoding. Set from value printed bytaler-auditor-offline setup.
You can set this configuration value using:
# As the 'auditor' and 'helper' users:
[auditor]
PUBLIC_KEY = $SOMELONGBASE32VALUEHERE
14.4.4. Configuring the auditor’s REST endpoint#
The auditor can serve HTTP over both TCP and UNIX domain socket.
The following values are to be configured in the section [auditor]:
serve: must be set totcpto serve HTTP over TCP, orunixto serve HTTP over a UNIX domain socketport: Set to the TCP port to listen on ifserveistcp.unixpath: set to the UNIX domain socket path to listen on ifserveisunixunixpath_mode: number giving the mode with the access permission MASK forunixpath(i.e. 660 =rw-rw----).
14.4.5. Bank account#
Bank accounts for the auditor (user auditor-wire) are configured in
exactly the same way as bank accounts for the exchange. See the exchange (and
LibEuFin) documentation for details.
14.4.6. Database#
The option DB under section [auditor] gets the DB backend’s name the
exchange is going to use. So far, only DB = postgres is supported. After
choosing the backend, it is mandatory to supply the connection string
(namely, the database name). This is possible in two ways:
via an environment variable:
TALER_AUDITORDB_POSTGRES_CONFIG.via configuration option
CONFIG, under section[auditordb-$BACKEND]. For example, the demo exchange is configured as follows:[auditor] ... DB = postgres ... [auditordb-postgres] CONFIG = postgres:///auditordemo
If an exchange runs its own auditor, it may use the same database for the auditor and the exchange itself.
The taler-auditor-dbinit tool is used to initialize the auditor’s
tables. After running this tool, the rights to CREATE or DROP tables
are no longer required and should be removed.
Both the taler-auditor-httpd and the taler-auditor (and its helpers)
also need (read-only) access to a (recent, current, synchronized) copy of the
exchange’s database. The configuration options are the same that are also
used when configuring the exchange’ database:
[exchange]
...
DB = postgres
...

[exchangedb-postgres]
CONFIG = postgres:///exchangedemo
14.4.7. Legal conditions for using the service#
The service has well-known API endpoints to return its legal conditions to the user in various languages and various formats. This section describes how to setup and configure the legal conditions.
14.4.8. Terms of Service#
The service has an endpoint “/terms” to return the terms of service (in legal language) of the service operator. Client software show these terms of service to the user when the user is first interacting with the service. Terms of service are optional for experimental deployments, if none are configured, the service will return a simple statement saying that there are no terms of service available.
To configure the terms of service response, there are two options in the configuration file for the service:
TERMS_ETAG: The current “Etag” to return for the terms of service. This value must be changed whenever the terms of service are updated. A common value to use would be a version number. Note that if you change theTERMS_ETAG, you MUST also provide the respective files inTERMS_DIR(see below).TERMS_DIR: The directory that contains the terms of service. The files in the directory must be readable to the service process.
14.4.9. Privacy Policy#
The service has an endpoint “/pp” to return the terms privacy policy (in legal language) of the service operator. Clients should show the privacy policy to the user when the user explicitly asks for it, but it should not be shown by default. Privacy policies are optional for experimental deployments, if none are configured, the service will return a simple statement saying that there is no privacy policy available.
To configure the privacy policy response, there are two options in the configuration file for the service:
PRIVACY_ETAG: The current “Etag” to return for the privacy policy. This value must be changed whenever the privacy policy is updated. A common value to use would be a version number. Note that if you change thePRIVACY_ETAG, you MUST also provide the respective files inPRIVACY_DIR(see below).PRIVACY_DIR: The directory that contains the privacy policy. The files in the directory must be readable to the service process.
14.4.10. Legal policies directory layout#
The TERMS_DIR and PRIVACY_DIR directory structures must follow a
particular layout. You may use the same directory for both the terms of
service and the privacy policy, as long as you use different ETAGs. Inside of
the directory, there should be sub-directories using two-letter language codes
like “en”, “de”, or “jp”. Each of these directories would then hold
translations of the current terms of service into the respective language.
Empty directories are permitted in case translations are not available.
Then, inside each language directory, files with the name of the value set as
the TERMS_ETAG or PRIVACY_ETAG must be provided. The extension of each
of the files should be typical for the respective mime type. The set of
supported mime types is currently hard-coded in the service, and includes
“.epub”, “.html”, “.md”, “.pdf” and “.txt” files. If other files are present,
the service may show a warning on startup.
14.4.10.1. Example#
A sample file structure for a TERMS_ETAG of “tos-v0” would be:
TERMS_DIR/en/tos-v0.txt
TERMS_DIR/en/tos-v0.html
TERMS_DIR/en/tos-v0.pdf
TERMS_DIR/en/tos-v0.epub
TERMS_DIR/en/tos-v0.md
TERMS_DIR/de/tos-v0.txt
TERMS_DIR/de/tos-v0.html
TERMS_DIR/de/tos-v0.pdf
TERMS_DIR/de/tos-v0.epub
TERMS_DIR/de/tos-v0.md
If the user requests an HTML format with language preferences “fr” followed by
“en”, the service would return TERMS_DIR/en/tos-v0.html lacking a version in
French.
14.4.11. Generating the Legal Terms#
The taler-terms-generator script can be used to generate directories with
terms of service and privacy policies in multiple languages and all required
data formats from a single source file in .rst format and GNU gettext
translations in .po format.
To use the tool, you need to first write your legal conditions in English in
reStructuredText (rst). You should find a templates in
$PREFIX/share/terms/*.rst where $PREFIX is the location where you
installed the service to. Whenever you make substantive changes to the legal
terms, you must use a fresh filename and change the respective ETAG. The
resulting file must be called $ETAG.rst and the first line of the file should be the title of the document.
Once you have written the $ETAG.rst file in English, you can
generate the first set of outputs:
$ taler-terms-generator -i $ETAG
Afterwards, you should find the terms in various formats for all configured
languages (initially only English) in $PREFIX/share/terms/. The generator
has a few options which are documented in its man page.
14.4.12. Adding translations#
Translations must be available in subdirectories
locale/$LANGUAGE/LC_MESSAGES/$ETAG.po.
To start translating, you first need to add a new
language:
$ taler-terms-generator -i $ETAG -l $LANGUAGE
Here, $LANGUAGE should be a two-letter language
code like de or fr. The command will generate
a file locale/$LANGUAGE/LC_MESSAGES/$ETAG.po
which contains each English sentence or paragraph
in the original document and an initially empty
translation. Translators should update the .po
file. Afterwards, simply re-run
$ taler-terms-generator -i $ETAG
to make the current translation(s) available to the service.
Note
You must restart the service whenever adding or updating legal documents or their translations.
14.4.13. Updating legal documents#
When making minor changes without legal implications, edit the .rst file,
then re-run the step to add a new language for each existing translation to
produce an updated .po file. Translate the sentences that have changed and
finally run the generator (without -l) on the ETAG (-i $ETAG) to
create the final files.
When making major changes with legal implications, you should first rename (or
copy) the existing .rst file and the associated translation files to a new
unique name. Afterwards, make the major changes, update the .po files,
complete the translations and re-create the final files. Finally, do not
forget to update the ETAG configuration option to the new name and to
restart the service.
14.5. Deployment#
Before GNU Taler wallets will happily interact with an exchange, the
respective auditor’s public key (as obtained via taler-auditor-offline
setup from the offline user) must be added under the respective currency
to the wallet. This is usually expected to be hard-coded into the Taler
wallet.
Users can also manually add auditors for a particular currency via a Web page offering the respective pairing.
FIXME-DOLD: explain how that Web page works, once it works…
14.5.1. Exchange#
The exchange operator must use the taler-exchange-offline tool to add the
auditor’s public key, base URL and (business) name to the list of approved
auditors of the exchange. For details, see Auditor configuration in the
exchange operator manual.
14.5.2. Signing Denominations#
These steps must be performed regularly whenever the exchange is
deploying new denomination keys. After the exchange operator
has signed new keys using the taler-exchange-offline tool,
each auditor should run:
# As the 'helper' user:
$ taler-auditor-offline download > input.json
to import the latest set of denomination keys. The key data should then be copied to the offline system and there be inspected using:
# As the 'offline' user:
$ taler-auditor-offline show < input.json
and compared with the data the exchange operator saw when doing the offline signature. This process should involve directly the humans operating both systems and may require them to establish a trustworthy connection. The details how the auditor communicates with the exchange operator are a business process that is outside of the scope of this document.
Note that the input.json does not contain any confidential data. However,
signing the wrong keys would be fatal in that it may allow an illegitimate
exchange to convince users that it is a trustworthy operator and subsequently
betray the user’s trust that is anchored in the existence of a trustworthy
auditor.
Given the verified JSON input, the auditor can then sign it (typically on its offline system) using:
# As the 'offline' user:
$ taler-auditor-offline sign < input.json > output.json
The resulting output.json should then be copied to an online system,
and from there uploaded to the exchange using:
# As the 'helper' user:
$ taler-auditor-offline upload < output.json
The contents of output.json can again be public and require no special
handling.
If the auditor has been correctly added, the exchange’s /keys
response will contain an entry in the auditors array mentioning the
auditor’s URL.
Commands, like taler-auditor-offline, that support the -l LOGFILE
command-line option, send logging output to standard error by default.
14.5.3. Database#
The next key step for the auditor is to configure replication of the exchange’s database in-house. This should be performed in two steps as illustrated in the following figure:

First, the exchange should use standard PostgreSQL replication features to
enable the auditor to obtain a full copy of the exchange’s database.
Second, the auditor should make a “trusted” local copy, ensuring that it
never replicates malicious changes using taler-auditor-sync. Both
of these steps are described in more detail below.
We note that as a result of these steps, the auditor will have three
databases: its own production primary database (as configured in
auditordb-postgres), its on production copy of the exchange’s database
(exchangedb-postgress), and a third, untrusted “ingres” copy of the
exchange database. The untrusted database should run as a separate PostgreSQL
instance and is only accessed via taler-auditor-sync and the replication
mechanism driven by the exchange operator.
14.5.3.1. Ingres replication of the exchange production database#
Ingres operation should be done using the auditor-ingres user — or
depending on the setup parts of the operation may be done by the postgres
user directly.
The full copy can be obtained in various ways with PostgreSQL. It is possible to use log shipping with streaming replication as described in https://www.postgresql.org/docs/13/warm-standby.html, or to use logical replication, as described in https://www.postgresql.org/docs/13/logical-replication.html. We note that asynchronous replication should suffice.
The resulting auditor database should be treated as read-only on the auditor
side. The taler-exchange-dbinit tool can be used to setup the schema, or
the schema can be replicated using PostgreSQL’s standard mechanisms. The same
applies for schema upgrades: if logical replication is used (which does not
replicate schema changes), taler-exchange-dbinit can be used to migrate
the schema(s) in both the ingres and production copies of the exchange’s
database as well.
On the exchange side, a database user must be created that has the right to perform database replication. This is done using:
# As the 'postgres' user of the exchange:
$ createuser --replication egress
$ echo "ALTER ROLE egress WITH PASSWORD '$PASSWORD'; | psql
$ echo "CREATE PUBLICATION $NAME FOR ALL TABLES;" | psql taler-exchange
The exchange must share the password of the publication with the auditor. A
good $NAME relates to the auditor’s business unit name. A secure tunnel
must be setup between the exchange and the auditor, for example using SSH or
Wireguard.
It is also necessary to edit main.cf of the exchange and on the auditor
side to enable logical replication. If an exchange has multiple auditors, it
should setup multiple egress accounts. The exchange must ensure that
the following lines are in the main.cf PostgreSQL configuration (the port
may differ) to enable replication over the network:
listen_addresses='*'
port = 5432
wal_level= logical
Equally, the auditor must configure logical replication in the main.cf
PostgreSQL configuration:
wal_level= logical
Next, the postgres user of the auditor’s system must first initialize the
local tables:
# Configure database:
[exchange]
DB = "postgres"
[exchangedb-postgres]
CONFIG = "postgres:///taler-ingress"
# As the 'ingress' user of the exchange:
$ taler-exchange-dbinit
To complete the replication, the postgres user of the auditor’s
system must subscribe:
# As the 'postgres' user of the exchange:
$ createuser --replication egress
$ echo "ALTER ROLE egress WITH PASSWORD '$PASSWORD'; | psql
$ echo "CREATE PUBLICATION $NAME FOR ALL TABLES;" | psql taler-exchange
For details, we refer to the PostgreSQL manual.
Note
Depending on the replication method used, the exchange may perform
unexpected changes to the schema or perform UPDATE, DELETE or
DROP operations on the tables. Hence, the auditor cannot rely upon the
exchange’s primary copy to respect schema constraints, especially as we
have to presume that the exchange could act maliciously. Furthermore, it
is unclear to what degree PostgreSQL database replication mechanisms are
robust against a malicious master database. Thus, the auditor should
isolate its primary copy of the exchange database, including the PostgreSQL
process, from its actual operational data.
14.5.3.2. Safe replication of the ingres database into the auditor production database#
Using taler-auditor-sync as the sync user, the auditor should
make a second “safe” copy of the exchange’s ingres database.
taler-auditor-sync basically reads from one exchange database and inserts
all records found into a second exchange database. If the source database
violates invariants, the tool halts with an error. This way, records violating
invariants are never even copied, and in particular schema changes and
deletions or updates are not propagated into the auditor’s production
database.
While taler-auditor-sync could in theory be run directly against the
exchange’s production system, this is likely a bad idea due to the high
latency from the network between auditor and exchange operator. Thus, we
recommend first making an “untrusted” ingress copy of the exchange’s
production database using standard PostgreSQL tooling, and then using
taler-auditor-sync to create a second “safe” copy. The “safe” copy used
by the production system should also run under a different UID.
Before taler-auditor-sync can be used, the target database must be
initialized with the exchange schema using taler-exchange-dbinit.
Note that running taler-auditor-sync requires the use of two
configuration files, one specifying the options for accessing the source
database, and a second with the options for accessing the destination
database. In both cases, likely only the [exchangedb]/CONFIG option
needs to be changed.
To run taler-auditor-sync, you must first configure two configuration
files that identify the source and destination databases:
# src.conf
[exchangedb]
CONFIG = "postgres:///auditor-ingres/"
# dst.conf
[exchangedb]
CONFIG = "postgres:///auditor/"
Now you should be able to launch the synchronization process. You can run
the process via systemd in the background. For a first one-off test, you should
use the -t option which will cause the process to terminate once the two
databases are synchronized:
# As the 'sync' user:
$ taler-auditor-sync -s src.conf -d dst.cfg -t
When the exchange performs garbage collection to DELETE obsolete records,
this change should be automatically replicated to the auditors untrusted
ingress database. However, as taler-auditor-sync tries to be “safe”,
it will not replicate those deletions to the auditor’s production database.
Thus, it is necessary to (occasonally) run taler-exchange-dbinit -g on
the auditor’s production database to garbage collect old data in the
auditor’s production copy. We note that this does not have to be done
at the same time when the exchange runs its garbage collection.
14.6. Operation#
14.6.1. Web service#
The taler-auditor-httpd runs the required REST API for the auditor. The
service must have INSERT (and SELECT) rights on the
deposit_confirmations table in the auditor’s database. We expect that in
future versions additional rights may be required.
For now, we recommend simply running the taler-auditor-httpd under the
auditor user. However, it is also possible (and might be more secure) to
create a separate user with more restrictive permissions for this purpose.
As the taler-auditor-httpd does not include HTTPS-support, it is
advisable to run it behind a reverse proxy that offers TLS termination.
14.6.2. Audit#
Performing an audit is done by invoking the taler-auditor shell script as
the auditor user.
The shell script invokes the various helper processes. For additional
performance and security, one may want to run the various helpers individually
and with the respective minimal set of access rights (only
taler-helper-auditor-wire needs the credentials to query the bank for wire
transfers, alas if auditor-wire is used to talk to the bank, this issue is
already addressed). The shell script combines the final JSON outputs of the
various helpers using the taler-helper-auditor-render.py script into the
TeX report. Regardless, the simplest way to obtain a report is to run:
$ taler-audit
This generates a file auditor-report.pdf (in a temporary directory created
for this purpose) with all of the issues found and the financial assessment of
the exchange. The exact filename will be output to the console upon
completion.
We note that taler-audit by default runs in incremental mode. As a result,
running the commands again will only check the database entries that have been
added since the last run.
You can use taler-auditor-dbinit -r to force a full check since the
beginning of time. However, as this may require excessive time and
interactions with the bank (which may not even have the wire transfer records
anymore), this is not recommended in a production setup.
14.6.3. Reading the report#
The auditor’s report needs to be read carefully, as it includes several categories of failures of different severity:
Delayed operations, where an operation was expected to have happened, but did not happen yet, possibly because of a disagreement in system time or overloading of the system. These failures only require action if the delays are significant.
Inconsistencies in the data that have no clear financial impact.
Inconsistencies in the data that show that the exchange experienced an unexpected financial loss (such as accepting a coin for deposit with an invalid signature).
Inconsistencies in the data that show that the exchange caused some other party to experience a financial loss (such as not wiring the correct amount to a merchant).
Configuration issues (such as wire fees unavailable).
14.6.4. Database upgrades#
To upgrade the database between Taler versions can be done by running:
$ taler-auditor-dbinit
$ taler-exchange-dbinit
In any case, it is recommended that exchange and auditor coordinate closely
during schema-changing database upgrades as without coordination the database
replication or taler-auditor-sync will likely experience problematic
failures. In general, we recommend:
halting the exchange business logic,
allowing the replication and
taler-auditor-syncto complete (see also the -t option oftaler-auditor-sync)completing a
taler-auditrun against the old schemamigrating the exchange schema (
taler-exchange-dbinit) of the master database, possibly the ingres database and the auditor’s production copymigrating the auditor database (
taler-auditor-dbinit)resuming database replication between the exchange’s master database and the auditor’s ingres copy
resuming
taler-auditor-syncresuming the regular exchange and auditor business logic
Regardless, the above is merely the general rule. Please review the specific release notes to ensure this procedure is correct for the specific upgrade.
14.6.5. Database reset#
The auditor database can be reset using:
$ taler-auditor-dbinit -R
However, running this command will result in all data in the database being lost. Thus, doing so may result in significant computation (and bandwidth consumption with the bank) when the auditor is next launched, as it will re-download and re-verify all historic transactions. Hence this should not be done in a production system.
14.6.6. Revocations#
When an auditor detects that the private key of a denomination key pair has been compromised, one important step is to revoke the denomination key. The exchange operator includes the details on how to revoke a denomination key, so the auditor should only have to report (and possibly enforce) this step. For more information, see Revocations in the exchange operator manual.
If all denominations of an exchange are revoked, the exchange includes logic to wire back all returned funds to the bank accounts from which they originate. If some denominations remain operational, wallets will generally exchange old coins of revoked denominations for new coins – while providing additional information to demonstrate that these coins were not forged from the compromised private key but obtained via a legitimate withdraw operation.
14.6.7. Failures#
Most audit failures are handled by the auditor’s regular reporting functionality, creating a (hopefully descriptive) PDF report detailing the problems found.
However, there is one category of errors where this is not possible, which concerns arithmetic overflows for amounts. Taler’s specification limits amount values to at most 2^52. If, during the auditor’s calculations, amounts are encountered that exceed this threshold, the auditor will not generate a regular report, but instead write a log statement explaining where the problem happened and exit with a status code of 42.
The most common expected case when this happens is a corrupted database. This could be because the exchange is actively malicious, or more likely due to some data corruption. The audit cannot continue until the corruption has been addressed. If it is not possible to restore a fully correct version of the database, the suggestion is to replace the corrupted (and likely very large) amounts with zero (Note: this does not apply to the value of denominations or fees, here it is crucial that the correct amounts are restored). While an amount of zero would be incorrect, the auditing logic should be able to do its calculations with zero instead.
After patching the database, the audit can be restarted. A full reset is not required, as the audit transaction is aborted when the auditor exits with code 42. After restarting, the resulting audit report is likely to indicate errors relating to the corrupted fields (such as invalid signatures, arithmetic errors by the exchange, etc.), but at least the loss/gain calculations will be meaningful and actually indicative of the scope of the error created by the corrupted data.
14.7. Auditor implementation guide#
The auditor implementation is split into five main processes, called
taler-helper-auditor-XXX. The split was done to realize the principle of
least privilege and to enable independent logic to be possibly run in
parallel. Only the taler-wire-auditor must have (read-only) access to the
exchange’s bank account, the other components only need access to the
database.
All auditor subsystems basically start their audit from a certain transaction
index (BIG SERIAL) in the auditor database which identifies where the last
audit concluded. They then check that the transactions claimed in the
exchange’s database match up internally, including the cryptographic
signatures and also with respect to amounts adding up. The auditor also
calculates the exchange’s profits and expected bank balances. Once all
existing transactions are processed, the auditor processes store the current
checkpoint in its database and generate a JSON report.
The taler-auditor shell script calls the five helpers and then
uses Jinja2 with a TeX template to convert the five individual
JSON reports into LaTeX and then into PDF.
14.7.1. The auditor’s database#
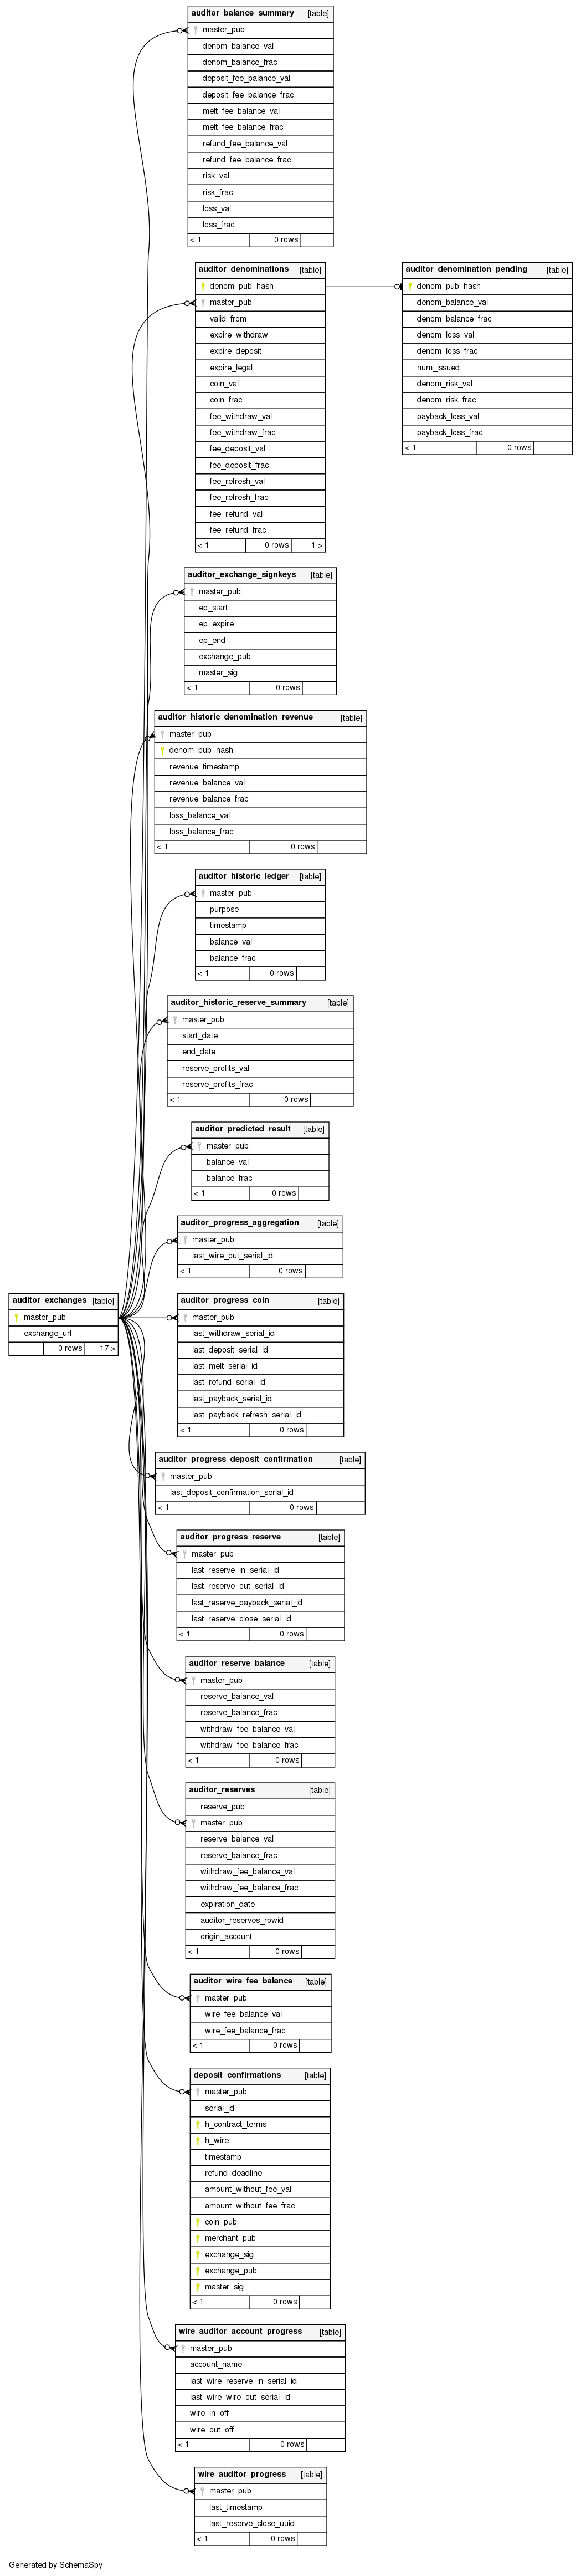
The database scheme used by the exchange looks as follows:
14.7.2. Invariants checked by the auditor#
The auditor verifies a large number of invariants that must hold for a Taler exchange. One objective in the design of the auditor was to check each invariant only once, both to minimize cost and to avoid duplicate reporting of problems where possible. As a result, not every invariant is checked in every pass where it might seem applicable.
14.7.2.1. Invariants checked by the taler-helper-auditor-aggregation#
This is from CodeBlau’s analysis. A proper write-up is pending. CodeBlau reports the following checks:
arithmetic inconsistencies
disagreement in fee for deposit between auditor and exchange db
disagreement in fee for melt between auditor and exchange db
disagreement in fee for refund between auditor and exchange db
aggregation of fee is negative
aggregation (contribution): Expected coin contributions differ: coin value without fee, total deposit without refunds
wire out fee is negative
coin arithmetic inconsistencies
refund (merchant) is negative
refund (balance) is negative
spend > value
coin denomination signature invalid
start date before previous end date
end date after next start date
wire out inconsistencies in amount
row inconsistencies
wire account given is malformed
h(wire) does not match wire
failed to compute hash of given wire data
database contains wrong hash code for wire details
no transaction history for coin claimed in aggregation
could not get coin details for coin claimed in aggregation
could not find denomination key for coin claimed in aggregation
coin denomination signature invalid
target of outgoing wire transfer do not match hash of wire from deposit
date given in aggregate does not match wire transfer date
wire fee signature invalid at given time
specified wire address lacks method
wire fee unavailable for given time
14.7.2.2. Invariants checked by the taler-helper-auditor-coins#
This is from CodeBlau’s analysis. A proper write-up is pending. CodeBlau reports the following checks:
check that all denominations used by the exchange have been signed using this auditor’s key. All denominations encountered in the database that this auditor did not officially sign for are reported (but still included in the audit as they obviously may impact the exchange’s bank balance). Depending on the business situation, this may be normal (say if an exchange is changing auditors and newer denominations are no longer supported until their end-of-life by the current auditor).
emergency on denomination over loss
value of coins deposited exceed value of coins issued
emergency on number of coins, num mismatch
arithmetic inconsistencies
melt contribution vs. fee
melt (cost)
refund fee
row inconsistencies
revocation signature invalid
denomination key not found
denomination key for fresh coin unknown to auditor
denomination key for dirty coin unknown to auditor
denomination key for deposited coin unknown to auditor
coin validity in known_coin, by checking denomination signatures
coin validity in melt, by checking signatures
refresh hanging, zero reveals (harmless)
verify deposit signature
verify refund signature
recoup, check coin
recoup, check signature
recoup, denomination not revoked
14.7.2.3. Invariants checked by the taler-helper-auditor-deposits#
This tool verifies that the deposit confirmations reported by merchants directly to the auditor are also included in the database duplicated from the exchange at the auditor. This is to ensure that the exchange cannot defraud merchants by simply not reporting deposits to the auditor.
14.7.2.4. Invariants checked by the taler-helper-auditor-reserves#
This is from CodeBlau’s analysis. A proper write-up is pending. CodeBlau reports the following checks:
report arithmetic inconsistency
closing aggregation fee
global escrow balance
denomination key validity withdraw inconsistencies
bad signature losses in withdraw
bad signature losses in recoup
bad signature losses in recoup-master
reserve balance, insufficient, losses and gains
reserve balance, summary wrong
reserve not closed after expiration time
could not determine closing fee / closing-fee unavailable
denomination key not found for withdraw
denomination key not in revocation set for recoup
target account not verified, auditor does not know reserve
target account does not match origin account
14.7.2.5. Invariants checked by the taler-helper-auditor-wire#
This auditor is special in that it is the only pass that is required to have read-only access to the exchange’s bank account (privilege separation). Its main role is to verify that the wire transfers in the exchange’s database and those reported by the bank are identical.
This is from CodeBlau’s analysis. A proper write-up is pending. CodeBlau reports the following checks:
check pending
wire missing
execution date mismatch
wire out consistency
wire transfer not made (yet?)
receiver account mismatch
wire amount does not match
justification for wire transfer not found
duplicate subject hash
duplicate wire offset
incoming wire transfer claimed by exchange not found
wire subject does not match
wire amount does not match
debit account url does not match
execution date mismatch
closing fee above total amount
14.7.3. Testing the auditor#
The main objective of the auditor is to detect inconsistencies. Thus, the
test-auditor.sh script deliberately introduces various inconsistencies into
a synthetic exchange database. For this, a “normal” exchange database is
first generated using the taler-wallet-cli. Then, various fields or rows
of that database are manipulated, and the auditor is let loose on the modified
database. Afterwards, the test verifies that the JSON contains values
indicating that the auditor found the inconsistencies. The script also
verifies that template expansion and LaTeX run work for the JSON output,
but it does not verify the correctness of the final PDF.
The test-auditor.sh script is written to maximize code coverage: it should
cover as many code paths as possible in both the exchange and the auditor. It
should also ideally create all interesting possible variations of the exchange
database fields (within the constraints of the database schema).
In general, test-auditor.sh runs the tests against an “old” database where
some transactions are past the due-date (and hence the aggregator would trigger
wire transfers), as well as a freshly generated exchange database where the
auditor would not perform any transfers. Auditor interactions can be made
before or after the aggregator, depending on what is being tested.
The current script also rudimentarily tests the auditor’s resume logic, by re-starting the auditor once against a database that the auditor has already seen.
The test-revocation.sh script performs tests related to the handling of
key revocations.
The test-sync.sh script performs tests related to the taler-auditor-sync
tool.