1. Exchange Operator Manual#
1.1. Introduction#
1.1.1. About GNU Taler#
GNU Taler is an open protocol for an electronic payment system with a free software reference implementation. GNU Taler offers secure, fast and easy payment processing using well understood cryptographic techniques. GNU Taler allows customers to remain anonymous, while ensuring that merchants can be held accountable by governments. Hence, GNU Taler is compatible with anti-money-laundering (AML) and know-your-customer (KYC) regulation, as well as data protection regulation (such as GDPR).
1.1.2. About this manual#
This manual targets system administrators who want to install and operate a GNU Taler exchange.
1.1.3. Organizational prerequisites#
Operating a GNU Taler exchange means that you are operating a payment service provider, which means that you will most likely need a bank license and/or follow applicable financial regulation. The Exchange KYC/AML Operator Manual goes into depth for how an exchange can be configured for compliance. Exceptions to compliance rules may apply, especially if you are operating a regional currency or a payment system for an event with a closed user group. If in doubt, please contact a competent lawyer in your country about the legality of operating a GNU Taler exchange.
GNU Taler payment service providers generally need to ensure high availability and should have really good backups (synchronous replication, asynchronous remote replication, off-site backup, 24/7 monitoring, etc.). This manual will not cover these aspects of operating a payment service provider.
We will assume that you can operate a (sufficiently high-availability, high-assurance) PostgreSQL database. Furthermore, we expect some moderate familiarity with the compilation and installation of free software packages. You need to understand the cryptographic concepts of private and public keys and must be able to protect private keys stored in files on disk.
Note
Taler may store sensitive business and customer data in the database. Any operator SHOULD thus ensure that backup operations are encrypted and secured from unauthorized access.
1.1.4. Architecture overview#
GNU Taler is a pure payment system, not a crypto-currency. As such, it operates in a traditional banking context. In particular, this means that payments can be executed in ordinary currencies such as USD or EUR. Furthermore, a typical merchant in Taler has a regular bank account, and would use it to receive funds via Taler.
Consequently, a typical Taler exchange must interact with a bank. The bank of the exchange holds funds in an account where the balance is basically equivalent to the value of all coins in circulation. (Small mismatches arise whenever customers are about to withdraw coins and have already sent the funds into the bank account, or if merchants just deposited coins and are about to receive wire transfers for deposited coins, or due to fees charged by the exchange and the operator not yet having drained the fees from the account.)
The exchange uses an intermediary system to talk to its bank. This shifts the technical burden (XML-based communications, additional cryptography, and a vast variety of standards) for this interaction into another bank-specific subsystem. Such intermediary system abstracts the native banking protocol by exposing the Taler Wire Gateway API; this way, the exchange can conduct its banking operations in a simplified and JSON-based style.
When customers wire money to the exchange’s bank account, the Taler Wire Gateway API must notify the exchange about the incoming wire transfers. The exchange then creates a reserve based on the subject of the wire transfer. The wallet which knows the secret key matching the wire transfer subject can then withdraw coins from the reserve, thereby draining it. The liability of the exchange against the reserve is thereby converted into a liability against digital coins issued by the exchange. When the customer later spends the coins at a merchant, and the merchant deposits the coins at the exchange, the exchange first aggregates the amount from multiple deposits from the same merchant and then instructs its bank to make a wire transfer to the merchant, thereby fulfilling its obligation and eliminating the liability. The exchange charges fees for some or all of its operations to cover costs and possibly make a profit.
Auditors are third parties, for example financial regulators, that verify that the exchange operates correctly. The same software is also used to calculate the exchange’s profits, risk and liabilities by the accountants of the exchange.
The Taler software stack for an exchange consists of the following components:
HTTP frontend: The HTTP frontend interacts with Taler wallets and merchant backends. It is used to withdraw coins, deposit coins, refresh coins, issue refunds, map wire transfers to Taler transactions, inquire about the exchange’s bank account details, signing keys and fee structure. The binary is the
taler-exchange-httpd.Crypto-Helpers: The
taler-exchange-secmod-rsa,taler-exchange-secmod-csandtaler-exchange-secmod-eddsaare three programs that are responsible for managing the exchange’s online signing keys. They must run on the same machine as thetaler-exchange-httpdas the HTTP frontend communicates with the crypto helpers using UNIX Domain Sockets.Aggregator: The aggregator combines multiple deposits made by the same merchant and (eventually) triggers wire transfers for the aggregate amount. The merchant can control how quickly wire transfers are made. The exchange may charge a fee per wire transfer to discourage excessively frequent transfers. The binary is the
taler-exchange-aggregator.Closer: The
taler-exchange-closertool check that reserves are properly closed. If a customer wires funds to an exchange and then fails to withdraw them, the closer will (eventually) trigger a wire transfer that sends the customer’s funds back to the originating wire account.Transfer: The
taler-exchange-transfertool is responsible for actually executing the aggregated wire transfers. It is the only process that needs to have the credentials to execute outgoing wire transfers. The tool uses the Taler Wire Gateway API to execute wire transfers. This API is provided by the Taler Python Bank for stand-alone deployments (like those withKUDOS) and by LibEuFin. LibEuFin is an adapter which maps the Taler Wire REST API to traditional banking protocols like EBICS and FinTS.Wirewatch: The
taler-exchange-wirewatchtool is responsible for observing incoming wire transfers to the exchange. It needs to have the credentials to obtain a list of incoming wire transfers. The tool also uses the Taler Wire Gateway API to observe such incoming transfers. It is possible that observing incoming and making outgoing wire transfers is done via different bank accounts and/or credentials.Wire adapter: A wire adapter is a component that enables exchange to talk to a bank. Each wire adapter must implement the Taler Wire Gateway API. Three wire adapters are currently provided:
The libtalerfakebank implements a bank with a wire adapter API inside of a testcase.
taler-fakebank-runis a stand-alone process using libtalerfakebank. Note that this adapter is only useful for tests, as all transaction data is kept in memory. The binary is packaged in thelibtalerexchange-devpackage on Debian/Ubuntu and possibly other platforms as it is not intended for production.For production, libeufin’s
libeufin-nexuscomponent implements a wire adapter towards the traditional SEPA banking system with IBAN accounts using the EBICS protocol.taler-magnet-bank component implements a wire adapter towards the Magnet Bank API.
taler-cyclos component implements a wire adapter towards the Cyclos API.
To use GNU Taler with blockchains, the Depolymerization component provides a wire gateway API that runs on top of blockchains like Bitcoin and Ethereum.
The client-side wire adapter API is implemented in libtalerbank and is used by
taler-exchange-transferto execute wire transfers and bytaler-exchange-wirewatchand the Taler auditor to query bank transaction histories.DBMS: The exchange requires a DBMS to store the transaction history for the Taler exchange and aggregator, and a (typically separate) DBMS for the Taler auditor. For now, the GNU Taler reference implementation only supports PostgreSQL, but the code could be easily extended to support another DBMS. .. index:: PostgreSQL
Auditor: The auditor verifies that the transactions performed by the exchange were done properly. It checks the various signatures, totals up the amounts and alerts the operator to any inconsistencies. It also computes the expected bank balance, revenue and risk exposure of the exchange operator. The main binary is the
taler-auditor. Aside from the key setup procedures, the most critical setup for deploying an auditor is providing the auditor with an up-to-date copy of the exchange’s database.
1.1.5. Key Types#
The exchange works with four types of keys:
master key (kept offline, configured manually at merchants and wallets)
online message signing keys (signs normal messages from the exchange)
denomination keys (signs digital coins)
security module keys (signs online message signing keys and denomination keys)
Additionally, the exchange is sometimes concerned with the auditor’s public key (to verify messages signed by auditors approved by the exchange operator) and the merchant’s public key (to verify refunds are authorized by the merchant).
Most of the keys are managed fully automatically or configured as part of the denomination configuration. Some configuration settings must be manually set with regards to the exchange’s master key.
1.1.6. Offline keys#
The exchange (and ideally also its auditor(s)) uses a long-term offline master siging key that identifies the operator and is used to authenticate critical information, such as the exchange’s bank account and the actual keys the exchange uses online.
Interactions with the offline system are performed using the
taler-exchange-offline tool. To use the offline system will require
exchange operators to copy JSON files from or to the offline system (say using
an USB stick). The offline system does not need any significant amount of
computing power, a Raspberry-Pi is perfectly sufficient and the form-factor
might be good for safe-keeping! (You should keep a copy of the (encrypted)
private offline key on more than one physical medium though.)
Exchange operators are strongly advised to secure their private master key and any copies on encrypted, always-offline computers. Again, this manual assumes that you are familiar with good best practices in operational security, including securing key material.
1.1.7. Online signing key security#
To provide an additional level of protection for the private online signing
keys used by the exchange, the actual cryptographic signing operations are
performed by three helper processes, taler-exchange-secmod-rsa,
taler-exchange-secmod-cs and taler-exchange-secmod-eddsa.
The current implementation does not yet support the use of a hardware security module (HSM). If you have such a device with adequate functionality and are interested in Taler supporting it, please contact the developers for HSM integration support.
1.1.7.1. Functionality#
The UNIX domain sockets of the secmod helpers have mode 0620 (u+rw, g+w). The exchange process MUST thus be in the same group as the crypto helper processes to enable access to the keys. No other users should be in that group!
The two helper processes will create the required private keys, and allow anyone with access to the UNIX domain socket to sign arbitrary messages with the keys or to inform them about a key being revoked. The helper processes are also responsible for deleting the private keys if their validity period expires or if they are informed about a key having been revoked.
1.1.7.2. Security goals#
From a security point of view, the helpers are designed to only make it harder for an attacker who took control of the HTTP daemon’s account to extract the private keys, limiting the attacker’s ability to create signatures to the duration of their control of that account.
Note
In the future, the helper processes should additionally provide a mechanism to track the total number of signatures they have made for the various keys.
1.1.7.3. Setup#
The helper processes should be run under a user ID that is separate from that
of the user running the main taler-exchange-httpd service. To get any
security benefit from this, it is important that helpers run under a different
user ID than the main HTTP frontend. In fact, ideally, each helper should run
under its own user ID. The taler-exchange-httpd service will securely
communicate with the helpers using UNIX domain sockets.
1.1.7.4. Configuration#
The helpers and the exchange HTTP service need both access to the same
configuration information. Having divergent configurations may result in
run-time failures. It is recommended that the configuration file (-c
option) is simply shared between all of the different processes, even though
they run as different system users. The configuration does not contain any
sensitive information.
1.2. Installation#
Before installing a Taler exchange, please make sure that your system does not have swap space enabled. Swap space is a security risk that Taler does not try to mitigate against.
We recommend the setup of offline signing keys to be done on a second machine that does not have Internet access.
In this guide’s shell-session fragments, the command prompt shows two pieces of information:
Who is performing the command (
$uservsroot, and ending character$vs#).Host where the command is supposed to be executed (
exchange-offlinevsexchange-online). It is possible to do the entire setup on one machine, but we do not recommend this for security reasons.
1.2.1. Before you start#
To deploy this with a real bank, you need:
IBAN of the bank account to use
BIC of the bank
EBICS host, user and partner IDs
Information to write down during the installation:
LibEuFin Nexus superuser password
Taler facade base URL
exchange Nexus username and password
1.2.2. Installing from source#
The following instructions will show how to install libgnunetutil and the GNU Taler exchange from source.
The package sources can be find in our download directory.
GNU Taler components version numbers follow the MAJOR.MINOR.MICRO format.
The general rule for compatibility is that MAJOR and MINOR must match.
Exceptions to this general rule are documented in the release notes.
For example, Taler merchant 1.3.0 should be compatible with Taler exchange 1.4.x
as the MAJOR version matches. A MAJOR version of 0 indicates experimental
development, and you are expected to always run all of the latest releases
together (no compatibility guarantees).
First, the following packages need to be installed before we can compile the backend:
“Sphinx RTD Theme” Python package aka
python3-sphinx-rtd-themeon Debian-based systems (for GNUnet documentation support, can be omitted if GNUnet is configured with--disable-documentation)libsqlite3 >= 3.16.2
GNU libunistring >= 0.9.3
libcurl >= 7.26 (or libgnurl >= 7.26)
libqrencode >= 4.0.0 (Taler merchant only)
GNU libgcrypt >= 1.6 (1.10 or later highly recommended)
libsodium >= 1.0
libargon2 >= 20171227
libjansson >= 2.7
PostgreSQL >= 15, including libpq
GNU libmicrohttpd >= 0.9.71
GNUnet >= 0.25.2 (from source tarball)
Python3 with
jinja2
If you are on Debian stable or later, the following command may help you install these dependencies:
# apt-get install \
  libqrencode-dev \
  libsqlite3-dev \
  libltdl-dev \
  libunistring-dev \
  libsodium-dev \
  libargon2-dev \
  libcurl4-gnutls-dev \
  libgcrypt20-dev \
  libjansson-dev \
  libpq-dev \
  libmicrohttpd-dev \
  python3-jinja2 \
  postgresql-15
Before you install GNUnet, you must download and install the dependencies mentioned in the previous section, otherwise the build may succeed, but could fail to export some of the tooling required by GNU Taler.
On Ubuntu, you also need to install pkg-config, for example:
$ apt-get install pkg-config
To install GNUnet, unpack the tarball and change into the resulting directory, then proceed as follows:
$ ./configure [--prefix=GNUNETPFX]
$ # Each dependency can be fetched from non standard locations via
$ # the '--with-<LIBNAME>' option. See './configure --help'.
$ make
# make install
# ldconfig
If you did not specify a prefix, GNUnet will install to /usr/local,
which requires you to run the last step as root.
The ldconfig command (also run as root) makes the
shared object libraries (.so files)
visible to the various installed programs.
Please note that unlike most packages, if you want to run the make check
command, you should run it only after having done make install. The
latter ensures that necessary binaries are copied to the right place.
In any case, if make check fails, please consider filing a
bug report with the Taler bug tracker.
There is no need to actually run a GNUnet peer to use the Taler merchant backend – all the merchant needs from GNUnet is a number of headers and libraries!
After installing GNUnet, unpack the GNU Taler exchange tarball, change into the resulting directory, and proceed as follows:
$ ./configure [--prefix=EXCHANGEPFX] \
              [--with-gnunet=GNUNETPFX]
$ # Each dependency can be fetched from non standard locations via
$ # the '--with-<LIBNAME>' option. See './configure --help'.
$ make
# make install
If you did not specify a prefix, the exchange will install to /usr/local,
which requires you to run the last step as root. You have to specify
--with-gnunet=/usr/local if you installed GNUnet to /usr/local in the
previous step.
Please note that unlike most packages, if you want to run the make check
command, you should run it only after having done make install. The
latter ensures that necessary binaries are copied to the right place.
In any case, if make check fails, please consider filing a
bug report with the Taler bug tracker.
1.2.3. Installing the GNU Taler binary packages on Debian#
To install the GNU Taler Debian packages, first ensure that you have the right Debian distribution. At this time, the packages are built for Debian trixie.
You need to add a file to import the GNU Taler packages. Typically,
this is done by adding a file /etc/apt/sources.list.d/taler.list that
looks like this:
deb [signed-by=/etc/apt/keyrings/taler-systems.gpg] https://deb.taler.net/apt/debian trixie main
Next, you must import the Taler Systems SA public package signing key into your keyring and update the package lists:
# wget -O /etc/apt/keyrings/taler-systems.gpg \
    https://taler.net/taler-systems.gpg
# apt update
Note
You may want to verify the correctness of the Taler Systems SA key out-of-band.
Now your system is ready to install the official GNU Taler binary packages using apt.
To install the Taler exchange, you can now simply run:
[root@exchange-online]# apt install taler-exchange
Note that the package does not perform any configuration work except for setting up the various users and the systemd service scripts. You still must configure at least the database, HTTP reverse proxy (typically with TLS certificates), denomination and fee structure, bank account, auditor(s), offline signing and the terms of service.
On the offline system, you should run at least:
[root@exchange-offline]# apt install taler-exchange-offline
1.2.4. Installing the GNU Taler binary packages on Ubuntu#
To install the GNU Taler Ubuntu packages, first ensure that you have
the right Ubuntu distribution. At this time, the packages are built for
Ubuntu Lunar and Ubuntu Jammy. Make sure to have universe in your
/etc/apt/sources.list.d/ubuntu.sources (after main)
as we depend on some packages from Ubuntu universe.
A typical /etc/apt/sources.list.d/taler.list file for this setup
would look like this for Ubuntu Noble:
deb [signed-by=/etc/apt/keyrings/taler-systems.gpg] https://deb.taler.net/apt/ubuntu/ noble main
Next, you must import the Taler Systems SA public package signing key into your keyring and update the package lists:
# wget -O /etc/apt/keyrings/taler-systems.gpg \
    https://taler.net/taler-systems.gpg
# apt update
Note
You may want to verify the correctness of the Taler Systems key out-of-band.
Now your system is ready to install the official GNU Taler binary packages using apt.
To install the Taler exchange, you can now simply run:
[root@exchange-online]# apt install taler-exchange
Note that the package does not perform any configuration work except for setting up the various users and the systemd service scripts. You still must configure at least the database, HTTP reverse proxy (typically with TLS certificates), denomination and fee structure, bank account, auditor(s), offline signing and the terms of service.
On the offline system, you should run at least:
[root@exchange-offline]# apt install taler-exchange-offline
1.2.5. Services, users, groups and file system hierarchy#
The taler-exchange package will create several system users to compartmentalize different parts of the system:
taler-exchange-httpd: runs the HTTP daemon with the core business logic.taler-exchange-secmod-rsa: manages the RSA private online signing keys.taler-exchange-secmod-cs: manages the CS private online signing keys.taler-exchange-secmod-eddsa: manages the EdDSA private online signing keys.taler-exchange-closer: closes idle reserves by triggering wire transfers that refund the originator.taler-exchange-aggregator: aggregates deposits into larger wire transfer requests.taler-exchange-transfer: performs wire transfers with the bank (via LibEuFin/Nexus).taler-exchange-wirewatch: checks for incoming wire transfers with the bank (via LibEuFin/Nexus).postgres: runs the PostgreSQL database (from postgresql package).www-data: runs the frontend HTTPS service with the TLS keys (from nginx package).
Note
The taler-merchant package additionally creates a taler-merchant-httpd user
to run the HTTP daemon with the merchant business logic.
The exchange setup uses the following system groups:
taler-exchange-db: group for all Taler users with direct database access, specifically taler-exchange-httpd, taler-exchange-wirewatch, taler-exchange-closer and taler-exchange-aggregator.taler-exchange-secmod: group for processes with access to online signing keys; this group must have four users: taler-exchange-secmod-rsa, taler-exchange-secmod-cs, taler-exchange-secmod-eddsa and taler-exchange-httpd.taler-exchange-offline: group for the access to the offline private key (only used on the offline host and not used on the online system).
The package will deploy systemd service files in
/usr/lib/systemd/system/ for the various components:
taler-exchange-aggregator.service: service that schedules wire transfers which combine multiple deposits to the same merchant.taler-exchange-closer.service: service that watches for reserves that have been abandoned and schedules wire transfers to send the money back to the originator.taler-exchange-httpd.service: main Taler exchange logic with the public REST API.taler-exchange-httpd.socket: systemd socket activation for the Taler exchange HTTP daemon.taler-exchange-secmod-eddsa.service: software security module for making EdDSA signatures.taler-exchange-secmod-rsa.service: software security module for making RSA signatures.taler-exchange-secmod-cs.service: software security module for making CS signatures.taler-exchange-transfer.service: service that triggers outgoing wire transfers (pays merchants).taler-exchange-wirewatch.service: service that watches for incoming wire transfers (first step of withdraw).taler-exchange.target: Main target for the Taler exchange to be operational.
The deployment creates the following key locations in the system:
/etc/taler-exchange/: configuration files./run/taler-exchange/: contains the UNIX domain sockets for inter-process communication (IPC)./var/lib/taler-exchange/: serves as the $HOME for all Taler exchange users and contains sub-directories with the private keys; which keys are stored here depends on the host:online system: exchange-secmod-eddsa, exchange-secmod-cs and exchange-secmod-rsa keys.
offline system: exchange-offline keys.
1.3. Configuration Fundamentals#
This chapter provides fundamental details about the exchange configuration.
The configuration for all Taler components uses a single configuration file
as entry point: /etc/taler-exchange/taler-exchange.conf.
System defaults are automatically loaded from files in
/usr/share/taler-exchange/config.d.
These default files should never be modified.
The default configuration taler-exchange.conf configuration file
also includes all configuration files in /etc/taler-exchange/conf.d.
The settings from files in
conf.d are only relevant to particular components of an exchange, while
taler-exchange.conf contains settings that affect all exchange components.
The directory /etc/taler-exchange/secrets contains configuration file snippets with
values that should only be readable to certain users. They are included with the @inline-secret@
directive and should end with .secret.conf.
To view the entire configuration annotated with the source of each configuration option, you
can use the taler-exchange-config helper:
[root@exchange-online]# taler-exchange-config --diagnostics
< ... annotated, full configuration ... >
Warning
While taler-exchange-config also supports rewriting configuration files, we strongly
recommend to edit configuration files manually, as taler-exchange-config does not
preserve comments and, by default, rewrites /etc/taler-exchange/taler-exchange.conf.
1.3.1. Configuration format#
All GNU Taler components are designed to possibly share the same configuration files. When installing a GNU Taler component, the installation deploys default values in configuration files located at ${prefix}/share/taler/config.d/ where ${prefix} is the installation prefix. Different components must be installed to the same prefix.
In order to override these defaults, the user can write a custom configuration
file and either pass it to the component at execution time using the -c
option, or name it taler.conf and place it under $HOME/.config/ which is where
components will look by default. Note that the systemd service files pass -c
/etc/taler/taler.conf, thus making /etc/taler/taler.conf
the primary location for the configuration.
A config file is a text file containing sections, and each section contains maps options to their values. Configuration files follow basically the INI syntax:
[section1]
value1 = string
value2 = 23

[section2]
value21 = string
value22 = /path22
Comments start with a hash (#). Throughout the configuration, it is
possible to use $-substitution for options relating to names of files or
directories. It is also possible to provide defaults values for those
variables that are unset, by using the following syntax:
${VAR:-default}. There are two ways a user can set the value
of $-prefixable variables:
by defining them under a
[paths]section:[paths] TALER_DEPLOYMENT_SHARED = ${HOME}/shared-data .. [section-x] path-x = ${TALER_DEPLOYMENT_SHARED}/x
or by setting them in the environment:
$ export VAR=/x
The configuration loader will give precedence to variables set under
[path] over environment variables.
The utility taler-config, which gets installed along with the exchange,
can be used get and set configuration values without directly editing the
configuration file. The option -f is particularly useful to resolve
pathnames, when they use several levels of $-expanded variables. See
taler-config --help.
The repository git://git.taler.net/deployment contains example code
for generating configuration files under deployment/netzbon/.
1.4. Exchange Database Setup#
The access credentials for the exchange’s database are configured in
/etc/taler-exchange/secrets/exchange-db.secret.conf.
Currently, only PostgreSQL is supported as a database backend.
The following users must have access to the exchange database:
taler-exchange-httpd
taler-exchange-wire
taler-exchange-aggregator
taler-exchange-closer
These users are all in the taler-exchange-db group, and the
exchange-db.secret.conf should be only readable by users in
this group.
Note
The taler-exchange-dbconfig tool can be used to automate the database setup. When using the Debian/Ubuntu packages, the users should already have been created, so you can just run the tool without any arguments and should have a working database configuration. The rest of this section only explains what the taler-exchange-dbconfig shell script fully automates.
To create a database for the Taler exchange on the local system, run:
[root@exchange-online]# su - postgres
[postgres@exchange-online]# createuser taler-exchange-httpd
[postgres@exchange-online]# createuser taler-exchange-wire
[postgres@exchange-online]# createuser taler-exchange-aggregator
[postgres@exchange-online]# createuser taler-exchange-closer
[postgres@exchange-online]# createdb -O taler-exchange-httpd taler-exchange
[postgres@exchange-online]# exit
This will create a taler-exchange database owned by the
taler-exchange-httpd user. We will use that user later to perform
database maintenance operations.
Assuming the above database setup, the database credentials to configure in the configuration file would simply be:
[exchange]
DB = postgres

[exchangedb-postgres]
CONFIG=postgres:///taler-exchange
If the database is run on a different host, please follow the instructions from the PostgreSQL manual for configuring remote access.
After configuring the database credentials, the exchange database needs to be initialized with the following command:
[root@exchange-online]# sudo -u taler-exchange-httpd taler-exchange-dbinit

..note::

  To run this command, the user must have ``CREATE TABLE``, ``CREATE
  INDEX``, ``ALTER TABLE`` and (in the future possibly even) ``DROP TABLE``
  permissions.  Those permissions are only required for this step (which may
  have to be repeated when upgrading a deployment).  Afterwards, during
  normal operation, permissions to ``CREATE`` or ``ALTER`` tables are not
  required by any of the Taler exchange processes and thus should not be
  granted.  For more information, see
  :doc:`manpages/taler-exchange-dbinit.1`.
Finally we need to grant the other accounts limited access:
[root@exchange-online]# sudo -u taler-exchange-httpd bash
[taler-exchange-httpd@exchange-online]# echo 'GRANT SELECT,INSERT,UPDATE ON ALL TABLES IN SCHEMA exchange TO "taler-exchange-aggregator";' \
  | psql taler-exchange
[taler-exchange-httpd@exchange-online]# echo 'GRANT SELECT,INSERT,UPDATE ON ALL TABLES IN SCHEMA exchange TO "taler-exchange-closer";' \
  | psql taler-exchange
[taler-exchange-httpd@exchange-online]# echo 'GRANT SELECT,INSERT,UPDATE ON ALL TABLES IN SCHEMA exchange TO "taler-exchange-wire";' \
  | psql taler-exchange
[taler-exchange-httpd@exchange-online]# echo 'GRANT USAGE ON ALL SEQUENCES IN SCHEMA exchange TO "taler-exchange-aggregator";' \
  | psql taler-exchange
[taler-exchange-httpd@exchange-online]# echo 'GRANT USAGE ON ALL SEQUENCES IN SCHEMA exchange TO "taler-exchange-closer";' \
  | psql taler-exchange
[taler-exchange-httpd@exchange-online]# echo 'GRANT USAGE ON ALL SEQUENCES IN SCHEMA exchange TO "taler-exchange-wire";' \
  | psql taler-exchange
[taler-exchange-httpd@exchange-online]# exit
Note
The above instructions for changing database permissions only work after
having initialized the database with taler-exchange-dbinit, as
the tables need to exist before permissions can be granted on them. The
taler-exchange-dbinit tool cannot setup these permissions, as it
does not know which users will be used for which processes.
1.4.1. Data protection concept#
The kyc-attributes table contains the most sensitive
data, namely the KYC records of the recipients of payments.
The data could include passports, business documentation
and other sensitive information. At a high-level, it is
stored in JSON format (key-value), compressed and then
additionally encrypted using a secret key from the
exchange configuration (the ATTRIBUTE_ENCRYPTION_KEY).
Thus, this data is protected even if the full database
is leaked.
The aml-history table stores the main information
provided by AML officers. This may contain sensitive
data about risk assessments on customers, exposed or
secret limits imposed on individual accounts, and
in general forms supplied by bank staff. AML decisions
are also tracked in the legitimization-* tables,
including the latest rules that apply to an account.
The second most sensitive table is
wire-targets, as it contains the IBANs (and possibly
other visible information from RFC 8905) of the bank
accounts of the customers. Many other tables contain
transaction data (incoming, outgoing, p2p transfers,
etc) which are somewhat less sensitive. It should be
noted that the actual contracts between customers and
merchants are not available to the exchange operator;
the contracts table only stores contracts for p2p
transfers in an end-to-end encrypted format that the
exchange itself can never decrypt.
The database is periodically cleaned up via the
taler-exchange-dbinit --gc command. It is
currently hard-coded (!) to delete KYC/AML data
of accounts that have been inactive for 10 years.
Data on incoming wire transfers (reserves) is
deleted after the LEGAL_RESERVE_EXPIRATION_TIME
is reached, as configured in the [exchangedb]
section. The default is set to 7 years.
Payment data is deleted whenever the legal expiration date for the
DURATION_LEGAL configured in the respective section coin is reached
(typically also after 10 years).
1.5. Basic Setup: Currency, Denominations and Keys#
A Taler exchange only supports a single currency. The currency
and the smallest currency unit supported by the bank system
must be specified in /etc/taler-exchange/taler-exchange.conf.
 [exchange]
 CURRENCY = EUR
 CURRENCY_ROUND_UNIT = EUR:0.01

 # ... rest of file ...
Warning
When editing
/etc/taler-exchange/taler-exchange.conf, take care to not accidentally remove the@inline-matching@directive to include the configuration files inconf.d.
1.5.1. Coins (denomination keys)#
Next, the electronic cash denominations that the exchange offers must be specified.
Sections specifying denomination (coin) information start with coin_. By
convention, the name continues with $CURRENCY_[$SUBUNIT]_$VALUE_$REVISION,
i.e. [coin_eur_ct_10_0] for a 10 cent piece. However, only the coin_
prefix is mandatory. Once configured, these configuration values must not
change. The $REVISION part of the section name should be incremented if
any of the coin attributes in the section changes. Each coin_-section
must then have the following options:
VALUE: How much is the coin worth, the format is CURRENCY:VALUE.FRACTION. For example, a 10 cent piece is “EUR:0.10”.DURATION_WITHDRAW: How long can a coin of this type be withdrawn? This limits the losses incurred by the exchange when a denomination key is compromised.DURATION_SPEND: How long is a coin of the given type valid? Smaller values result in lower storage costs for the exchange.DURATION_LEGAL: How long is the coin of the given type legal?FEE_WITHDRAW: What does it cost to withdraw this coin? Specified using the same format as value.FEE_DEPOSIT: What does it cost to deposit this coin? Specified using the same format as value.FEE_REFRESH: What does it cost to refresh this coin? Specified using the same format as value.FEE_REFUND: What does it cost to refund this coin? Specified using the same format as value.CIPHER: Which cipher to use for this coin? Must be eitherRSAorCS.RSA_KEYSIZE: How many bits should the RSA modulus (product of the two primes) have for this type of coin.AGE_RESTRICTED: Set toYESto make this a denomination with supportfor age restrictions. See age restriction extension below for details. This option is optional and defaults to
NO.
See taler-exchange.conf(5) for information on duration values
(i.e. DURATION_WITHDRAW and DURATION_SPEND above,
and OVERLAP_DURATION and DURATION below).
Additionally, there are two global configuration options of note:
[taler-exchange-secmod-rsa/OVERLAP_DURATION]: What is the overlap of the withdrawal timespan for denomination keys? The value given here must be smaller than any of theDURATION_WITHDRAWvalues for any of the coins.[taler-exchange-secmod-rsa/LOOKAHEAD_SIGN]: For how far into the future should denomination keys be pre-generated? This allows the exchange and auditor operators to download, offline-sign, and upload denomination key signatures for denomination keys that will be used in the future by the exchange.
Note
We recommend setting the LOOKAHEAD_SIGN value to at least one year and
then to perform the offline-signing procedure at least once every 6 months
to ensure that there is sufficient time for wallets to learn the new keys
and to avoid unavailability in case this critical maintenance procedure is
delayed.
Note
It is crucial that the configuration provided in these sections is identical (!) for the exchange and the crypto helpers. We recommend pointing both users to the same configuration file!
The taler-harness has a helper command that generates a
reasonable denomination structure.
[root@exchange-online]# taler-harness deployment gen-coin-config \
                          --min-amount EUR:0.01 \
                          --max-amount EUR:100 \
                          > /etc/taler-exchange/conf.d/exchange-coins.conf
You can manually review and edit the generated configuration file. The main
change that is possibly required is updating the various fees. Note that you
MUST NOT edit a coin configuration section after the initial setup. If you
must change the values, you must instead create a new section with a
different unique name (still with the coin_ prefix) and comment out or
remove the existing section. Do take care to not introduce the name of the
disabled section again in the future.
1.5.2. Sign keys#
There are three global configuration options of note for sign keys:
[taler-exchange-secmod-eddsa/DURATION]: How long are sign keys used to sign messages? After this time interval expires, a fresh sign key will be used (key rotation). We recommend using aDURATIONof a few weeks to a few months for sign keys.[taler-exchange-secmod-eddsa/OVERLAP_DURATION]: What is the overlap of the timespan for sign keys? We recommend a few minutes or hours. Must be smaller thanDURATION.[taler-exchange-secmod-eddsa/LOOKAHEAD_SIGN]: For how far into the future should sign keys be pre-generated? This allows the exchange and auditor operators to download, offline-sign, and upload sign key signatures for sign keys that will be used in the future by the exchange.
Note
We recommend setting the LOOKAHEAD_SIGN value to at least one year and
then to perform the offline-signing procedure at least once every 6 months
to ensure that there is sufficient time for wallets to learn the new keys
and to avoid unavailability in case this critical maintenance procedure is
delayed.
1.5.3. Setting up the offline signing key#
Before launching an exchange, the offline signing (master) key must be generated and set in the configuration. The offline signing keys of the exchange should be stored on a different machine. The responsibilities of this offline signing machine are:
Generation of the exchange’s offline master signing key.
Secure storage of the exchange’s offline master signing key.
Generation of certificates (signed with the offline master signing key) that will be imported by the exchange.
Revocation of keys when the online system was compromised or is being terminated
Configuration file options related to the master key are:
[exchange-offline/MASTER_PRIV_FILE]: Path to the exchange’s masterprivate file. Only needs to be provided on the offline system where the
taler-exchange-offlinecommand is used. The default value is usually fine and does not require adjustment.
[exchange/MASTER_PUBLIC_KEY]: Must specify the exchange’s master publickey. Needed for the exchange to verify information signed by the offline system. This value must almost always be set explicitly by hand.
[root@exchange-offline]# taler-exchange-offline setup
< ... prints the exchange master public key >
The public key printed as the output of this command must be put into the configuration of the online machine:
 [exchange]
 MASTER_PUBLIC_KEY = YE6Q6TR1ED...

 # ... rest of file ...
1.6. Wire Gateway Setup#
The Taler Wire Gateway is an API that connects the Taler exchange to the underlying core banking system. There are several implementations of wire gateways:
Project deploymerization implements a wire gateway on top of Bitcoin or Ethereum
The libeufin-bank provides a wire gateway interface on top of a regional currency bank
The taler-fakebank-run command is an in-memory bank simulator with a wire gateway interface for testing
Before continuing, you need to decide which wire gateway you want to use, and install and configure it on your system. Afterwards, you need to have two key pieces of information from that setup:
The username and password to access the exchange’s account in the system.
The
payto://URI of that account (see RFC 8905).
If you use the libeufin-bank, you need to set a special configuration option because the taler-exchange-wire-gateway-client does not yet support token authentication:
 [libeufin-bank]
 PWD_AUTH_COMPAT = YES
1.6.1. Exchange Bank Account Configuration#
An exchange must be configured with the right settings to access its bank account via a Taler wire gateway. An exchange can be configured to use multiple bank accounts by using multiple wire gateways. Typically only one wire gateway is used.
To configure a bank account in Taler, we need to furnish two pieces of information:
The
payto://URI of the bank account, which uniquely identifies the account. Examples for such URIs includepayto://iban/CH9300762011623852957for a bank account with an IBAN orpayto://x-taler-bank/localhost:8080/2for the 2nd bank account at the Taler bank demonstrator running atlocalhoston port 8080. The first part of the URI followingpayto://(ibanorx-taler-bank) is called the wire method.The
taler-exchange-wirewatchandtaler-exchange-transfertools needs to be provided resources for authentication to the respective banking service. The format in which the authentication information is currently a username and password for HTTP basic authentication.
Each Taler wire gateway is configured in a configuration section that follows
the pattern exchange-account-$id, where $id is an internal identifier
for the bank account accessed by the exchange. The basic information for an
account should be put in /etc/taler-exchange/conf.d/exchange-business.conf. The
secret credentials to access the Taler Wire Gateway API should be put into a
corresponding exchange-accountcredentials-$id section in
/etc/taler-exchange/secrets/exchange-accountcredentials.conf. The latter file
should be only readable for the taler-exchange-wire user. Only the
taler-exchange-wirewatch and taler-exchange-transfer services should
run as the taler-exchange-wire user. Other exchange processes do not need
to have access to the account credentials.
You can configure multiple accounts for an exchange by creating sections
starting with exchange-account- for the section name. You must specify
ENABLE_-settings for each account whether it should be used, and for what
(incoming or outgoing wire transfers):
[exchange-account-1]
# Account identifier in the form of an RFC-8905 payto:// URI.
# For SEPA, looks like payto://iban/$IBAN?receiver-name=$NAME
# Make sure to URL-encode spaces in $NAME!
#
# With x-taler-bank (for Fakebank)
# PAYTO_URI = "payto://x-taler-bank/bank.demo.taler.net/Exchange?receiver-name=exop"
#
# Example using IBAN (for use with LibEuFin)
PAYTO_URI = "payto://iban/CH9300762011623852957?receiver=name=exop"

# Use for exchange-aggregator (outgoing transfers)
ENABLE_DEBIT = YES
# Use for exchange-wirewatch (and listed in /wire)
ENABLE_CREDIT = YES

@inline-secret@ exchange-accountcredentials-1 ../secrets/exchange-accountcredentials.secret.conf
[exchange-accountcredentials-1]

# LibEuFin expects basic auth.
WIRE_GATEWAY_AUTH_METHOD = basic

# Username and password to access the Taler wire gateway.
USERNAME = ...
PASSWORD = ...

# URL for talking to the bank wire the wire API.
WIRE_GATEWAY_URL = https://bank.demo.taler.net/accounts/exchange/taler-wire-gateway/
Such a wire gateway configuration can be tested with the following commands:
[root@exchange-online]# taler-exchange-wire-gateway-client \
  --section exchange-accountcredentials-1 --debit-history
[root@exchange-online]# taler-exchange-wire-gateway-client \
  --section exchange-accountcredentials-1 --credit-history
On success, you will see some of your account’s transaction history (or an empty history), while on failure you should see an error message.
1.7. Deployment#
This chapter describes how to deploy the exchange once the basic installation and configuration are completed.
1.7.1. Serving#
The exchange can serve HTTP over both TCP and UNIX domain socket.
The following options are to be configured in the section [exchange]:
SERVE: Must be set totcpto serve HTTP over TCP, orunixto serve HTTP over a UNIX domain socket.PORT: Set to the TCP port to listen on ifSERVEistcp.UNIXPATH: Set to the UNIX domain socket path to listen on ifSERVEisunix.UNIXPATH_MODE: Number giving the mode with the access permission maskfor the
UNIXPATH(i.e. 660 =rw-rw---). Make sure to set it in such a way that your reverse proxy has permissions to access the UNIX domain socket. The default (660) assumes that the reverse proxy is a member of the group under which the exchange HTTP server is running.
1.7.2. Reverse Proxy Setup#
By default, the taler-exchange-httpd service listens for HTTP connections
on a UNIX domain socket. To make the service publicly available, a reverse
proxy such as nginx should be used. We strongly recommend to configure nginx
to use TLS.
The public URL that the exchange will be served under should
be put in /etc/taler-exchange/conf.d/exchange-business.conf configuration file.
 [exchange]
 BASE_URL = https://example.com/

 # ... rest of file ...
The taler-exchange package ships with a sample configuration that can be
enabled in nginx:
[root@exchange-online]# vim /etc/nginx/sites-available/taler-exchange
< ... customize configuration ... >
[root@exchange-online]# ln -s /etc/nginx/sites-available/taler-exchange \
                              /etc/nginx/sites-enabled/taler-exchange
[root@exchange-online]# systemctl reload nginx
Note that the reverse proxy must set a HTTP X-Forwarded-Host header to
refer to the hostname used by nginx and a HTTP X-Forwarded-Proto header to
inform the exchange whether the external protocol was http or https.
Thus, depending on your setup, you will likely have to edit those parts of the
provided taler-exchange configuration file.
With this last step, we are finally ready to launch the main exchange process.
1.7.3. Launching an exchange#
A running exchange requires starting the following processes:
taler-exchange-secmod-rsa(as special user, sharing group with the HTTPD)taler-exchange-secmod-cs(as special user, sharing group with the HTTPD)taler-exchange-secmod-eddsa(as special user, sharing group with the HTTPD)taler-exchange-httpd(needs database access)taler-exchange-aggregator(only needs database access)taler-exchange-closer(only needs database access)taler-exchange-wirewatch(needs bank account read credentials and database access)taler-exchange-transfer(needs credentials to initiate outgoing wire transfers and database access)
The crypto helpers (secmod) must be started before the taler-exchange-httpd and
they should use the same configuration file.
For the most secure deployment, we recommend using separate users for each of these processes to minimize information disclosures should any of them be compromised. The helpers do not need access to the PostgreSQL database (and thus also should not have it).
The processes that require access to the bank account need to have a
configuration file with the respective credentials in it. We recommend using a
separate configuration at least for taler-exchange-transfer which is the
only process that needs to know the credentials to execute outgoing wire
transfers.
All of these processes should also be started via a hypervisor like
systemd or gnunet-arm that automatically re-starts them should they
have terminated unexpectedly. If the bank is down (say for maintenance), it is
possible to halt the taler-exchange-wirewatch and/or
taler-exchange-transfer processes (to avoid them making requests to the
bank API that can only fail) without impacting other operations of the
exchange. Naturally, incoming wire transfers will only be observed once
taler-exchange-wirewatch is resumed, and merchants may complain if the
disabled taler-exchange-transfer process causes payment deadlines to be
missed.
Note
The taler-exchange-httpd does not ship with HTTPS enabled by default.
In production, it should be run behind an HTTPS reverse proxy that performs
TLS termination on the same system. Thus, it would typically be configured
to listen on a UNIX domain socket. The /management and /auditors
APIs do technically not have to be exposed on the Internet (only to the
administrators running taler-exchange-offline) and should be blocked
by the reverse proxy for requests originating from outside of the bank.
(However, this is not a strong security assumption: in principle having
these endpoints available should do no harm. However, it increases the
attack surface.)
Given proper packaging, all of the above are realized via a simple systemd target. This enables the various processes of an exchange service to be started using a simple command:
[root@exchange-online]# systemctl start taler-exchange.target
Note
At this point, the exchange service is not yet fully operational.
To check whether the exchange is running correctly under the advertised base URL, run:
[root@exchange-online]# export BASE_URL=$(taler-exchange-config -s exchange -o base_url)
[root@exchange-online]# wget ${BASE_URL}management/keys
The request might take some time to complete on slow machines, because a lot of key material will be generated.
1.8. Offline Signing Setup, Key Maintenance and Tear-Down#
The exchange HTTP service must be running before you can complete the following offline signing procedure. Note that when an exchange is running without offline keys its not fully operational. To make the exchange HTTP service fully operational, the following steps involving the offline signing machine must be completed:
The public keys of various online keys used by the exchange service are exported via a management HTTP API.
The offline signing system validates this request and signs it. Additionally, the offline signing system signs policy messages to configure the exchange’s bank accounts and associated fees.
The messages generated by the offline signing system are uploaded via the management API of the exchange HTTP service.
A typical minimal setup would look something like this:
[anybody@exchange-online]# taler-exchange-offline \
  download > sig-request.json

[root@exchange-offline]# taler-exchange-offline \
  sign < sig-request.json > sig-response.json
[root@exchange-offline]# taler-exchange-offline \
  enable-account payto://iban/$IBAN?receiver-name=$NAME > acct-response.json
[root@exchange-offline]# taler-exchange-offline \
  wire-fee now iban EUR:0 EUR:0 > fee-response.json
[root@exchange-offline]# taler-exchange-offline \
  global-fee now EUR:0 EUR:0 EUR:0 4weeks 6a 4 > global-response.json

[anybody@exchange-online]# taler-exchange-offline upload < sig-response.json
[anybody@exchange-online]# taler-exchange-offline upload < acct-response.json
[anybody@exchange-online]# taler-exchange-offline upload < fee-response.json
[anybody@exchange-online]# taler-exchange-offline upload < global-response.json
The following sections will discuss these steps in more depth.
1.8.1. Signing the online signing keys#
To sign the online signing keys, first the future key material should be downloaded using:
$ taler-exchange-offline download > future-keys.json
Afterwards, future-keys.json contains data about denomination and online signing keys that the exchange operator needs to sign with the offline tool. The file should be copied to the offline system. There, the operator should run:
$ taler-exchange-offline show < future-keys.json
and verify that the output contains the fee structure and key lifetimes they expect to see. They should also note the public keys being shown and communicate those to the auditors over a secure channel. Once they are convinced the file is acceptable, they should run:
$ taler-exchange-offline sign < future-keys.json > offline-sigs.json
The offline-sigs.json file must then be copied to an online system that is able to again communicate with the exchange. On that system, run:
$ taler-exchange-offline upload < offline-sigs.json
to provision the signatures to the exchange.
The download sign upload sequence in the commands above has to be done
periodically, as it signs the various online signing keys of the exchange
which periodically expire.
1.8.2. Account signing#
The enable-account step is important and must be used to sign the
payto:// URI in a way suitable to convince wallets that this is the
correct address to wire funds to. Note that for each bank account, additional
options must be set in the configuration file to tell the exchange how to
access the bank account. The offline tool only configures the externally
visible portions of the setup. The chapter on bank account configuration has further details.
taler-exchange-offline accepts additional options to configure the use of the account. For example, additional options can be used to add currency conversion or to restrict interactions to bank accounts from certain countries:
$ taler-exchange-offline \
    enable-account payto://iban/CH9300762011623852957
      conversion-url https://conversion.example.com/
For details on optional enable-account arguments,
see taler-exchange-offline(1).
1.8.3. Wire fee structure#
For each wire method (“iban” or “x-taler-bank”) the
exchange must know about applicable wire fees. This is also done
using the taler-exchange-offline tool:
$ taler-exchange-offline wire-fee 2040 iban EUR:0.05 EUR:0.10
The above sets the wire fees for wire transfers involving iban accounts
(in Euros) in the year 2040 to 5 cents (wire fee) and 10 cents (closing fee).
The tool only supports setting fees that apply for the entire calendar year.
We recommend provisioning an exchange with wire fees at least for the next two years. Note that once the fees have been set for a year, they cannot be changed (basically, by signing the fees the exchange makes a legally binding offer to the customers).
Note
Provisioning future wire fees, like provisioning future denomination and signing keys, are key regular maintenance procedures for every exchange operator. We recommend setting automated reminders for this maintenance activity!
1.8.4. Auditor configuration#
At this point, the exchange will be able to use those keys, but wallets and merchants may not yet trust them! Thus, the next step is for an auditor to affirm that they are auditing this exchange. Before an auditor can do this, the exchange service must be informed about any auditor that is expected to provision it with auditor signatures.
This is also done using the taler-exchange-offline tool on the offline
system. First, the auditor must be configured and provide the exchange
operator with its public key (using taler-auditor-offline setup) and the
URL of its REST API. The exchange operator also needs a human-readable name
that may be shown to users to identify the auditor. For more information on
how to setup and operate an auditor, see
taler-auditor-offline(1) and Auditor Operator Manual.
Given this information, the exchange operator can enable the auditor:
$ taler-exchange-offline enable-auditor $PUB_KEY $REST_URL "$AUDITOR_NAME" > auditor.json
As before, the auditor.json file must then be copied from the offline system
to a system connected to the exchange and there uploaded to the exchange using taler-exchange-offline upload.
1.8.5. Revocations#
When an exchange goes out of business or detects that the private key of
a denomination key pair has been compromised, it may revoke some or all
of its denomination keys. At this point, the hashes of the revoked keys
must be returned as part of the /keys response under “recoup”.
Wallets detect this, and then return unspent coins of the respective
denomination key using the /recoup API.
To revoke a denomination key, you need to know the hash of the denomination
public key, $HDP. The $HDP value is usually included in the security
report that is generated when a compromise is detected). Given this
value, the key revocation can be approved on the offline system:
$ taler-exchange-offline revoke-denominatin $HDP > revocation.json
The resulting revocation.json must be copied to a system connected to the
exchange and uploaded to the exchange using the upload subcommand
of taler-exchange-offline.
Note
Denomination key revocations should only happen under highly unusual (“emergency”) conditions and not in normal operation.
1.9. Setup Linting#
The taler-harness package comes with a tool that runs various
checks on the current GNU Taler exchange deployment:
[root@exchange-online]# apt install taler-harness
[root@exchange-online]# taler-harness deployment lint-exchange
You can optionally pass the --debug option to get more verbose output, and
--continue to continue with further checks even though a previous one has
failed.
1.10. Testing and Troubleshooting#
We recommend testing whether an exchange deployment is functional by using the Taler wallet command line interface. The tool can be used to withdraw and deposit electronic cash via the exchange without having to deploy and operate a separate merchant backend and storefront.
The following shell session illustrates how the wallet can be used to withdraw electronic cash from the exchange and subsequently spend it. For these steps, a merchant backend is not required, as the wallet acts as a merchant.
# This will now output a payto URI that money needs to be sent to in order to allow withdrawal
# of taler coins.
$ taler-wallet-cli advanced withdraw-manually --exchange $EXCHANGE_URL --amount EUR:10.50
Show the status of the manual withdrawal operation.
$ taler-wallet-cli transactions
At this point, a bank transfer to the exchange’s bank account needs to be made with the correct subject / remittance information as instructed by the wallet after the first step. With the above configuration, it should take about 5 minutes after the wire transfer for the incoming transfer to be observed by the Nexus.
Run the following command to check whether the exchange received an incoming bank transfer:
[root@exchange-online]# taler-exchange-wire-gateway-client \
   --section exchange-accountcredentials-1 --credit-history
Once the transfer has been made, try completing the withdrawal using:
$ taler-wallet-cli run-pending
Afterwards, check the status of transactions and show the current wallet balance:
$ taler-wallet-cli transactions
$ taler-wallet-cli balance
Now, we can directly deposit coins via the exchange into a target account. (Usually, a payment is made via a merchant. The wallet provides this functionality for testing.)
$ taler-wallet-cli deposit create EUR:5 \
  payto://iban/$IBAN?receiver-name=Name
$ taler-wallet-cli run-pending
Check if this transaction was successful (from the perspective of the wallet):
$ taler-wallet-cli transactions
If the transaction failed, fix any open issue(s) with the exchange and run the “run-pending” command.
The wallet can also track if the exchange wired the money to the merchant account. The “deposit group id” can be found in the output of the transactions list.
$ taler-wallet-cli deposit track $DEPOSIT_GROUP_ID
You can also check using the exchange-tools whether the exchange sent an outgoing transfer:
[root@exchange-online]# taler-exchange-wire-gateway-client \
  --section exchange-accountcredentials-1 --debit-history
After enough time has passed, the money should arrive at the specified IBAN.
For more information on the taler-wallet-cli tool, see taler-wallet-cli(1).
1.10.1. taler-exchange-config#
1.10.2. Using taler-*-config#
GNU Taler comes with various tools all called taler-$COMPONENT-config,
such as taler-exchange-config and taler-merchant-config. They
all behave the same way, but are accessing the default configurations
of the respective $COMPONENT. In this man page we will thus simply
refer to these tools as the $TALER_CONFIG tool.
The $TALER_CONFIG tool can be used to extract or manipulate configuration
values; however, the configuration use the well-known INI file format and is
generally better edited by hand to preserve comments and structure. Thus, $TALER_CONFIG should primarily be used
to inspect or understand a configuration that is in place,
and not to update it!
Run
$ $TALER_CONFIG -s $SECTION
to list all of the configuration values in section $SECTION.
Run
$ $TALER_CONFIG -s $SECTION -o $OPTION
to extract the respective configuration value for option $OPTION in
section $SECTION.
Finally, to change a setting and clobber your entire configuration file structure, inlining all values and removing all comments, run
$ $TALER_CONFIG -s $SECTION -o $OPTION -V $VALUE
to set the respective configuration value to $VALUE. Note that you
have to manually restart affected Taler components after you change the
configuration to make the new configuration go into effect.
Some default options will use $-variables, such as $DATADIR within
their value. To expand the $DATADIR or other $-variables in the
configuration, pass the -f option to $TALER_CONFIG. For example,
compare:
$ $TALER_CONFIG --section exchange-offline --option MASTER_PRIV_FILE
$ $TALER_CONFIG -f --section exchange-offline --option MASTER_PRIV_FILE
While the configuration file is typically located at
$HOME/.config/taler-$COMPONENT.conf,
an alternative location can be specified to any
GNU Taler component using the -c option.
1.10.3. Private key storage#
Keeping the private keys the helpers create secret is paramount. If the private keys are lost, it is easy to provision fresh keys (with the help of the auditor). Thus, we recommend that the private keys of the crypto helpers are not backed up: in the rare event of a disk failure, they can be regenerated. However, we do recommend using RAID (1+1 or 1+1+1) for all disks of the system.
1.10.4. Internal audits#
While an exchange should use an external auditor to attest to regulators that
it is operating correctly, an exchange operator can also use the auditor’s
logic to perform internal checks. For this, an exchange operator can generally
follow the auditor guide. However, instead of using taler-auditor-sync,
an internal audit can and likely should be performed either directly against
the production exchange database or against a synchronous copy created using
standard database replication techniques. After all, the exchange operator
runs this for diagnostics and can generally trust its own database to maintain
the database invariants.
Running the auditor against the original production database (without
using taler-auditor-sync) enables the auditing logic to perform a few
additional checks that can detect inconsistencies. These checks are enabled
by passing the -i option to the taler-auditor command. As always,
the resulting report should be read carefully to see if there are any problems
with the setup.
Reports are generally created incrementally, with taler-auditor reporting
only incidents and balance changes that were not covered in previous reports.
While it is possible to reset the auditor database and to restart the audit
from the very beginning, this is generally not recommended as this may be too
expensive.
1.10.5. Database Scheme#
The exchange database must be initialized using taler-exchange-dbinit.
This tool creates the tables required by the Taler exchange to operate.
The tool also allows you to reset the Taler exchange database, which is
useful for test cases but should never be used in production. Finally,
taler-exchange-dbinit has a function to garbage collect a database,
allowing administrators to purge records that are no longer required.
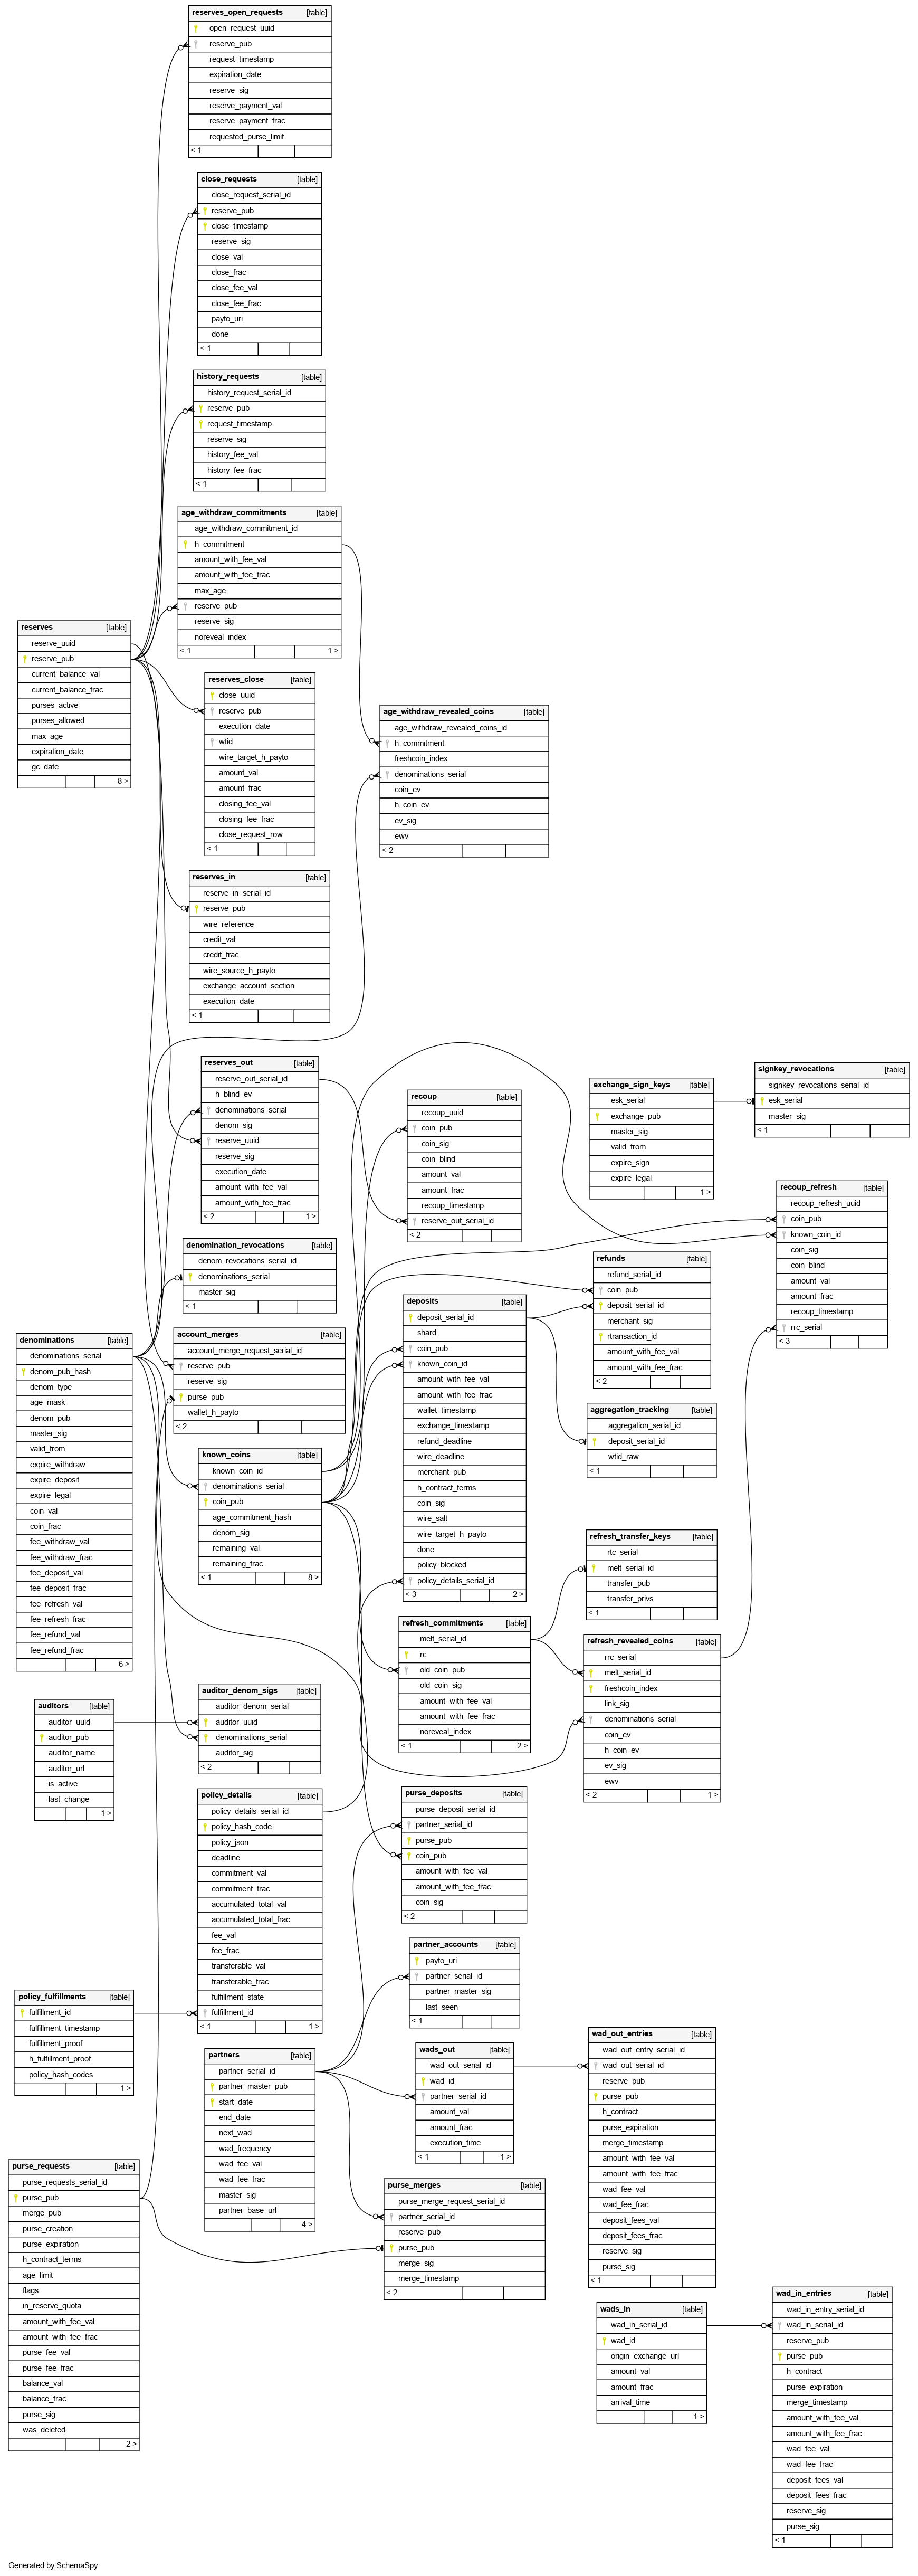
The database scheme used by the exchange looks as follows:
The jmeasures JSON in the legitimization_measures
table is of type LegitimizationMeasures:
interface LegitimizationMeasures {

  // Array of legitimization measures that
  // are to be applied.
  measures: MeasureInformation[];

  // True if the client is expected to eventually satisfy all requirements.
  // Default (if missing) is false.
  is_and_combinator?: boolean;

  // True if the requested operation is categorically forbidden.
  // The measures array will be empty in this case.
  verboten: boolean;
}
1.10.6. Database upgrades#
Before installing a new exchange version, you should probably make a backup of the existing database and study the release notes on migration. In general, the way to migrate is to stop all existing Taler exchange processes and run:
$ taler-exchange-dbinit
This will migrate the existing schema to the new schema. You also may need to grant Taler exchange processes the rights to the new tables (see last step of database setup).
Note
The taler-exchange-dbconfig tool can be used to automate the database migration. In general, simply invoking it again should trigger the migration including taler-exchange-dbinit and setting the permissions.
If you do not want to keep any data from the previous installation, the exchange database can be fully re-initialized using:
$ taler-exchange-dbinit --reset
However, running this command will result in all data in the database being lost, which may result in significant financial liabilities as the exchange can then not detect double-spending. Hence this operation must not be performed in a production system. You still also need to then grant the permissions to the other exchange processes again.
1.11. Benchmarking#
This chapter describes how to run various benchmarks against a Taler exchange. These benchmark can be used to measure the performance of the exchange by running a (possibly large) number of simulated clients against one Taler deployment with a bank, exchange and (optionally) auditor.
Real benchmarks that are intended to demonstrate the scalability of GNU Taler should not use the tools presented in this section: they may be suitable for microbenchmarking and tuning, but the setup is inherently not optimized for performance or realism, both for the load generation and the server side. Thus, we do not recommend using these performance numbers to assess the scalability of GNU Taler. That said, the tools can be useful to help identify performance issues.
The taler-unified-setup.sh script can be used to launch all required
services and clients. However, the resulting deployment is simplistic
(everything on the local machine, one single-threaded process per service
type) and not optimized for performance at all. However, this can still be
useful to assess the performance impact of changes
to the code or configuration.
The various configuration files used in the code snippets in this section can
be found in the src/benchmark/ directory of the exchange. These are
generally intended as starting points. Note that the configuration files
ending in .edited are created by taler-unified-setup.sh and contain
some options that are determined at runtime by the setup logic provided by
taler-unified-setup.sh.
1.11.1. Choosing a bank#
For the bank, both a fakebank (-f) and libeufin-based (-ns)
bank deployment are currently supported by all benchmark tools and
configuration templates.
Fakebank is an ultra-fast in-memory implementation of the Taler bank API. It
is suitable when the goal is to benchmark the core GNU Taler payment system
and to ignore the real-time gross settlement (RTGS) system typically provided
by an existing bank. When using the fakebank, taler-unified-setup.sh must
be started with the -f option and be told to use the right exchange bank
account from the configuration files via -u exchange-account-1.
$ dropdb talercheck; createdb talercheck
$ taler-unified-setup.sh -emwt -c $CONF -f -u exchange-account-1
libeufin is GNU Taler’s adapter to the core banking system using the EBICS
banking protocol standard. It uses a Postgres database to persist data and is
thus much slower than fakebank. If your GNU Taler deployment uses libeufin in
production, it likely makes sense to benchmark with libeufin. When using the
fakebank, taler-unified-setup.sh must be started with the -ns options
(starting libeufin-nexus and libeufin-bank) and be told to use the right
exchange bank account from the configuration files via -u
exchange-account-2. Note that taler-unified-setup.sh currently cannot
reset a libeufin database, and also will not run if the database is already
initialized. Thus, you must re-create the database every time before
running the command:
$ dropdb talercheck; createdb talercheck
$ taler-unified-setup.sh -emwt -c $CONF -ns -u exchange-account-2
1.11.2. taler-bank-benchmark#
This is the simplest benchmarking tool, simulating only the bank interaction.
$ CONF="benchmark-cs.conf"
$ # or with libeufin
$ dropdb talercheck; createdb talercheck
$ taler-unified-setup.sh -emwt -c "$CONF" -f -u exchange-account-1
$ # Once <<READY>>, in another shell (remember to set $CONF):
$ time taler-bank-benchmark -c "$CONF" -r 40 -p 4 -P4 -u exchange-account-1 -f
$ # or with libeufin
$ dropdb talercheck; createdb talercheck
$ taler-unified-setup.sh -emwt -c "$CONF" -ns -u exchange-account-2
$ # Once <<READY>>, in another shell (remember to set $CONF):
$ time taler-bank-benchmark -c "$CONF" -r 40 -p 1 -P1 -u exchange-account-2
For each parallel (-p) client, a number of reserves (-r) is first
established by transferring money from a “user” account (42) to the
Exchange’s account with the respective reserve public key as wire subject.
Processing is then handled by parallel (-P) service workers.
1.11.3. taler-exchange-benchmark#
This benchmarking tool simulates a number of clients withdrawing,
depositing and refreshing coins. Operations that are not covered by the
taler-exchange-benchmark tool today include closing reserves, refunds,
recoups and P2P payments.
$ CONF="benchmark-cs.conf" # -rsa also makes sense
$ # With fakebank
$ dropdb talercheck; createdb talercheck
$ taler-unified-setup.sh -aemwt -c "$CONF" -f -u exchange-account-1
$ # Once <<READY>>, in another shell (remember to set $CONF):
$ taler-exchange-benchmark -c "$CONF".edited -u exchange-account-1 -n 1 -p1 -r 5 -f
$ #
$ # With libeufin
$ dropdb talercheck; createdb talercheck
$ taler-unified-setup.sh -aemwt -c "$CONF" -ns -u exchange-account-2
$ # Once <<READY>>, in another shell (remember to set $CONF):
$ taler-exchange-benchmark -c "$CONF".edited -u exchange-account-2 -L WARNING -n 1 -p1 -r 5
For each parallel (-p) client, a number of reserves (-r) is first
established by transferring money from a “user” account (42) to the
Exchange’s account with the respective reserve public key as wire subject.
Next, the client will withdraw a number of coins (-n) from the
reserve and deposit them. Additionally, a fraction (-R) of the dirty
coins will then be subject to refreshing. For some deposits, the auditor
will receive deposit confirmations.
The output of taler-exchange-benchmark will include for each parallel
client the total time spent in each of the major operations, possible
repetitions (i.e. if the operation failed the first time), total execution
time (operating system and user space) and other details.
1.11.4. taler-aggregator-benchmark#
This is another simple benchmark tool that merely prepares an exchange
database to run a stand-alone benchmark of the taler-exchange-aggregator
tool. After preparing a database and running the tool, you can then
run one or more taler-exchange-aggregator processes and measure how
quickly they perform the aggregation work.
$ CONF=benchmark-rsa.conf
$ taler-exchange-dbinit -c "$CONF" --reset
$ ./taler-aggregator-benchmark -c "$CONF" -m 500 -r 10 -d 100
$ time taler-exchange-aggregator -c "$CONF" --test
This above commands will first create 100 deposits with 10 refunds into each
of 500 merchant accounts using randomized time stamps. Afterwards, it will
time a single aggregator process in --test mode (asking it to terminate
as soon as there is no more pending work).
1.12. FIXMEs#
We should have some summary with the inventory of services that should be running. Systemd by default doesn’t show this nicely. Maybe suggest running “systemd list-dependencies taler-exchange.target”?
What happens when the TWG doesn’t like one particular outgoing transaction? How to recover from that as a sysadmin when it happens in practice?