4. Merchant Backend Operator Manual#
4.1. Introduction#
4.1.1. About GNU Taler#
GNU Taler is an open protocol for an electronic payment system with a free software reference implementation. GNU Taler offers secure, fast and easy payment processing using well understood cryptographic techniques. GNU Taler allows customers to remain anonymous, while ensuring that merchants can be held accountable by governments. Hence, GNU Taler is compatible with anti-money-laundering (AML) and know-your-customer (KYC) regulation, as well as data protection regulation (such as GDPR).
4.1.2. About this manual#
This manual targets system administrators who want to install a GNU Taler merchant backend.
We expect some moderate familiarity with the compilation and installation of Free Software packages. An understanding of cryptography is not required.
4.1.3. Architecture overview#
Taler is a pure payment system, not a new crypto-currency. As such, it operates in a traditional banking context. In particular, this means that in order to receive funds via Taler, the merchant must have a regular bank account, and payments can be executed in ordinary currencies such as USD or EUR. Taler can also be used as a regional currency; for such scenarios, the Taler system also includes its own stand-alone bank.
The Taler software stack for a merchant consists of four main components:
A frontend which interacts with the customer’s browser. The frontend enables the customer to build a shopping cart and place an order. Upon payment, it triggers the respective business logic to satisfy the order. This component is not included with Taler, but rather assumed to exist at the merchant. The Merchant API Tutorial gives an introduction for how to integrate Taler with Web shop frontends.
A back-office application that enables the shop operators to view customer orders, match them to financial transfers, and possibly approve refunds if an order cannot be satisfied. This component is not included with Taler, but rather assumed to exist at the merchant. The Merchant Backend API provides the API specification that should be reviewed to integrate such a back-office with the Taler backend.
A Taler-specific payment backend which makes it easy for the frontend to process financial transactions with Taler. This manual primarily describes how to install and configure this backend.
A DBMS which stores the transaction history for the Taler backend. For now, the GNU Taler reference implementation only supports PostgreSQL, but the code could be easily extended to support another DBMS. Please review the PostgreSQL documentation for details on how to configure the database.
The following image illustrates the various interactions of these key components:
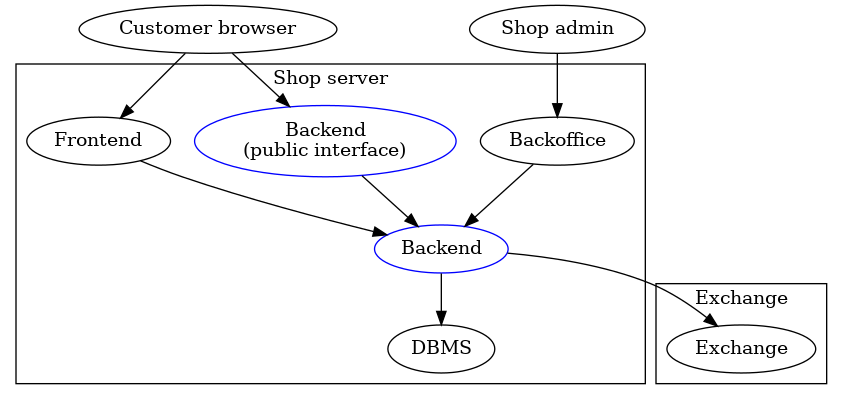
Basically, the backend provides the cryptographic protocol support, stores Taler-specific financial information in a DBMS and communicates with the GNU Taler exchange over the Internet. The frontend accesses the backend via a RESTful API. As a result, the frontend never has to directly communicate with the exchange, and also does not deal with sensitive data. In particular, the merchant’s signing keys and bank account information are encapsulated within the Taler merchant backend.
A typical deployment will additionally include a full-blown Web server (like
Apache or Nginx). Such a Web server would be responsible for TLS termination and
access control to the /private/ and /management/ API endpoints of the
merchant backend. Please carefully review the section on secure setup before deploying a Taler merchant backend into production.
4.2. Terminology#
This chapter describes some of the key concepts used throughout the manual.
4.2.1. Instances#
The backend allows a single HTTP server to support multiple independent shops
with distinct business entities sharing a single backend. An instance is
the name or identifier that allows the single HTTP server to determine which
shop a request is intended for. Each instance has its own base URL in the
REST API of the merchant backend (/instances/$INSTANCE/). Each instance
can use its own bank accounts and keys for signing contracts. All major
accounting functionality is separate per instance. Access to each instance is
controlled via a bearer token (to be set in the HTTP “Authorization” header).
All instances share the same database, top-level HTTP(S) address and the
main Taler configuration (especially the accepted currency and exchanges).
Note
This documentation does not use the term “user” or “username” in conjunction with instances as that might create confusion between instances with paying customers using the system. We also do not use the term “account” in conjunction with instances, as that might cause confusion with bank accounts. That said, conceptually it is of course acceptable to consider instances to be the “users” or “accounts” of a merchant backend and the bearer token is equivalent to a passphrase.
4.2.2. Instance Bank Accounts#
To receive payments, an instance must have configured one or more bank accounts. When configuring the bank account of an instance, one should ideally also provide the address and credentials of an HTTP service implementing the Taler Bank Revenue HTTP API. Given such a service, the GNU Taler merchant backend can automatically reconcile wire transfers from the exchange to the merchant’s bank account with the orders that are being settled.
This documentation exclusively uses the term account for the bank accounts of a merchant or shop that may be associated with an instance.
Note
When an instance has more than one bank account configured, there is
no notion of a “default” or “primary” account: any of the configured
accounts may receive the funds for a given transaction, and which one is
used is not predictable from the merchant UI. The account is chosen
per transaction based on what the settling exchange supports — i.e. the
wire method and account restrictions of that exchange. For example, if an
instance offers both a CH-IBAN and a DE-IBAN account, one exchange may
settle to the CH account while another settles to the DE account; adding an
x-taler-bank account introduces yet another possibility. If you need
funds to arrive in a specific account, configure only that account.
4.2.3. Inventory#
The Taler backend offers inventory management as an optional function. Inventory is tracked per instance and consists of products sold in units. Inventory can be finite (physical stock) or infinite (for digital products). Products may include previews (images) to be shown to the user as well as other meta-data. Inventory management allows the frontend to lock products, reserving a number of units from stock for a particular (unpaid) order. The backend can keep track of how many units of a product remain in stock and ensure that the number of units sold does not exceed the number of units in stock.
Inventory management is optional, and it is possible for the frontend to include products in orders that are not in the inventory. The frontend can also override prices of products in the inventory or set a total price for an order that is different from the price of the sum of the products in the order.
4.2.4. Orders and Contracts#
In Taler, users pay merchants for orders. An order is first created by the merchant. To create an order, the merchant must specify the specific terms of the order. Order terms include details such as the total amount to be paid, payment fees the merchant is willing to cover, the set of products to deliver, a delivery location and many other details. The merchant API specification specifies the full set of possible order terms.
After an order is created, it is claimed by a wallet. Once an order is claimed by a specific wallet, only that wallet will be able to pay for this order, to the exclusion of other wallets even if they see the same order URL. Sharing order URLs is explicitly allowed: if a user shares an order URL with another user, that other user should be given the opportunity to purchase the same product.
To prevent unauthorized wallets from claiming an order, merchants can specify that claims require authorization in the form of a claim token. This is useful in case the order ID is predictable (say because an existing order ID scheme with predictable order IDs from the merchant frontend is used) and at the same time malicious actors claiming orders is problematic (say because of limited stocks). The use of claim tokens is optional, but if a claim token is used, it must be provided to the wallet as part of the order URI.
Additionally, when stocks are limited, you can configure Taler to set a product lock on items (say, while composing the shopping cart). These locks will ensure that the limited stock is respected when making offers to consumers.
A wallet may pay for a claimed order, at which point the order turns into a
(paid) contract. Orders have a configurable expiration date (the
pay_deadline) after which the commercial offer expires and any stock of
products locked by the order will be automatically released, allowing the
stock to be sold in other orders. When an unpaid order expires, the customer
must request a fresh order if they still want to make a purchase.
Once a contract has been paid, the merchant should fulfill the contract. It is possible for the merchant to refund a contract order, for example if the contract cannot be fulfilled after all. Refunds are only possible after the customer paid and before the exchange has wired the payment to the merchant. Once the funds have been wired, refunds are no longer allowed by the Taler exchange. The wire deadline specifies the latest point in time by which an exchange must wire the funds, while the (earlier) refund deadline specifies the earliest point in time when an exchange may wire the funds. Thus, refunds are always possible between the time of purchase and the refund deadline, but may remain possible until the wire deadline.
Contract information is kept for legal reasons in the merchant database. The
main legal reason is typically to provide tax records in case of a tax audit.
After the legal expiration (by default: a decade), contract information is
deleted when running the garbage collector using taler-merchant-dbinit.
4.2.5. Templates#
Usually, a merchant must use an authenticated endpoint to create an order and then share the link to the order with a wallet. Templates are a mechanism that allows wallets to create their own orders directly, using a public endpoint. The template fixes some properties of the contracts created from it, while other details may be left for the customer to provide. Templates are useful in cases where the point-of-sale of a merchant is offline (and thus cannot setup an order), or even in cases where a simple static QR code is desired to accept payments or donations.
When generating a template, the “summary” text of the contract and the “amount” to be paid by the customer can be fixed or left for the customer to specify. If the customer is expected to provide either or both of these values, the template link (or QR code) can specify a default value. For example, a cafeteria with a fixed price lunch may use a “lunch” template with both values fixed to the lunch price and the “lunch” product, a bakery might fix the summary to “baked goods” but allow the customer to enter the amount based on the total price of the items being bought, and a charity may allow donating an arbitrary amount and summary message while also suggesting default values.
If an offline merchant wants to confirm that a customer did actually pay the agreed amount using an order derived from a template, they can associate an OTP device with the template.
4.2.6. OTP Devices#
A One-Time-Password (OTP) generator is a device or application that generates a 4 to 8 digit code typically used for authentication. The widely used TOTP standard is described in RFC 6238. For GNU Taler merchant backends, OTP devices are used as a way to assure a merchant without network connectivity that a customer made a digital payment. The idea is described in depth in our SUERF Policy Brief. To use this method, a merchant must configure the OTP device’s shared secret in the merchant backend, and then associate the OTP device with a Templates. Once the customer has paid, they are given a list of OTP codes which must be shown to the merchant who can check that at least one of the codes matches their OTP device, proving that the customer made the payment.
4.2.7. Transfers#
The Taler backend can be used to verify that the exchange correctly wired all of the funds to the merchant. However, if no Taler Bank Revenue HTTP API was provided for the respective bank account, the backend does not have access to the incoming wire transfers of the merchant’s bank account. In this case, merchants should manually provide the backend with wire transfer data that specifies the wire transfer subject and the amount that was received. Given this information, the backend can detect and report any irregularities that might arise.
4.2.8. Webhooks#
A webhook is a pre-defined HTTP request that the GNU Taler merchant backend will make upon certain events, such as an order being paid or refunded. When the configured event happens, the merchant backend will make an HTTP request to the endpoint configured in the webhook configuration, possibly sending selected data about the event to the respective Web service. Webhooks can be used to trigger additional business logic outside of the GNU Taler merchant backend.
4.3. Installation#
This chapter describes how to install the GNU Taler merchant backend.
4.3.1. Installing the GNU Taler binary packages on Debian#
To install the GNU Taler Debian packages, first ensure that you have the right Debian distribution. At this time, the packages are built for Debian trixie.
You need to add a file to import the GNU Taler packages. Typically,
this is done by adding a file /etc/apt/sources.list.d/taler.list that
looks like this:
deb [signed-by=/etc/apt/keyrings/taler-systems.gpg] https://deb.taler.net/apt/debian trixie main
Next, you must import the Taler Systems SA public package signing key into your keyring and update the package lists:
# wget -O /etc/apt/keyrings/taler-systems.gpg \
    https://taler.net/taler-systems.gpg
# apt update
Note
You may want to verify the correctness of the Taler Systems SA key out-of-band.
Now your system is ready to install the official GNU Taler binary packages using apt.
To install the Taler merchant backend, you can now simply run:
# apt install taler-merchant
Note that the package does not complete the integration of the backend with
the HTTP reverse proxy (typically with TLS certificates). A configuration
fragment for Nginx or Apache will be placed in
/etc/{apache,nginx}/conf-available/taler-merchant.conf. You must
furthermore still configure the database and the instances, and may need to
extend the fragment with access control restrictions for non-default
instances. For automated deployments, you can also use
the taler-merchant-rproxy-setup helper script—see
automated reverse proxy configuration.
4.3.2. Installing the GNU Taler binary packages on Ubuntu#
To install the GNU Taler Ubuntu packages, first ensure that you have
the right Ubuntu distribution. At this time, the packages are built for
Ubuntu Lunar and Ubuntu Jammy. Make sure to have universe in your
/etc/apt/sources.list.d/ubuntu.sources (after main)
as we depend on some packages from Ubuntu universe.
A typical /etc/apt/sources.list.d/taler.list file for this setup
would look like this for Ubuntu Noble:
deb [signed-by=/etc/apt/keyrings/taler-systems.gpg] https://deb.taler.net/apt/ubuntu/ noble main
Next, you must import the Taler Systems SA public package signing key into your keyring and update the package lists:
# wget -O /etc/apt/keyrings/taler-systems.gpg \
    https://taler.net/taler-systems.gpg
# apt update
Note
You may want to verify the correctness of the Taler Systems key out-of-band.
Now your system is ready to install the official GNU Taler binary packages using apt.
To install the Taler merchant backend, you can now simply run:
# apt install taler-merchant
Note that the package does not complete the integration of the backend with
the HTTP reverse proxy (typically with TLS certificates). A configuration
fragment for Nginx or Apache will be placed in
/etc/{apache,nginx}/conf-available/taler-merchant.conf. You must
furthermore still configure the database and the instances, and may need to
extend the fragment with access control restrictions for non-default
instances. For automated deployments, you can also use
the taler-merchant-rproxy-setup helper script—see
automated reverse proxy configuration.
4.3.3. Installing from source#
The following instructions will show how to install a GNU Taler merchant backend from source.
The package sources can be found in our download directory.
GNU Taler components version numbers follow the MAJOR.MINOR.MICRO format.
The general rule for compatibility is that MAJOR and MINOR must match.
Exceptions to this general rule are documented in the release notes.
For example, Taler merchant 1.3.0 should be compatible with Taler exchange 1.4.x
as the MAJOR version matches. A MAJOR version of 0 indicates experimental
development, and you are expected to always run all of the latest releases
together (no compatibility guarantees).
First, the following packages need to be installed before we can compile the backend:
“Sphinx RTD Theme” Python package aka
python3-sphinx-rtd-themeon Debian-based systems (for GNUnet documentation support, can be omitted if GNUnet is configured with--disable-documentation)libsqlite3 >= 3.16.2
GNU libunistring >= 0.9.3
libcurl >= 7.26 (or libgnurl >= 7.26)
libqrencode >= 4.0.0 (Taler merchant only)
GNU libgcrypt >= 1.6 (1.10 or later highly recommended)
libsodium >= 1.0
libargon2 >= 20171227
libjansson >= 2.7
PostgreSQL >= 15, including libpq
GNU libmicrohttpd >= 0.9.71
GNUnet >= 0.25.2 (from source tarball)
Python3 with
jinja2
If you are on Debian stable or later, the following command may help you install these dependencies:
# apt-get install \
  libqrencode-dev \
  libsqlite3-dev \
  libltdl-dev \
  libunistring-dev \
  libsodium-dev \
  libargon2-dev \
  libcurl4-gnutls-dev \
  libgcrypt20-dev \
  libjansson-dev \
  libpq-dev \
  libmicrohttpd-dev \
  python3-jinja2 \
  postgresql-15
Before you install GNUnet, you must download and install the dependencies mentioned in the previous section, otherwise the build may succeed, but could fail to export some of the tooling required by GNU Taler.
On Ubuntu, you also need to install pkg-config, for example:
$ apt-get install pkg-config
To install GNUnet, unpack the tarball and change into the resulting directory, then proceed as follows:
$ ./configure [--prefix=GNUNETPFX]
$ # Each dependency can be fetched from non standard locations via
$ # the '--with-<LIBNAME>' option. See './configure --help'.
$ make
# make install
# ldconfig
If you did not specify a prefix, GNUnet will install to /usr/local,
which requires you to run the last step as root.
The ldconfig command (also run as root) makes the
shared object libraries (.so files)
visible to the various installed programs.
Please note that unlike most packages, if you want to run the make check
command, you should run it only after having done make install. The
latter ensures that necessary binaries are copied to the right place.
In any case, if make check fails, please consider filing a
bug report with the Taler bug tracker.
There is no need to actually run a GNUnet peer to use the Taler merchant backend – all the merchant needs from GNUnet is a number of headers and libraries!
After installing GNUnet, unpack the GNU Taler exchange tarball, change into the resulting directory, and proceed as follows:
$ ./configure [--prefix=EXCHANGEPFX] \
              [--with-gnunet=GNUNETPFX]
$ # Each dependency can be fetched from non standard locations via
$ # the '--with-<LIBNAME>' option. See './configure --help'.
$ make
# make install
If you did not specify a prefix, the exchange will install to /usr/local,
which requires you to run the last step as root. You have to specify
--with-gnunet=/usr/local if you installed GNUnet to /usr/local in the
previous step.
There is no need to actually run a Taler exchange to use the Taler merchant backend – all the merchant needs from the Taler exchange is a few headers and libraries!
Note
There is an additional optional dependency that you could install to obtain support for tax-deductible donations. This is only useful for charities and only in countries with tax authorities that operate a Donau to register charities and accept Taler-style digitally signed donation statements. As of right now, we are pretty sure that list is right now empty. But, if you want to experiment with Taler-style donation statements, you need to install Donau after the exchange and before the merchant.
Please note that unlike most packages, if you want to run the make check
command, you should run it only after having done make install. The
latter ensures that necessary binaries are copied to the right place.
In any case, if make check fails, please consider filing a
bug report with the Taler bug tracker.
The following steps assume all dependencies are installed.
First, unpack the GNU Taler merchant tarball and change into the resulting directory. Then, use the following commands to build and install the merchant backend:
$ ./configure [--prefix=PFX] \
              [--with-gnunet=GNUNETPFX] \
              [--with-exchange=EXCHANGEPFX]
$ # Each dependency can be fetched from non standard locations via
$ # the '--with-<LIBNAME>' option. See './configure --help'.
$ make
# make install
If you did not specify a prefix, the exchange will install to
/usr/local, which requires you to run the last step as root.
You have to specify --with-exchange=/usr/local and/or
--with-gnunet=/usr/local if you installed the exchange and/or
GNUnet to /usr/local in the previous steps.
Depending on the prefixes you specified for the installation and the
distribution you are using, you may have to edit /etc/ld.so.conf, adding
lines for GNUNETPFX/lib/ and EXCHANGEPFX/lib/ and PFX/lib/
(replace the prefixes with the actual paths you used). Afterwards, you should
run ldconfig. Without this step, it is possible that the linker may not
find the installed libraries and launching the Taler merchant backend would
then fail.
Please note that unlike most packages, if you want to run the make check
command, you should run it only after having done make install. The
latter ensures that necessary binaries are copied to the right place.
In any case, if make check fails, please consider filing a
bug report with the Taler bug tracker.
4.4. How to configure the merchant backend#
The installation already provides reasonable defaults for most of the
configuration options. However, some must be provided, in particular the
database that the backend should use. By default, the file
$HOME/.config/taler-merchant.conf is where the Web shop administrator specifies
configuration values that augment or override the defaults.
Note that when using our binary packages, the systemd service files
force the use of /etc/taler-merchant/taler-merchant.conf as the main configuration file.
4.4.1. Configuration format#
All GNU Taler components are designed to possibly share the same configuration files. When installing a GNU Taler component, the installation deploys default values in configuration files located at ${prefix}/share/taler/config.d/ where ${prefix} is the installation prefix. Different components must be installed to the same prefix.
In order to override these defaults, the user can write a custom configuration
file and either pass it to the component at execution time using the -c
option, or name it taler.conf and place it under $HOME/.config/ which is where
components will look by default. Note that the systemd service files pass -c
/etc/taler/taler.conf, thus making /etc/taler/taler.conf
the primary location for the configuration.
A config file is a text file containing sections, and each section contains maps options to their values. Configuration files follow basically the INI syntax:
[section1]
value1 = string
value2 = 23

[section2]
value21 = string
value22 = /path22
Comments start with a hash (#). Throughout the configuration, it is
possible to use $-substitution for options relating to names of files or
directories. It is also possible to provide defaults values for those
variables that are unset, by using the following syntax:
${VAR:-default}. There are two ways a user can set the value
of $-prefixable variables:
by defining them under a
[paths]section:[paths] TALER_DEPLOYMENT_SHARED = ${HOME}/shared-data .. [section-x] path-x = ${TALER_DEPLOYMENT_SHARED}/x
or by setting them in the environment:
$ export VAR=/x
The configuration loader will give precedence to variables set under
[path] over environment variables.
The utility taler-config, which gets installed along with the exchange,
can be used get and set configuration values without directly editing the
configuration file. The option -f is particularly useful to resolve
pathnames, when they use several levels of $-expanded variables. See
taler-config --help.
The repository git://git.taler.net/deployment contains example code
for generating configuration files under deployment/netzbon/.
4.4.2. Backend options#
The following table describes the options that commonly need to be
modified. Here, the notation [$SECTION]/$OPTION denotes the option
$OPTION under the section [$SECTION] in the configuration file.
4.4.2.1. Service address#
The service address specifies where the taler-merchant-httpd should listen for requests. When using the Debian/Ubuntu packages, these options will already be configured correctly for the included Nginx and Apache configurations and will not need any changes.
The following option sets the transport protocol used by the merchant backend:
[MERCHANT]
SERVE = unix # or tcp
If this option is set to
tcpthen we need to set the TCP port in[MERCHANT]/PORT;unixthen we need to set the unix domain socket path and mode in[MERCHANT]/UNIXPATHand[MERCHANT]/UNIXPATH_MODE. The latter takes the usual permission mask given as a number, e.g. 660 for user/group read-write access.
The frontend can then connect to the backend over HTTP using the specified address. If frontend and backend run within the same operating system, the use of a UNIX domain socket is recommended to avoid accidentally exposing the backend to the network.
To run the Taler backend on TCP port 9966 (the default), use:
[MERCHANT]
SERVE = tcp
PORT = 9966
Note
If you need to change where the taler-merchant-httpd listens for requests,
you should edit /etc/taler-merchant/merchant-overrides.conf. By default, the
Taler merchant package will use a UNIX domain socket at
/run/taler-merchant/merchant-httpd/merchant-http.sock. For the best possible
security it is recommended to leave this in place and configure a reverse
proxy (Nginx or Apache) as described below.
When using the Debian/Ubuntu packages, the use of a UNIX domain socket
is already pre-configured in the /etc/taler-merchant/conf.d/merchant.conf
configuration file. Suitable reverse proxy configuration
file templates (taler-merchant) are be installed in the
respective sites-available directories of Apache and Nginx.
4.4.2.2. Currency#
Which currency the SPA uses by default is specified using the option:
[MERCHANT]
CURRENCY = EUR # or USD, ...
When testing with the Taler demonstration exchange at
https://exchange.demo.taler.net/ you probably want to set this
value to KUDOS:
[MERCHANT]
CURRENCY = KUDOS
The merchant backend is already multi-currency capable, and will allow you to create orders in all currencies for which an exchange is configured, not just the default currency. However, the Web interface does not yet offer multi-currency support and often only supports using the default currency.
Note
When using the Debian/Ubuntu packages, these options should be
configured in the /etc/taler-merchant/taler-merchant.conf configuration file
(alternatively, you can also edit /etc/taler-merchant/merchant-overrides.conf).
However, you must edit the taler-merchant.conf file manually and must not
use taler-merchant-config to do this, as that would inline the include
directives and destroy the carefully setup path structure.
4.4.2.3. Database#
In principle it is possible for the backend to support different DBMSs. The option
[MERCHANT]
DB = postgres
specifies which DBMS is to be used. However, currently only the value
postgres is supported. This is also the default.
In addition to selecting the DBMS software, the backend requires DBMS-specific options to access the database.
Note
The taler-merchant-dbconfig tool can be used to automate the database setup. When using the Debian/Ubuntu packages, the user should already have been created, so you can just run the tool without any arguments and should have a working database configuration.
Please make sure you did not create a taler merchant database manually before running this command or it will fail with SQL errors.
For the postgres backend, you need to specify:
[merchantdb-postgres]
CONFIG = "postgres:///taler-merchant"
This option specifies a PostgreSQL access path, typically using the format
postgres:///$DBNAME, where $DBNAME is the name of the PostgreSQL
database you want to use (here, taler-merchant on the local machine).
Suppose $USER is the name of the user who will run the backend process
(usually taler-merchant-httpd). Then, you need to first run:
$ sudo -u postgres createuser -d $USER
as the PostgreSQL database administrator (usually postgres) to
grant $USER the ability to create new databases. Next, you should
as $USER run:
$ createdb $DBNAME
to create the backend’s database. Here, $DBNAME must match the
database name given in the configuration file.
Now you should be able to create the tables and indices. To do this, run as
$USER (usually taler-merchant-httpd):
$ taler-merchant-dbinit
You may improve your security posture if you now REVOKE the rights to CREATE,
DROP or ALTER tables from $USER. However, if you do so, please be aware
that you may have to temporarily GRANT those rights again when you update the
merchant backend. For details on how to REVOKE or GRANT these rights, consult
the PostgreSQL documentation.
Note
Taler may store sensitive business and customer data in the database. Any operator SHOULD thus ensure that backup operations are encrypted and secured from unauthorized access.
4.4.2.4. Exchange#
To add an exchange to the list of trusted payment service providers, you create a section with a name that starts with “MERCHANT-EXCHANGE-”. In that section, the following options need to be configured:
The
EXCHANGE_BASE_URLoption specifies the exchange’s base URL. For example, to use the Taler demonstrator, specify:[merchant-exchange-kudos] EXCHANGE_BASE_URL = "https://exchange.demo.taler.net/"
The KUDOS demo exchange and others are usually enabled by default in the distribution so you can easily test your backend. If you want to disable KUDOS, for example because you only want to support CHF or EUR, do not delete the “kudos.conf”, but instead disable it explicitly in your main taler-merchant.conf configuration file using:
[merchant-exchange-kudos]
DISABLED = YES
This is also the preferred way to disable any other exchange that may be enabled by default. You can get a list of all of these exchange configuration sections using
taler-merchant-config -S | grep merchant-exchange-.The
MASTER_KEYoption specifies the exchange’s master public key in base32 encoding. For the Taler demonstrator, use:[merchant-exchange-kudos] MASTER_KEY = "GNRJCH0HYKN59939JC0CJ2JDC7ZNEBSATJFF00CVS3WPG4TQEA7G"
You can find out this key by running
curl https://exchange.demo.taler.net/keys | jq .master_public_key.
The
CURRENCYoption specifies the exchange’s currency. For the Taler demonstrator, use:[merchant-exchange-kudos] CURRENCY = "KUDOS"
Note that multiple exchanges can be added to the system by using different
identifiers in place of KUDOS in the example above. One exchange will only
ever support a single currency; thus, if you need support for multiple
currencies, you must add multiple exchanges.
The merchant already ships with a default configuration that contains the
merchant-exchange-kudos section from above.
Note
Manually setting up exchanges is only recommended under special circumstances. In general, GNU Taler distributions will include trustworthy exchanges (for each currency) in the default configuration, and there is rarely a good reason for trusting an exchange that has no relationship with the GNU Taler development team.
4.4.3. Sample backend configuration#
The following is an example for a complete backend configuration:
[merchant]
# Default currency; note that multi-currency support is still
# a bit experimental...
CURRENCY = KUDOS
SERVE = TCP
PORT = 9966
DATABASE = postgres

[merchantdb-postgres]
CONFIG = postgres:///taler-merchant

[merchant-exchange-kudos]
EXCHANGE_BASE_URL = https://exchange.demo.taler.net/
MASTER_KEY = FH1Y8ZMHCTPQ0YFSZECDH8C9407JR3YN0MF1706PTG24Q4NEWGV0
CURRENCY = KUDOS
Given the above configuration, the backend will use a PostgreSQL database
named donations running on the same host.
The backend will deposit the coins it receives to the exchange at
https://exchange.demo.taler.net/, which has the master key
FH1Y8ZMHCTPQ0YFSZECDH8C9407JR3YN0MF1706PTG24Q4NEWGV0.
4.4.4. Launching the backend#
Assuming you have configured everything correctly, you can launch the
merchant backend as $USER using (to provide a trivial example):
$ taler-merchant-httpd &
$ taler-merchant-webhook &
$ taler-merchant-kyccheck &
$ taler-merchant-wirewatch &
$ taler-merchant-depositcheck &
$ taler-merchant-exchangekeyupdate &
$ taler-merchant-reconciliation &
Note
If you compiled the merchant backend with support for donation
statements via Donau, you need to additionally launch
taler-merchant-donaukeyupdate.
To ensure these processes run always in the background and also after rebooting, you should use systemd, cron or some other init system of your operating system to launch the process. You should also periodically re-start these services to prevent them from exhausting the memory utilization of the PostgreSQL database. Consult the documentation of your operating system for how to start and stop daemons.
Note
When using the Debian/Ubuntu packages, the systemd configuration
will already exist. You only need to enable and start the service
using systemctl enable taler-merchant.target and
systemctl start taler-merchant.target. Additionally, you should
review the /etc/apache2/sites-available/taler-merchant.conf
or /etc/nginx/sites-available/taler-merchant (these files
contain additional instructions to follow), symlink it to
sites-enabled/ and restart your HTTP server. After that, you
should be able to visit the merchant backend at the respective
HTTP(S) endpoint.
If everything worked as expected, the command
$ wget -O - http://localhost:9966/config
should return some basic configuration status data about the service.
Please note that your backend might then be globally reachable without any access control. You can either:
Use the
--auth=$TOKENcommand-line option to taler-merchant-httpd to set an access token to be provided in anAuthorize: Bearer $TOKENHTTP header. Note that this can be used at anytime to override access control, but remains only in effect until a first instance is created or an existing instance authentication setting is modified.Set the
TALER_MERCHANT_TOKENenvironment variable to$TOKENfor the same effect. This method has the advantage of$TOKENnot being visible as a command-line interface to other local users on the same machine.Set up an instance with an authentication token before some unauthorized person has a chance to access the backend. As the backend is useless without any instance and the chances of remote attackers during the initial configuration is low, this is probably sufficient for most use-cases. Still, keep the first two scenarios in mind in case you ever forget your access token!
Production systems should additionally be configured to bind to a UNIX domain socket and use TLS for improved network privacy, see Secure setup.
4.4.4.1. Multi-factor authentication#
The merchant backend supports multi-factor authentication for critical endpoints, including issuing access token, changing login credentials, modifying the bank account and deleting the instance. To use multi-factor authentication, the merchant backend must be configured with helper programs that can be used to send e-mails or SMS messages.
[MERCHANT]
HELPER_SMS = sms_helper.sh
HELPER_EMAIL = email_helper.sh
These scripts will be called by the merchant backend with the first argument being the phone number or the e-mail address, and with the message with the TAN code to send to the user on standard input. The shell scripts must exit with a status code of 0 on success. A trivial e-mail helper would look like this:
#!/bin/sh
exec mail --subject="TAN code for the Taler merchant backend" "$1"
Here, mail refers to the classic UNIX mail command.
Example scripts can also be found in the GNU Anastasis Git.
4.4.4.2. Self-provisioning#
Self-provisioning allows anyone to create a merchant instance. This is useful if a merchant backend is offered as a public service. In this case, you should set:
[MERCHANT]
ENABLE_SELF_PROVISIONING = YES
To enable self-provisioned users to reset their passwords if they forgot them, the merchant backend requires two other authentication methods to be available and validated when the instance is self-provisioned. This can be enabled using:
[MERCHANT]
MANDATORY_TAN_CHANNELS = sms email
With this setting, users that self-provision an instance must first demonstrate control over the e-mail address and phone number provided, and can thus later reset their password without needing support from the administrator.
4.5. Instance setup#
We recommend the use of the single-page administration application (SPA) that
is served by default at the base URL of the merchant backend. You can use it
to perform all steps described in this section (and more!), using a simple Web
interface. Alternatively, you can also use the wget commands given below.
Regardless of which approach you use, the first step for using the backend
involves the creation of the admin instance. The admin instance can
also create, configure or delete other instances, similar to the root
account on UNIX. When no instance exists, then the backend is reachable
without any access control (unless you configured some in the reverse proxy).
Note
If you created a non-admin instance first, you cannot create an admin
instance via the SPA anymore. In this case, you can only create an
administrative account by using the command-line. By invoking
taler-merchant-passwd --instance=admin $PASSWORD you can set both the
password and create an admin instance if it does not yet exist.
However, for non-admin instances, you can only set the password with this tool.
The following documentation shows how to handle any instance. Thus, if you want to have multiple instances, you may need to perform the steps multiple times, once for each instance.
Note
A potential security concern is that normal API usage leaks instance existence. This means unauthorized users can distinguish between the case where the instance does not exist (HTTP 404) and the case where access is denied (HTTP 403). This concern can be addressed using a properly configured reverse proxy.
4.5.1. Instance setup with the SPA#
In order to setup an instance, you need the merchant backend to already be
running, and you must either have the credentials for the admin instance,
or no instance must be configured at all yet.
To start, point your browser to $PROTO://backend.$DOMAIN_NAME/, replacing
“$PROTO” with “https” or (rarely) “http” and “$DOMAIN_NAME” with your
organization’s DNS domain or subdomain.
Note
The label “backend” here is also just a suggestion, your administrator can in principle choose any name.
You should be welcomed by the following merchant backoffice page:
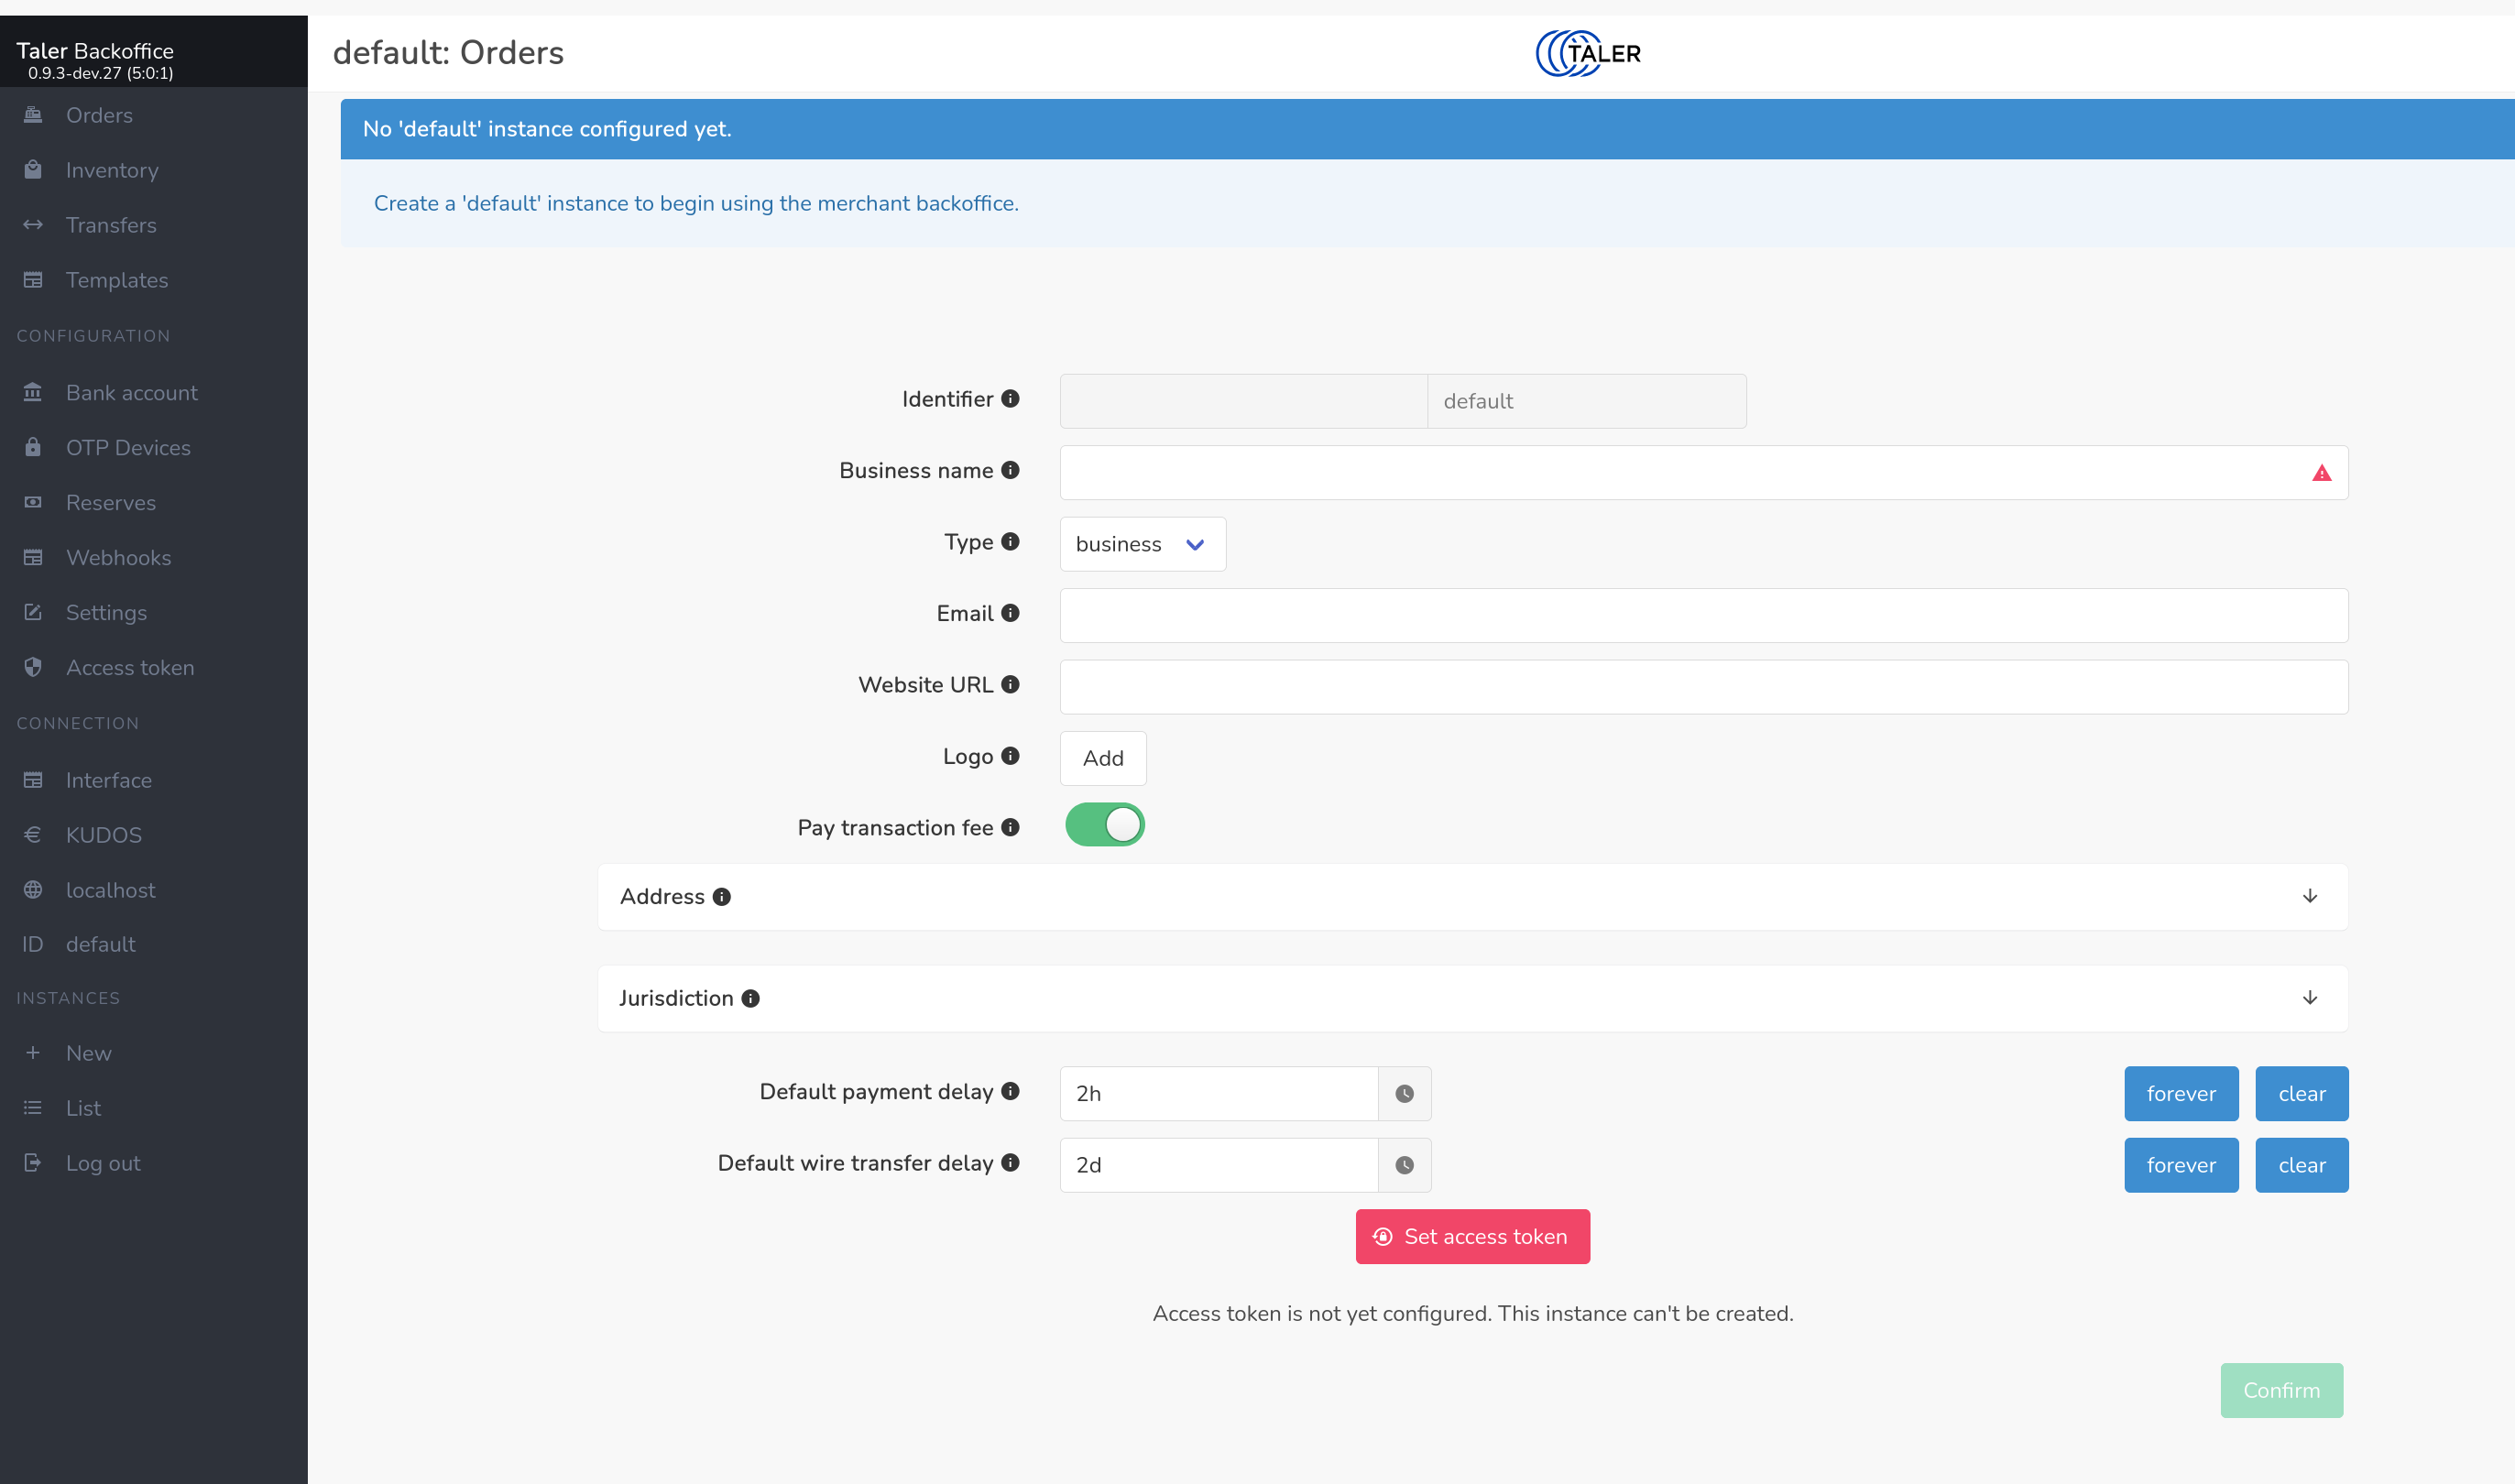
After supplying the required fields, primarily the name of your organization
and the desired access token, click confirm. You can change the instance
settings later via the Settings entry in the menu on the left.
4.5.2. Instance settings#
The settings dialog allows you to select an image to be used as a logo for your shop. Wallets may use that logo when showing contracts to highlight to customers which shop they are buying from.
The settings dialog allows you to specify the address of your business and the jurisdiction the shop is under. Both will be embedded into the contracts and may be shown by the Taler wallet to customers that want to know these details.
You must also configure whether you intend to pay transaction fees, or whether the customer is required to pay for any payment fees. If you do not cover the fees, the fees will be shown separately to the customer and added to the total of each order, which may discourage consumers from using the Taler payment method. The specific magnitude of the fees cannot be configured here, as it depends on the amount of the order and is dynamically computed. Regardless of what you specify here, the front-end can override the acceptable fee amount for each order it creates.
Note
Details on the acceptable fee calculation are described in the Taler design document 47.
Finally, you need to specify several settings relating to default deadlines.
(1) The “Default payment delay” specifies when an offer expires. The customer basically has this amount of time to pay, or the backend will refuse the payment and require the customer to get a new quote.
(2) The “Default refund delay” specifies how long the customer may receive refunds. The refund period is cumulative on top of the “Default payment delay”. Thus, the refund period ends independently of when the customer actually paid for the order. The exchange will not wire the funds to the merchant before the refund deadline lapses, as after the funds have been wired refunds using Taler are no longer possible.
(3) The “Default wire transfer delay” specifies how soon the exchange must wire the funds after the refund deadline. The delay is again cumulative on top of the “Default payment delay” and the “Default refund delay”. However, the resulting time is still not the actual wire deadline, as first the “Default wire rounding interval” is also considered.
(4) The “Default wire rounding interval” specifies to what period the wire deadline should be rounded up to. The ultimate wire deadline is computed by adding the default payment, rounding and wire delays to the current time and rounding the resulting timestamp to the “Default wire rounding interval”. Typical values include end-of-day, end-of-week, end-of-month, end-of-quarter or end-of-year.
Note
The wire deadline is rounded using the local timezone of the Taler merchant backend server, so if you want end-of-day payments make sure to run your merchant backend in your own timezone.
Specifying larger values for the wire transfer delay and the wire rounding interval allows the exchange to aggregate more payments into larger wire transfers. The exchange is required by the protocol to initiate the wire transfer before the wire transfer deadline.
All of the computed deadlines (payment, refund and wire transfer) are just defaults and can be modified by frontends for any specific order.
4.5.3. Instance setup without the Web interface#
Instances can be created by POSTing a request to /management/instances
without using the Web interface. This could be useful if you want to create
many instances programmatically. To create an instance without the Web
interface create a file instance.json with an
InstanceConfigurationRequest:
{
  "id" : "admin",
  "name": "Example Inc.",
  "address": { "country" : "zz" },
  "auth": { "method" : "external"} ,
  "jurisdiction": { "country" : "zz" },
  "use_stefan": true,
  "default_pay_delay": { "d_ms" : 1209600000 }
  "default_refund_delay": { "d_ms" : 1209600000 }
  "default_wire_transfer_delay": { "d_ms" : 1209600000 },
}
The name field will be shown as the name of your shop. The address
field is expected to contain your shop’s physical address. The various
default_* values specify defaults for transaction fees your shop is
willing to cover, how long offers made to the customer are valid, and how long
the exchange has before it must wire the funds to your bank account. Those
defaults can be modified for individual orders. For details, see the
contract terms specification.
You can then create the instance using:
$ wget --post-file=instance.json http://localhost:9966/management/instances
The base URL for the instance will then be http://localhost:9966/. You
can create additional instances, which will then be reachable under
http://localhost:9966/instances/$ID where $ID needs to be changed to
the identifier value of the respective instance.
Endpoints to modify (reconfigure), permanently disable (while keeping the data) or purge (deleting all associated data) instances exist as well and are documented in the Merchant Backend API documentation.
4.6. Instance bank account setup#
Before you can use an instance productively, you need to configure one or more bank accounts. These bank accounts will be provided to the Taler exchange operator to tell it where to wire the income from your sales. Every bank account has an associated wire method which determines how an exchange can transfer the funds. The most commonly supported wire method is iban, which implies that bank accounts are identified by IBAN numbers and wire transfers are to be executed between IBAN accounts. For regional currency setups, the wire method could also be x-taler-bank.
Note
When using a regional currency, you need to first create a bank account at
the regional bank. You may need to contact the respective administrator who
can set one up. After being able to login to the new bank account, you can
see your bank account number by clicking on the Welcome, $USERNAME
message in the profile page. Next to the bank account number, you can find
a convenient button to copy the number to the clipboard.
Not every exchange will support every wire method, and if you do not add a bank account with a wire method that is supported by a particular exchange, then you will not be able to receive payments via that exchange even if you configured the merchant backend to trust that exchange.
The simplest way to configure an account is to use the Web interface which has
specific forms for different wire methods. First, select Bank account at
the left of the page. The following page should be shown:
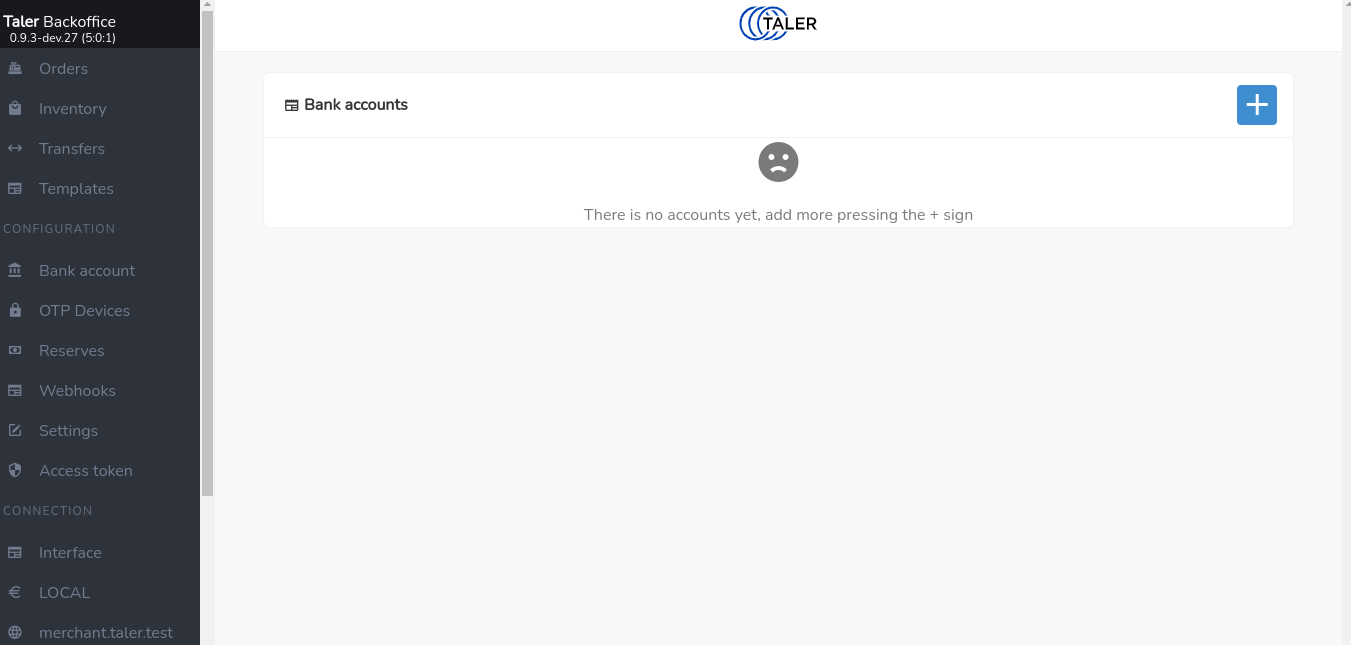
Click on the blue “+” sign on the top right of the page to add a new bank account. The following page should appear:
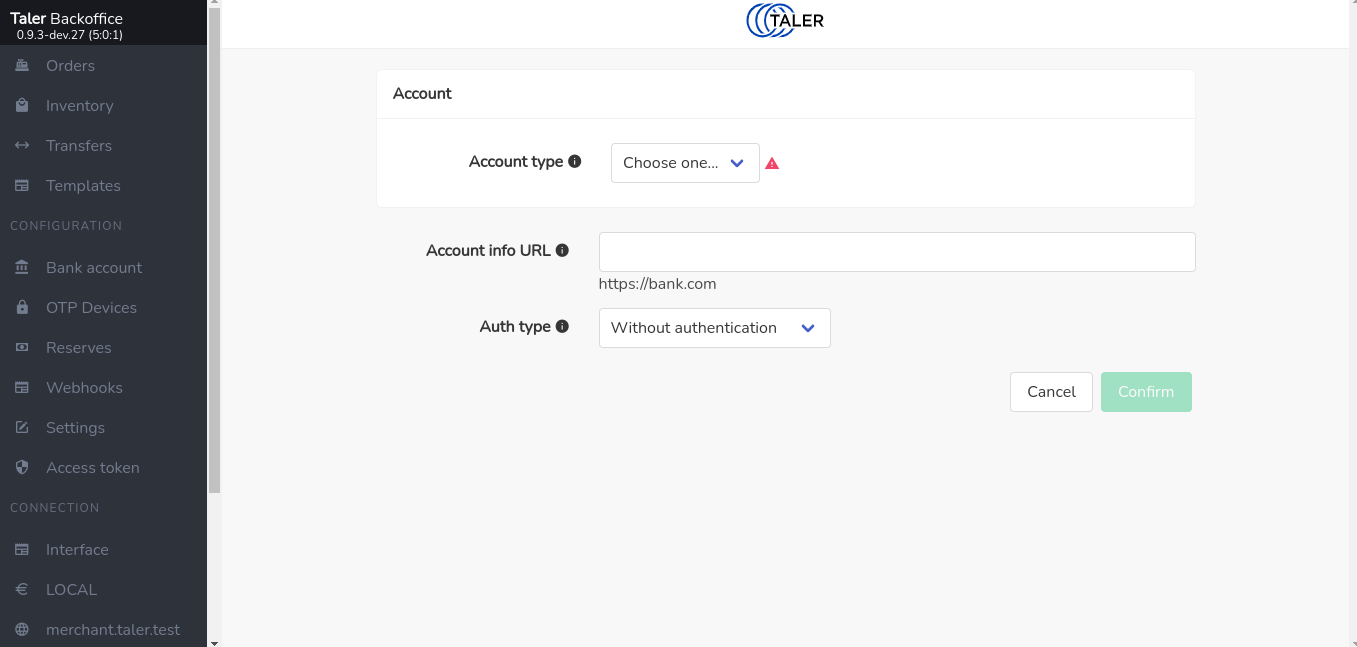
First, you should select the wire method, after which the dialog will show you
additional fields specific to the wire method. For example, if you choose
iban as the account type, the following page should appear:
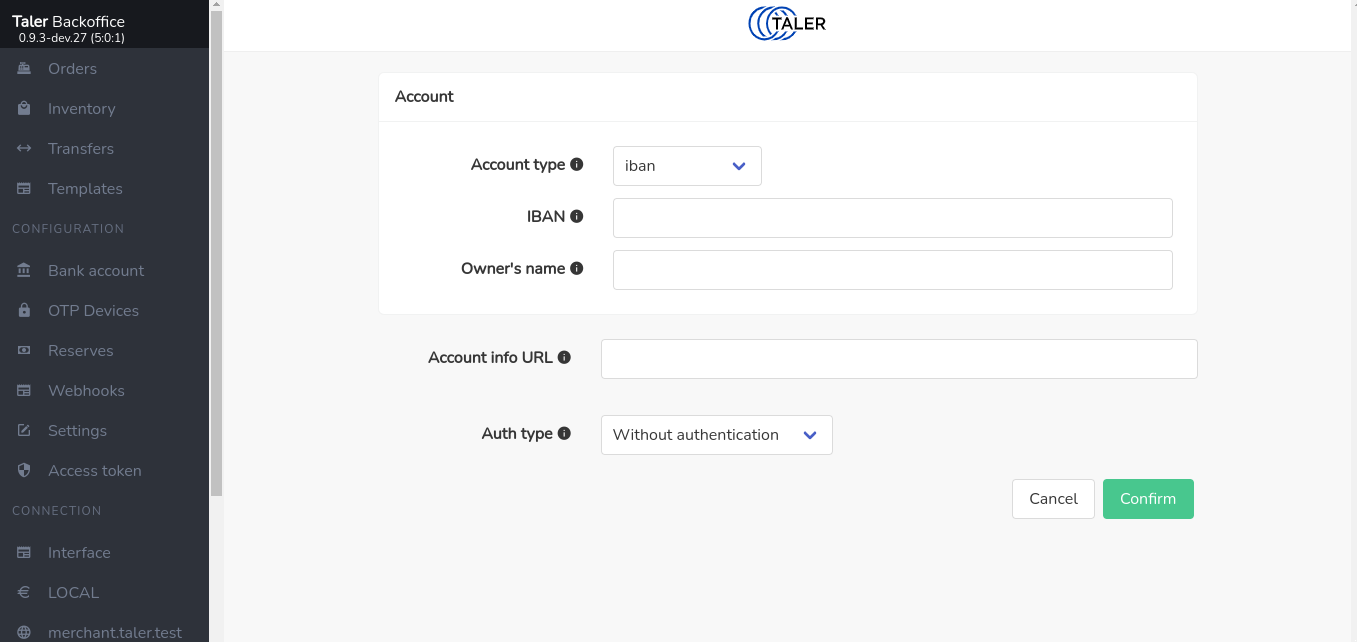
Specifying the revenue gateway with username and password is optional and discussed in section Automatic Settlement Data Import below.
After providing the details and confirming, the shop is ready to generate orders and accept payments.
4.6.1. Detecting Settlement: Manually Adding Transfers#
The exchange may aggregate many small amounts into one larger wire transfer. If you want to safely determine which orders have been settled (final payment from the exchange has been received), the backend must learn about the wire transfers made into your bank account. Basically, as a secure system, we do not simply trust a claim by the exchange that it would transfer the money, but we allow each merchant to check settlements.
An easy (but somewhat tedious) way to check settlements is to manually add every wire transfer that a merchant bank account has received from the exchange with the total amount and the wire transfer subject. Given this information, the merchant backend will inquire with the exchange which individual payments were aggregated, check that the total amount is correct, and will then flag the respective contracts as wired.
You can manually enter wire transfers under Transfers. However, this is
tedious, and so if your banking setup supports it, we highly recommend
using the automatic settlement data import.
4.6.2. Automatic Settlement Data Import#
To automatically import settlement data, you need to provide the merchant backend with the address and access credentials of a Taler Bank Revenue HTTP API for each bank account of an instance. The revenue API endpoint will allow the merchant backend to obtain a list of all incoming wire transfers into your bank account and automatically import them into the list of confirmed wire transfers.
Note that setting up a revenue API endpoint will usually require you to first
ask your bank for EBICS access and to set up Nexus Manual to provide
the revenue API endpoint. The Bank Setup Manual used by regional currency
setups also provides a revenue API endpoint at
$BANK_URL/accounts/$ACCOUNT_NAME/taler-revenue/. Thus, when using a
regional currency setup, simply use the $BANK_URL of your bank and specify
your bank login name and password in the Instance bank account setup dialog.
4.7. Manually creating an order using the SPA#
Arbitrary orders can also be created manually using the Web interface of the GNU Taler merchant backend. For this, log into the single page app (SPA) of the merchant backend using the authorization token of the respective instance you want to use.
Click on Orders at the top left corner of the merchant backoffice page; the
following page should appear
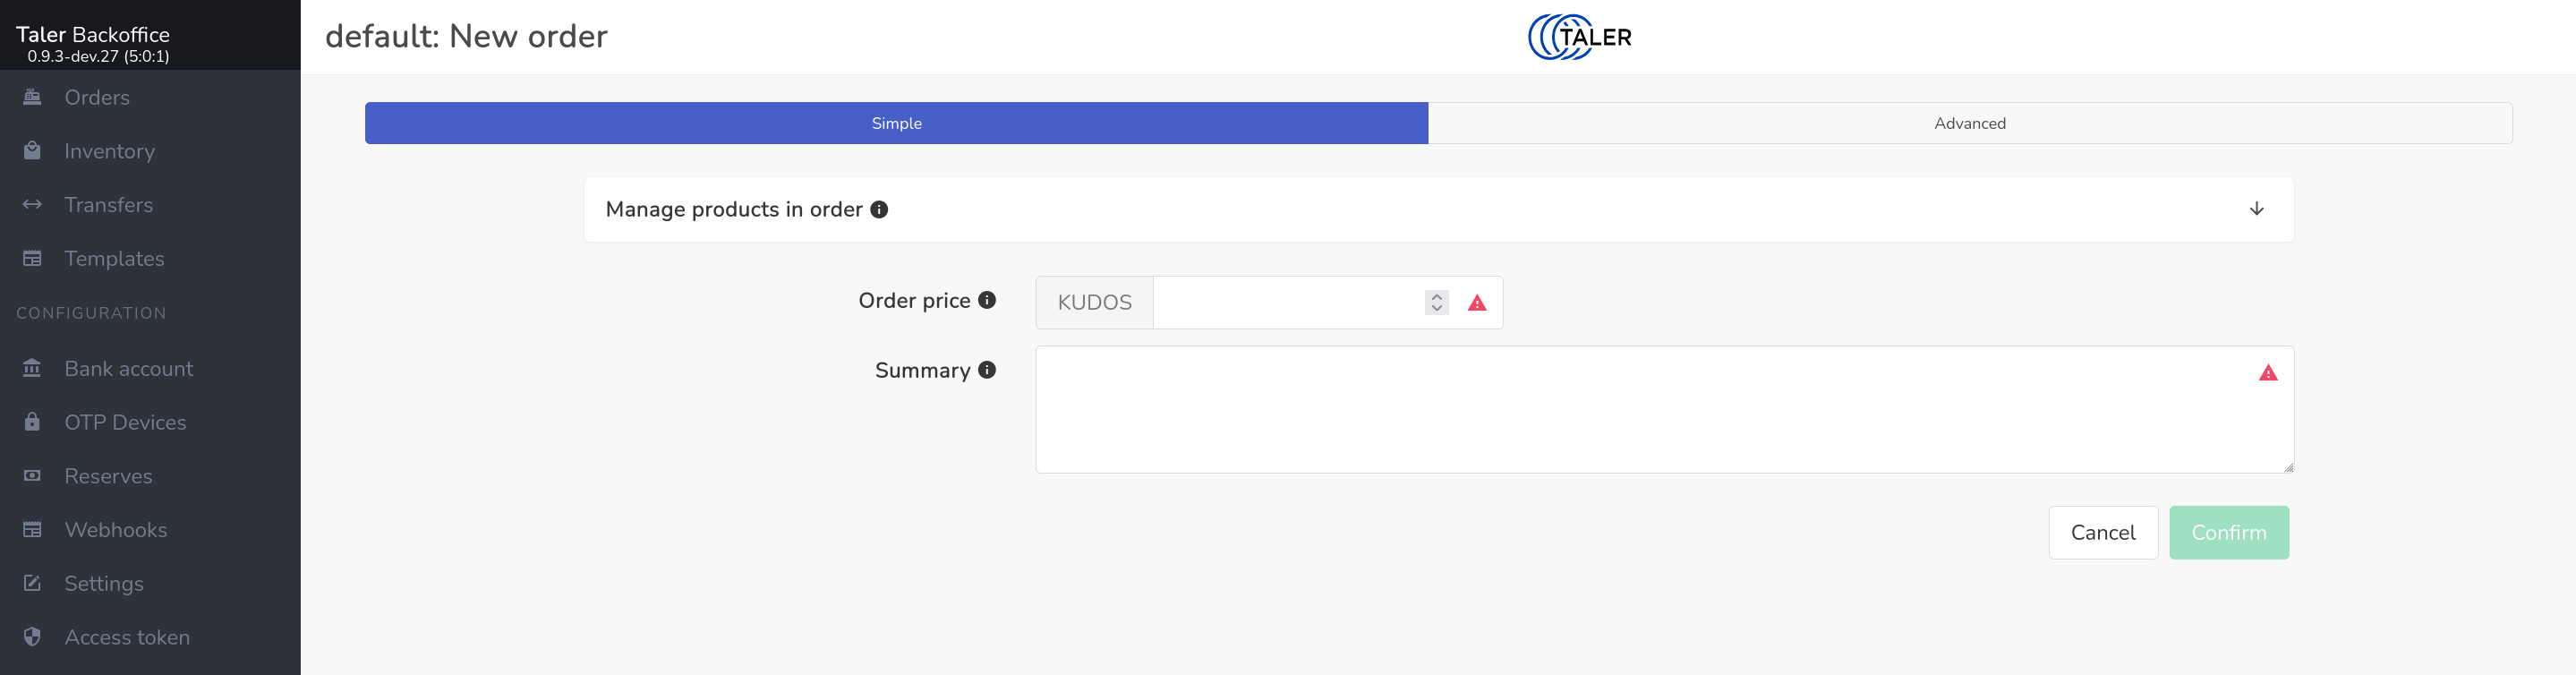
You can then set up orders by providing all of the required fields of an order, in particular an order summary and a price. You can also set various optional fields or override instance default settings.
After this the interface should show the following page with the related links to check the status of the order and let wallet pay for it.
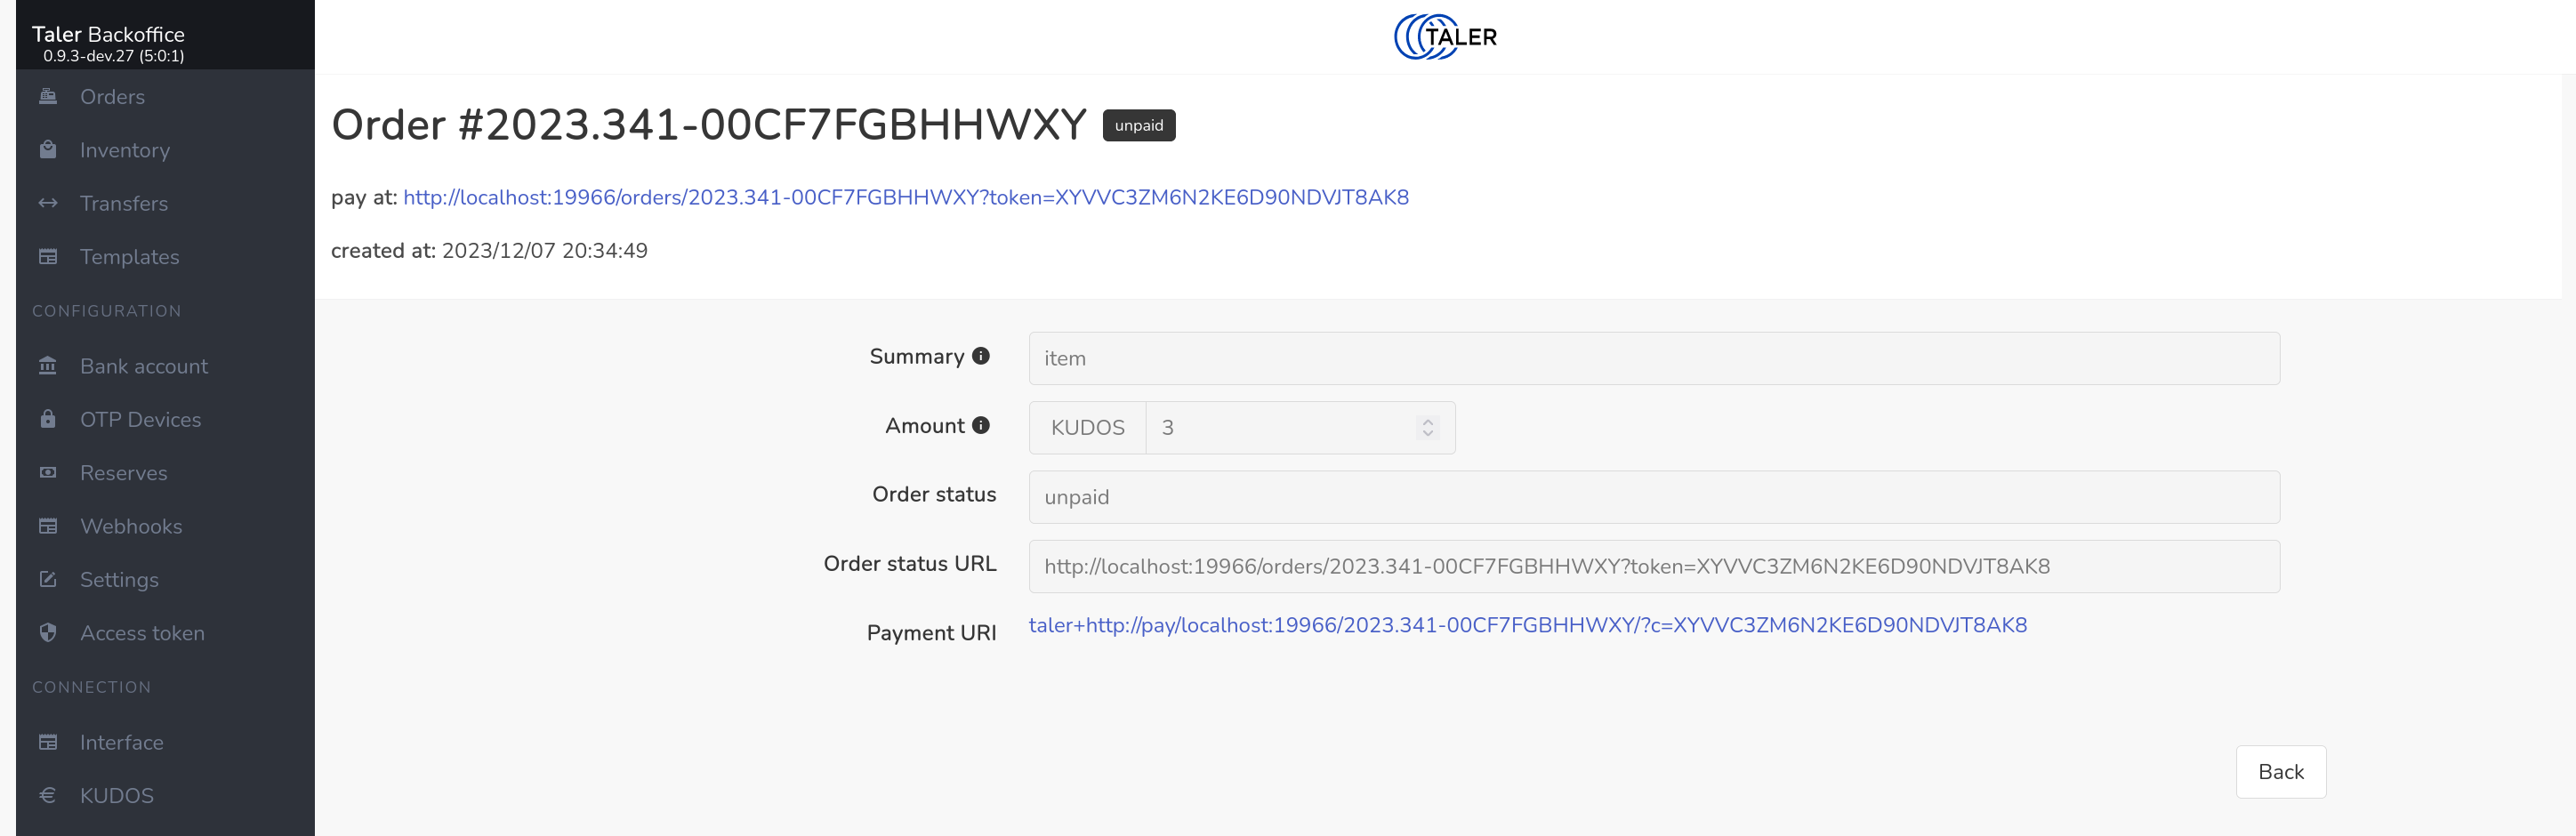
The order status page also shows you the progress of the order, including when a wallet has made the payment. You can also use the backend to approve refunds.
In order to test the setup, it should be now possible to use the command line wallet to withdraw Taler coins and spend them to pay for the order we just created.
In practice, you will rarely if ever setup orders manually like this. Instead,
a GNU Taler e-commerce front-end or the
Merchant Point of Sale App Manual will do this on-demand. Here, you will only need
to provide the respective front-ends with the URL of your instance
(e.g. https://backend.$DOMAIN/instances/$NAME) and your access token.
4.8. Paying an order#
The payer simply scans the (dynamic) QR code to initiate the payment. If a website is interacting with a WebExtension wallet, it may also directly trigger the GNU Taler wallet without requiring the user to explicitly scan the QR code. The payer should now review the contract terms and applicable fees. Selecting “pay” will complete the transaction. Typically, the wallet will then redirect the user to the fulfillment page where they can track the order or directly view the digital product that they purchased.
4.9. Setting up a template#
A template provides all or part of the information needed to setup an order and allows GNU Taler wallets to create an order. Usually, the creation of orders is a privileged process that requires knowledge of the authorization code for the respective instance. With templates, a customer’s wallet can directly create an order on-demand. The information of a template can be partial, in which case the customer is expected to provide the remaining details, typically the summary and/or amount of the order.
When setting up a template you need to specify all of the fixed inputs that the customer cannot change. You can then generate a template QR code where you may additionally specify editable defaults for the order, such as a default summary or a default amount which may still be changed by the wallet. The resulting template QR code encodes the specific merchant backend, instance and template ID as well as the (editable) default values. The resulting static QR code can then be printed and put on display.
Customers can scan the QR code with their GNU Taler wallet, complete the missing details or edit the defaults (if any), and pay the resulting order.
To secure template-based payments, you may specify a TOTP secret as part of the template. In this case, the merchant backend will send a set of TOTP payment confirmation codes to the GNU Taler wallet upon receiving a payment for an order created based on the template. If the point-of-sale has a TOTP generator with the same secret, they can compare their TOTP code with the codes shown by the customer on their wallet. This provides additional assurance that the customer actually made the payment instead of just showing a fake confirmation screen.
4.10. Paying with static QR codes#
The payer simply scans the (static) QR code to initiate the payment. If the template does not specify a fixed amount, the payer will be prompted to enter the amount to be paid (and possibly given the opportunity to specify or alter the summary). Selecting “pay” will complete the transaction. If payment confirmations are configured by the merchant backend, the wallet will then display a TOTP confirmation code that can be shown to the merchant as a proof of payment.
4.11. Setting up a webhook#
To receive notifications when a purchase has been made or a refund was given to a wallet, you can set up webhooks in the GNU Taler merchant backend. Webhooks allow you to trigger HTTP(S) requests based on certain events. A webhook is thus simply an HTTP request that the GNU Taler merchant backend will make when a certain event (such as a payment) happens.
There are various providers that can send an SMS to a phone number based on an HTTP request. Thus, by configuring such a provider in a webhook you can receive an SMS notification whenever a customer makes a payment.
Webhooks are configured per instance. In the Webhook configuration, you can specify which URL, which HTTP headers, which HTTP method and what HTTP body to send to the Webhook. Webhooks are automatically retried (with increasing delays) when the target server returns a temporary error.
Mustach templates and a limited version of it is used when defining the contents of Webhooks. Depending on the triggering event, the templates will be expanded with event-specific data. Limited in this case means that only a specific string is being replaced with the event-specific data, no support for parsing conditions or nested structures is provided.
4.11.1. Order created events#
For “order_created” events, the backend will provide the following information to the Mustache templating engine:
webhook_type: “order_created”.
order_id: the identifier of the newly created order.
contract: the full JSON contract for the order (see contract_terms for the structure).
instance_id: the merchant instance identifier that created the order.
4.11.2. Order pay events#
For “pay” events, the backend will provide the following information to the Mustache templating engine:
webhook_type: “pay”.
contract_terms: the contract terms of the paid order.
order_id: the ID of the order that received the refund.
4.11.3. Order refund events#
For “refund” events which are triggered when a refund is approved, the backend will provide the following information to the Mustache templating engine:
webhook_type: “refund”.
timestamp: time of the refund (using a Timestamp with the time in seconds since the UNIX epoch).
order_id: the ID of the order that received the refund.
contract_terms: the full JSON of the contract terms of the refunded order.
refund_amount: the amount that was being refunded.
reason: the reason entered by the merchant staff for granting the refund; be careful, you probably want to inform your staff if a webhook may expose this information to the consumer.
4.11.4. Order settled events#
For “order_settled” events which are triggered when the taler-merchant-reconciliation service is able to map an incoming wire transfer from the exchange to a paid order, the backend will provide the following information to the limited Mustache templating engine:
webhook_type: “order_settled”.
order_id: The unique identifier of the order that has been fully settled (all payments completed and wired to the merchant).
wtid: The wire transfer ID of the settlement.
4.11.5. Category added events#
For “category_added” events, the backend will provide the following information to the limited Mustache templating engine:
webhook_type: “category_added”.
category_serial: The unique identifier of the newly added category.
category_name: The name of the newly added category.
merchant_serial: The unique identifier of the merchant associated with the category.
4.11.6. Category updated events#
For “category_updated” events, the backend will provide the following information to the limited Mustache templating engine:
webhook_type: “category_updated”.
category_serial: The unique identifier of the updated category.
old_category_name: The name of the category before the update.
category_name: The name of the category after the update.
category_name_i18n: The internationalized name of the category after the update.
old_category_name_i18n: The internationalized name of the category before the update.
4.11.7. Category deleted events#
For “category_deleted” events, the backend will provide the following information to the limited Mustache templating engine:
webhook_type: “category_deleted”.
category_serial: The unique identifier of the deleted category.
category_name: The name of the deleted category.
4.11.8. Inventory added events#
For “inventory_added” events, the backend will provide the following information to the limited Mustache templating engine:
webhook_type: “inventory_added”.
product_serial: The unique identifier of the newly added product.
product_id: The ID of the newly added product.
description: The description of the newly added product.
description_i18n: The internationalized description of the newly added product.
unit: The unit of the newly added product.
image: The image of the newly added product.
taxes: The taxes of the newly added product.
price: The price of the newly added product.
total_stock: The total stock of the newly added product.
total_sold: The total sold of the newly added product.
total_lost: The total lost of the newly added product.
address: The address of the newly added product.
next_restock: The next restock of the newly added product.
minimum_age: The minimum age for buying the newly added product.
4.11.9. Inventory updated events#
For “inventory_updated” events, the backend will provide the following information to the limited Mustache templating engine:
webhook_type: “inventory_updated”.
product_serial: The unique identifier of the updated product.
product_id: The ID of the product.
old_description: The description of the product before the update.
description: The description of the product after the update.
old_description_i18n: The internationalized description of the product before the update.
description_i18n: The internationalized description of the product after the update.
old_unit: The unit of the product before the update.
unit: The unit of the product after the update.
old_image: The image of the product before the update.
image: The image of the product after the update.
old_taxes: The taxes of the product before the update.
taxes: The taxes of the product after the update.
old_price: The price of the product before the update.
price: The price of the product after the update.
old_total_stock: The total stock of the product before the update.
total_stock: The total stock of the product after the update.
old_total_sold: The total sold of the product before the update.
total_sold: The total sold of the product after the update.
old_total_lost: The total lost of the product before the update.
total_lost: The total lost of the product after the update.
old_address: The address of the product before the update.
address: The address of the product after the update.
old_next_restock: The next restock of the product before the update.
next_restock: The next restock of the product after the update.
old_minimum_age: The minimum age for buying the product before the update.
minimum_age: The minimum age for buying the product after the update.
4.11.10. Inventory deleted events#
For “inventory_deleted” events, the backend will provide the following information to the limited Mustache templating engine:
webhook_type: “inventory_deleted”.
product_serial: The unique identifier of the deleted product.
product_id: The ID of the deleted product.
description: The description of the deleted product.
description_i18n: The internationalized description of the deleted product.
unit: The unit of the deleted product.
image: The image of the deleted product.
taxes: The taxes of the deleted product.
price: The price of the deleted product.
total_stock: The total stock of the deleted product.
total_sold: The total sold of the deleted product.
total_lost: The total lost of the deleted product.
address: The address of the deleted product.
next_restock: The next restock of the deleted product.
minimum_age: The minimum age for buying the deleted product.
4.12. Secure setup#
The Taler backend is deliberately simple in terms of support for access control or transport layer security (TLS). Thus, production setups must deploy the Taler backend behind an HTTP(S) server that acts as a reverse proxy, performs TLS termination and authentication and then forwards requests to the backend.
4.12.1. Using UNIX domain sockets#
To ensure that the merchant backend is not exposed directly to the network, you should bind the backend to a UNIX domain socket:
[MERCHANT]
SERVE = unix
UNIXPATH = "/some/path/here.sock"
Do not use a UNIX domain socket path in “/tmp”: systemd (or other init systems) may give Web servers a private “/tmp” thereby hiding UNIX domain sockets created by other users/processes in “/tmp”.
If UNIX domain sockets are for some reason not possible, you may use a host-based firewall to block access to the TCP port of the merchant backend, but this is not recommended. If you do need a TCP socket, you should instead strongly consider using the “BIND_TO” option to at least bind it only to “localhost”.
4.12.2. Reverse proxy configuration#
4.12.2.1. Nginx#
For Nginx, a possible basic reverse proxy configuration would be:
proxy_pass http://unix:/some/path/here.sock;
proxy_redirect off;
proxy_set_header Host $host;
proxy_set_header X-Forwarded-Host "example.com";
proxy_set_header X-Forwarded-Proto "https";
Note that the above assumes your domain name is example.com and that you
have TLS configured. Leave out the last line if your Nginx reverse proxy does
not have HTTPS enabled. Make sure to restart the taler-merchant-httpd
process after changing the SERVE configuration.
4.12.2.2. Apache#
In Apache, make sure you have mod_proxy, mod_proxy_http and
mod_headers enabled:
$ a2enmod proxy
$ a2enmod proxy_http
$ a2enmod headers
Then configure your Apache reverse proxy like this (you may change the endpoint):
<Location "/">
ProxyPass "unix:/some/path/here.sock|http://example.com/"
RequestHeader add "X-Forwarded-Proto" "https"
</Location>
Note that the above again assumes your domain name is example.com and that
you have TLS configured. Note that you must add the https header unless
your site is not available via TLS.
4.12.3. Automated Reverse Proxy Configuration#
GNU Taler provides a helper script, taler-merchant-rproxy-setup, that
automates the most common reverse-proxy configuration tasks for both Nginx
and Apache:
Detects (or lets you choose) Nginx vs. Apache
Verifies and enables required modules and packages
Obtains (or skips) TLS certificates via Certbot (unless
--httponly)Backs up and populates the stock configuration with your domain
Optionally forces HTTP → HTTPS redirection (
--httpsonly)Enables the site and reloads the web server
4.12.3.1. Usage#
taler-merchant-rproxy-setup \
  --domain <example.com> [--nginx | --apache] [--httponly | --httpsonly]
4.12.3.2. Options#
--domain <name>(Required) The public domain name to configure.
--nginxForce use of Nginx (overriding auto-detection).
--apacheForce use of Apache2 (overriding auto-detection).
--httponlyOnly configure HTTP (no TLS). Skips Certbot entirely.
--httpsonlyEnable HTTPS and add an HTTP→HTTPS redirect.
-h, --helpShow this help message and exit.
Note
This script must be run as root (for example via sudo) and requires
that either Nginx or Apache2 (and Certbot for non-HTTP-only modes) be
installed on the system.
4.12.4. Access control#
All endpoints with /private/ in the URL must be restricted to authorized
users of the respective instance. Specifically, the HTTP server must be
configured to only allow access to $BASE_URL/private/ to the authorized
users of the admin instance, and to $BASE_URL/instances/$ID/private/ to
the authorized users of the instance $ID.
By default, the GNU Taler merchant backend simply requires the respective HTTP requests to include an “Authorization” header with a “Bearer” token set to the respective shared secret which must begin with “secret-token:” (following RFC 8959).
Note that all of the other endpoints (without /private/)
are expected to be fully exposed to the Internet, and wallets may have to
interact with those endpoints directly without client authentication.
4.12.5. Status code remapping#
Normal API usage leaks instance existence information. Distinguishing between 404 (Not found) and 403 (Forbidden) is useful for diagnostics.
For higher security (by leaking less information), you can add the following fragment, which remaps all 404 response codes to 403.
4.12.5.1. Nginx#
error_page 404 =403 /empty.gif;
4.12.5.2. Apache#
cond %{STATUS} =404
set-status 403
4.13. Customization#
4.13.1. Legal conditions for using the service#
The service has well-known API endpoints to return its legal conditions to the user in various languages and various formats. This section describes how to setup and configure the legal conditions.
4.13.2. Terms of Service#
The service has an endpoint “/terms” to return the terms of service (in legal language) of the service operator. Client software show these terms of service to the user when the user is first interacting with the service. Terms of service are optional for experimental deployments, if none are configured, the service will return a simple statement saying that there are no terms of service available.
To configure the terms of service response, there are two options in the configuration file for the service:
TERMS_ETAG: The current “Etag” to return for the terms of service. This value must be changed whenever the terms of service are updated. A common value to use would be a version number. Note that if you change theTERMS_ETAG, you MUST also provide the respective files inTERMS_DIR(see below).TERMS_DIR: The directory that contains the terms of service. The files in the directory must be readable to the service process.
4.13.3. Privacy Policy#
The service has an endpoint “/pp” to return the terms privacy policy (in legal language) of the service operator. Clients should show the privacy policy to the user when the user explicitly asks for it, but it should not be shown by default. Privacy policies are optional for experimental deployments, if none are configured, the service will return a simple statement saying that there is no privacy policy available.
To configure the privacy policy response, there are two options in the configuration file for the service:
PRIVACY_ETAG: The current “Etag” to return for the privacy policy. This value must be changed whenever the privacy policy is updated. A common value to use would be a version number. Note that if you change thePRIVACY_ETAG, you MUST also provide the respective files inPRIVACY_DIR(see below).PRIVACY_DIR: The directory that contains the privacy policy. The files in the directory must be readable to the service process.
4.13.4. Legal policies directory layout#
The TERMS_DIR and PRIVACY_DIR directory structures must follow a
particular layout. You may use the same directory for both the terms of
service and the privacy policy, as long as you use different ETAGs. Inside of
the directory, there should be sub-directories using two-letter language codes
like “en”, “de”, or “jp”. Each of these directories would then hold
translations of the current terms of service into the respective language.
Empty directories are permitted in case translations are not available.
Then, inside each language directory, files with the name of the value set as
the TERMS_ETAG or PRIVACY_ETAG must be provided. The extension of each
of the files should be typical for the respective mime type. The set of
supported mime types is currently hard-coded in the service, and includes
“.epub”, “.html”, “.md”, “.pdf” and “.txt” files. If other files are present,
the service may show a warning on startup.
4.13.4.1. Example#
A sample file structure for a TERMS_ETAG of “tos-v0” would be:
TERMS_DIR/en/tos-v0.txt
TERMS_DIR/en/tos-v0.html
TERMS_DIR/en/tos-v0.pdf
TERMS_DIR/en/tos-v0.epub
TERMS_DIR/en/tos-v0.md
TERMS_DIR/de/tos-v0.txt
TERMS_DIR/de/tos-v0.html
TERMS_DIR/de/tos-v0.pdf
TERMS_DIR/de/tos-v0.epub
TERMS_DIR/de/tos-v0.md
If the user requests an HTML format with language preferences “fr” followed by
“en”, the service would return TERMS_DIR/en/tos-v0.html lacking a version in
French.
4.13.5. Generating the Legal Terms#
The taler-terms-generator script can be used to generate directories with
terms of service and privacy policies in multiple languages and all required
data formats from a single source file in .rst format and GNU gettext
translations in .po format.
To use the tool, you need to first write your legal conditions in English in
reStructuredText (rst). You should find a templates in
$PREFIX/share/terms/*.rst where $PREFIX is the location where you
installed the service to. Whenever you make substantive changes to the legal
terms, you must use a fresh filename and change the respective ETAG. The
resulting file must be called $ETAG.rst and the first line of the file should be the title of the document.
Once you have written the $ETAG.rst file in English, you can
generate the first set of outputs:
$ taler-terms-generator -i $ETAG
Afterwards, you should find the terms in various formats for all configured
languages (initially only English) in $PREFIX/share/terms/. The generator
has a few options which are documented in its man page.
4.13.6. Adding translations#
Translations must be available in subdirectories
locale/$LANGUAGE/LC_MESSAGES/$ETAG.po.
To start translating, you first need to add a new
language:
$ taler-terms-generator -i $ETAG -l $LANGUAGE
Here, $LANGUAGE should be a two-letter language
code like de or fr. The command will generate
a file locale/$LANGUAGE/LC_MESSAGES/$ETAG.po
which contains each English sentence or paragraph
in the original document and an initially empty
translation. Translators should update the .po
file. Afterwards, simply re-run
$ taler-terms-generator -i $ETAG
to make the current translation(s) available to the service.
Note
You must restart the service whenever adding or updating legal documents or their translations.
4.13.7. Updating legal documents#
When making minor changes without legal implications, edit the .rst file,
then re-run the step to add a new language for each existing translation to
produce an updated .po file. Translate the sentences that have changed and
finally run the generator (without -l) on the ETAG (-i $ETAG) to
create the final files.
When making major changes with legal implications, you should first rename (or
copy) the existing .rst file and the associated translation files to a new
unique name. Afterwards, make the major changes, update the .po files,
complete the translations and re-create the final files. Finally, do not
forget to update the ETAG configuration option to the new name and to
restart the service.
4.13.8. Template Customization#
The installation process will install various HTML templates to be served to
trigger the wallet interaction. You may change those templates to your own
design. The templating language used is C implementation of mustache, and the templates are in the
share/taler-merchant/templates/ directory.
The file names must be of the form $NAME.$LANG.must where $NAME is the
name of the template and $LANG is the 2-letter language code of the
template. English templates must exist and will be used as a fallback. If the
browser (user-agent) has provided language preferences in the HTTP header and
the respective language exists, the correct language will be automatically
served.
The following subsections give details about each of the templates. The
subsection titles are the $NAME of the respective template.
4.13.8.1. request_payment#
Page shown to request the user to make a payment.
This template is instantiated using the following information:
taler_pay_uri: String; the
taler://pay/URI that must be given to the wallet to initiate the paymenttaler_pay_qrcode_svg: Image; an SVG image of the QR code with the
taler_pay_uri.order_summary: String; a text summarizing the order
order_status_url: URL of the merchant backend where the order status can be found, useful for long-polling to check if the order has been paid
4.13.8.2. offer_refund#
Page shown to offer a customer a refund.
This template is instantiated using the following information:
taler_refund_uri: String; the
taler://pay/URI that must be given to the wallet to initiate the paymenttaler_refund_qrcode_svg: Image; an SVG image of the QR code with the
taler_pay_uri.refund_amount: Amount; how much did the merchant refund
refund_taken: Amount; how much did the customer already take back in refunds
order_summary: String; a text summarizing the order
4.13.8.3. show_order_details#
Page shown to the user when they go back to the payment page but no payment is required and no refund is present.
This template is instantiated using the following information:
order_summary: String; a text summarizing the order
contract_terms: Object; the full contract terms (should probably not be shown in full!)
refund_amount: Amount; how much did the merchant refund
refund_taken: Amount; how much did the customer already take back in refunds
4.13.9. Static files#
The merchant backend also has the ability to serve small static files
under the /static/{FILENAME} endpoint. This is used by the templating
logic to load a CSS file, but you can also put other resources such as
images or JavaScript.
4.13.10. Internationalization#
Both templates and static files can be internationalized. This is done
by having the language of the resource be a part of the filename.
For templates the format is {BASENAME}.{LANGUAGE}.must. The
language is mandatory for templates, the default language is English (en).
For static files, the format is {BASENAME}.{LANGUAGE}.{EXT} for
internationalized files, and {BASENAME}.{EXT} for resources that do not
support internationalization. The HTTP client will always request
/static/{BASENAME}.{EXT}. If {BASENAME}.{EXT} exists, that resource is
returned. Otherwise, an internationalized file based on the language
preferences indicated by the browser is returned.
4.13.11. Limitations#
All of the static files must fit into memory and it must be possible for the
process to hold open file handles for all of these files. You may want
to increase the ulimit of the taler-merchant-httpd process if you have
many static files. Note that Mustach templates do not increase the number of
open files.
The backend determines the MIME type based on the file’s extension. The list of supported extensions is hard-coded and includes common text and image formats.
The current backend only provides a limited set of variables for the Mustach template expansion, and does not make use of scopes and other Mustach features.
4.14. Upgrade procedure#
This section describes the general upgrade procedure. Please see the release notes for your specific version to check if a particular release has special upgrade requirements.
Please note that upgrades are ONLY supported for released version of the merchant. Attempting to upgrade from or to a version in Git is not supported and may result in subtle data loss.
To safely upgrade the merchant, you should first stop the existing
taler-merchant-httpd process, backup your merchant database (see
PostgreSQL manual), and then install the latest version of the code.
If you REVOKED database permissions, ensure that the rights to CREATE,
DROP, and ALTER tables are GRANTed to $USER again. Then, run:
$ taler-merchant-dbinit
to upgrade the database to the latest schema. After that, you may again REVOKE the database permissions. Finally, restart the merchant services processes, either via your systemd or init system, or directly.
4.15. Advanced topics#
4.15.1. taler-merchant-config#
4.15.2. Using taler-*-config#
GNU Taler comes with various tools all called taler-$COMPONENT-config,
such as taler-exchange-config and taler-merchant-config. They
all behave the same way, but are accessing the default configurations
of the respective $COMPONENT. In this man page we will thus simply
refer to these tools as the $TALER_CONFIG tool.
The $TALER_CONFIG tool can be used to extract or manipulate configuration
values; however, the configuration use the well-known INI file format and is
generally better edited by hand to preserve comments and structure. Thus, $TALER_CONFIG should primarily be used
to inspect or understand a configuration that is in place,
and not to update it!
Run
$ $TALER_CONFIG -s $SECTION
to list all of the configuration values in section $SECTION.
Run
$ $TALER_CONFIG -s $SECTION -o $OPTION
to extract the respective configuration value for option $OPTION in
section $SECTION.
Finally, to change a setting and clobber your entire configuration file structure, inlining all values and removing all comments, run
$ $TALER_CONFIG -s $SECTION -o $OPTION -V $VALUE
to set the respective configuration value to $VALUE. Note that you
have to manually restart affected Taler components after you change the
configuration to make the new configuration go into effect.
Some default options will use $-variables, such as $DATADIR within
their value. To expand the $DATADIR or other $-variables in the
configuration, pass the -f option to $TALER_CONFIG. For example,
compare:
$ $TALER_CONFIG --section exchange-offline --option MASTER_PRIV_FILE
$ $TALER_CONFIG -f --section exchange-offline --option MASTER_PRIV_FILE
While the configuration file is typically located at
$HOME/.config/taler-$COMPONENT.conf,
an alternative location can be specified to any
GNU Taler component using the -c option.
4.15.3. Database Scheme#
The merchant database must be initialized using taler-merchant-dbinit.
This tool creates the tables required by the Taler merchant to operate.
The tool also allows you to reset the Taler merchant database, which is
useful for test cases but should never be used in production. Finally,
taler-merchant-dbinit has a function to garbage collect a database,
allowing administrators to purge records that are no longer required.
The database scheme used by the merchant looks as follows:
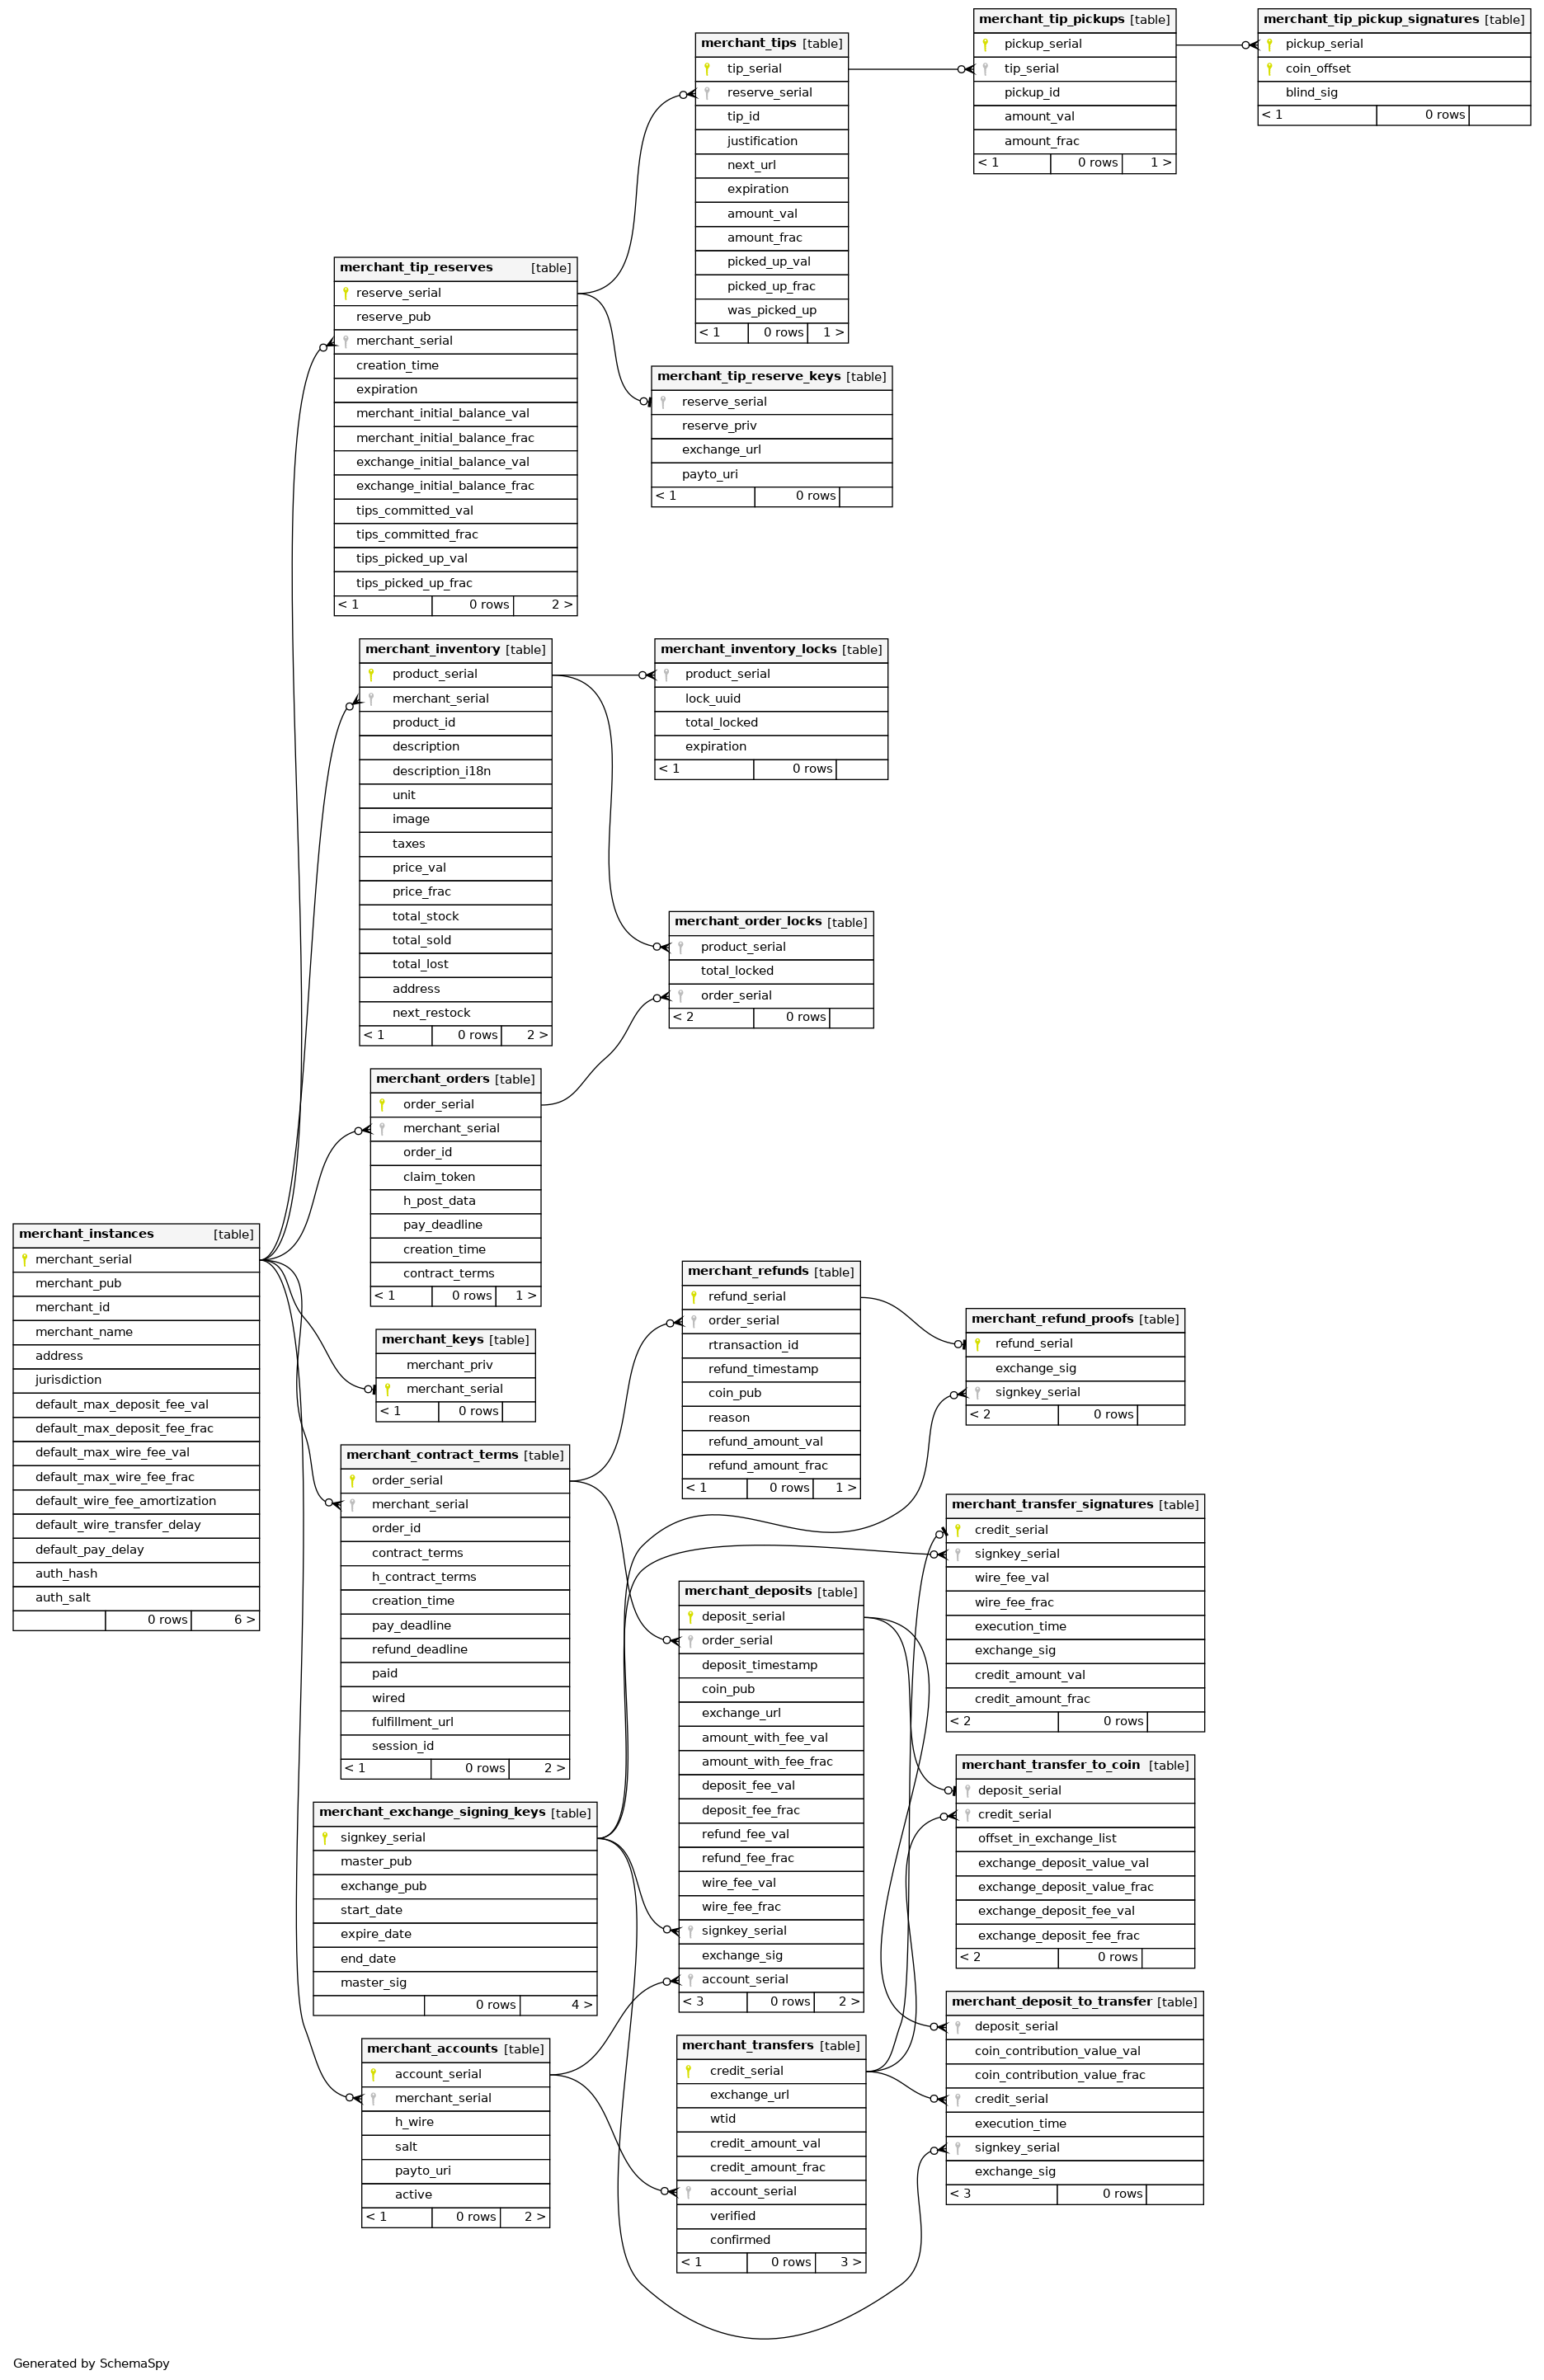
4.15.4. Benchmarking#
The merchant codebase offers the taler-merchant-benchmark tool to populate
the database with fake payments. The main goal of the benchmarking tool is to
serve as a starting point (!) for merchants that are interested in developing
stress tests to see how far their infrastructure can scale. As is, it
currently is not actually good at stressing the payment system.
The taler-unified-setup.sh script can be used to launch all required
services and clients. However, the resulting deployment is simplistic
(everything on the local machine, one single-threaded process per service
type) and not optimized for performance at all. However, this can still be
useful to assess the performance impact of changes
to the code or configuration.
Various configuration files that can be used in the code snippets in this
section can be found in the src/merchant-tools/ directory of the
merchant. These are generally intended as starting points. Note that the
configuration files ending in .edited are created by
taler-unified-setup.sh and contain some options that are determined at
runtime by the setup logic provided by taler-unified-setup.sh.
See Taler Exchange Manual for how to use taler-unified-setup.sh to setup the system and in particular on how to specify the bank to be used.
4.15.4.1. Running taler-merchant-benchmark#
You can run the tool as follows:
$ CONF=benchmark-rsa.conf
$ taler-unified-setup.sh -emwt -c "$CONF" -f -u exchange-account-1
$ time taler-merchant-benchmark ordinary -c "$CONF".edited -u exchange-account-1 -f -p 20
The current tool has already a few options, but we expect that to deliver relevant results it will need to be customized to better reflect the workload of a particular merchant. This customization would at this point likely involve writing (C) code. We welcome contributions to make it easier to customize the benchmark and/or to cover more realistic workloads from the start.
The tool takes all of the values it needs from the command line, with some of them being common to all subcommands:
--exchange-account-section=SECTIONSpecifies which configuration section specifies the bank account for the exchange that should be used for the benchmark. For the example configuration above, the SECTION value provided must beexchange-account-exchange.--fakebankSpecifies that the benchmark should expect to interact with a fakebank (instead of libeufin).
The tool comes with two operation modes: ordinary, and corner.
The first just executes normal payments, meaning that it uses the
admin instance and makes sure that all payments get aggregated. The
second gives the chance to leave some payments unaggregated, and also to
use merchant instances other than admin (which is, actually, the
one used by default by the tool).
Note
The ability to drive the aggregation policy is useful for testing the back-office facility.
Any subcommand is also equipped with the canonical --help option, so
feel free to issue the following command in order to explore all the
possibilities. For example:
$ taler-merchant-benchmark corner --help
will show all the options offered by the corner mode. Among the most interesting, there are:
--two-coins=TCThis option instructs the tool to perform TC many payments that use two coins, because normally only one coin is spent per payment.--unaggregated-number=UNThis option instructs the tool to perform UN (one coin) payments that will be left unaggregated.
As for the ordinary subcommand, it is worth explaining the following
option:
--payments-number=PNInstructs the tool to perform PN payments.
4.16. Temporarily Abandoned Features#
4.16.1. Installing Taler using Docker#
This section provides instructions for the merchant backend installation using ‘Docker‘.
For security reasons, we run Docker against a VirtualBox instance, so
the docker command should connect to a docker-machine instance
that uses the VirtualBox driver.
Therefore, the needed tools are: “docker“, “docker-machine“, and “docker-compose“. Please refer to Docker’s official [1] documentation in order to get those components installed, as that is not in this manual’s scope.
Before starting to build the merchant’s image, make sure a “docker-machine“ instance is up and running.
Because all of the Docker source file are kept in our “deployment“
repository, we start by checking out the git://git.taler.net/deployment
codebase:
$ git clone git://git.taler.net/deployment
Now we actually build the merchant’s image. From the same directory as above:
$ cd deployment/docker/merchant/
$ docker-compose build
If everything worked as expected, the merchant is ready to be launched. From the same directory as the previous step:
# Recall: the docker-machine should be up and running.
$ docker-compose up
You should see some live logging from all the involved containers. At this stage of development, you should also ignore some (harmless) error message from postresql about already existing roles and databases.
To test if everything worked as expected, it suffices to issue a simple request to the merchant, for example:
$ wget -O - http://$(docker-machine ip)/
# A greeting message should be returned by the merchant.