15. Directory Operator Manual#
15.1. Introduction#
15.1.1. About Taler Directory#
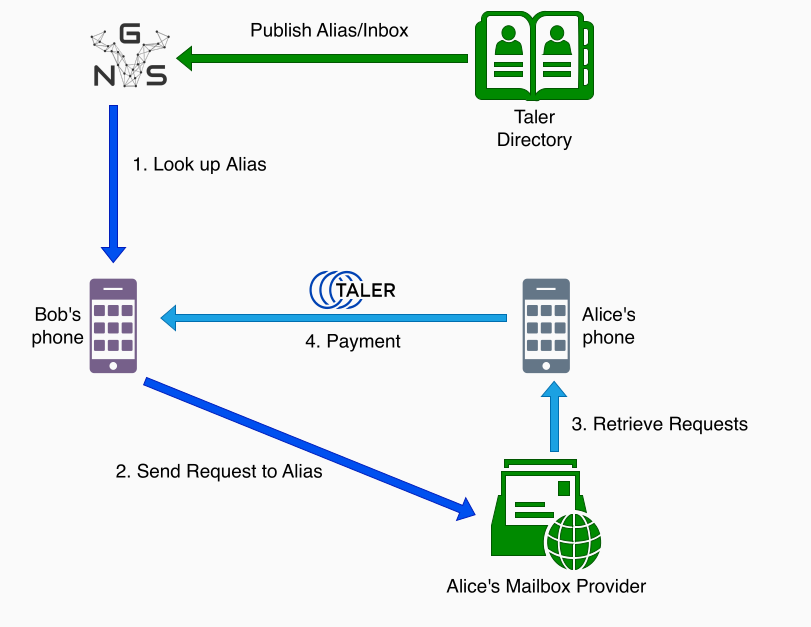
The Taler Directory (TalDir) alias lookup service allows Taler wallets to securely associate an inbox service (URL and public key) with the address of a messaging service used by the wallet’s user. Wallets can also lookup the inbox of other users. This will enable wallets to make wallet-to-wallet payments to distant wallets where the target user is only identified by their address in a messaging service. Examples for messaging services include E-mail and SMS. The service in principle allows registration of any valid URI as inbox service. For Taler, the URI is a link to a mailbox.
15.1.2. About this manual#
This manual targets system administrators who want to install, operate or integrate a directory service. To report issues or learn about known limitations, please check our bug tracker.
15.1.3. Architecture overview#
The following illustrations gives an overview of the architecture and the main interactions:
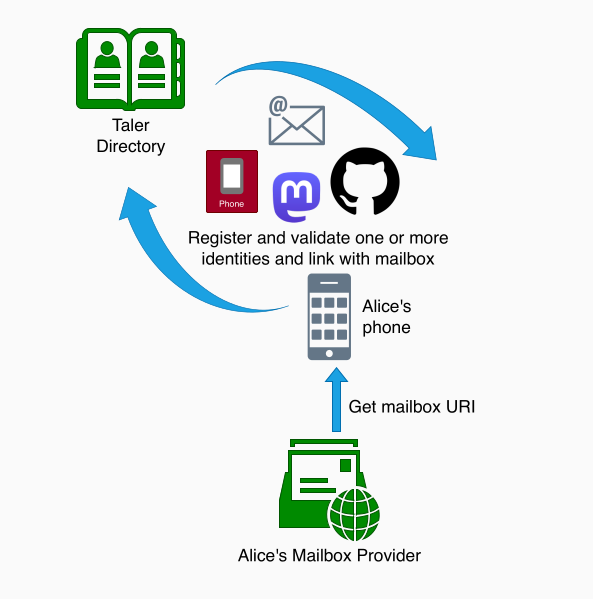
The user, in this case Alice, first requires a mailbox URI. In the case of GNU Taler Mailboxes offered through the mailbox service, mailbox URIs can be generated from wallet addresses.
The mailbox URI can then be associated with one or more aliases by Alice with the directory service. To do so, Alice must prove that she is actually behind a respective alias. For example, a validation link is sent to Alices email address if she wants to associate her email alias with the mailbox URI. The validation process differs depending on the alias used.
Other users, in this case Bob, may then resolve the mailbox URI using one of Alice’s aliases in order to request a payment, or use Alice’s wallet address to send money.
15.2. Installation#
In this guide’s shell-session fragments, the command prompt shows two pieces of information:
Who is performing the command (
$uservsroot, and ending character$vs#).
15.2.1. Installing from source#
The following instructions will show how to install libgnunetutil and the core GNU Taler libraries from source.
The package sources can be found in our download directory.
GNU Taler components version numbers follow the MAJOR.MINOR.MICRO format.
The general rule for compatibility is that MAJOR and MINOR must match.
Exceptions to this general rule are documented in the release notes.
For example, taler-directory 1.3.0 should be compatible with Taler exchange 1.4.x
as the MAJOR version matches. A MAJOR version of 0 indicates experimental
development, and you are expected to always run all of the latest releases
together (no compatibility guarantees).
First, the following packages need to be installed before we can compile the backend:
Golang >= 1.19
taler-merchant >= 1.0
For the GNS disseminator, a running GNUnet installation is also required:
Before you install GNUnet, you must download and install the dependencies mentioned in the previous section, otherwise the build may succeed, but could fail to export some of the tooling required by GNU Taler.
On Ubuntu, you also need to install pkg-config, for example:
$ apt-get install pkg-config
To install GNUnet, unpack the tarball and change into the resulting directory, then proceed as follows:
$ ./configure [--prefix=GNUNETPFX]
$ # Each dependency can be fetched from non standard locations via
$ # the '--with-<LIBNAME>' option. See './configure --help'.
$ make
# make install
# ldconfig
If you did not specify a prefix, GNUnet will install to /usr/local,
which requires you to run the last step as root.
The ldconfig command (also run as root) makes the
shared object libraries (.so files)
visible to the various installed programs.
The following steps assume all dependencies are installed.
First, unpack the GNU Taler merchant tarball and change into the resulting directory. Then, use the following commands to build and install the merchant backend:
$ ./configure [--prefix=PFX] \
              [--with-gnunet=GNUNETPFX] \
              [--with-exchange=EXCHANGEPFX]
$ # Each dependency can be fetched from non standard locations via
$ # the '--with-<LIBNAME>' option. See './configure --help'.
$ make
# make install
If you did not specify a prefix, the exchange will install to
/usr/local, which requires you to run the last step as root.
You have to specify --with-exchange=/usr/local and/or
--with-gnunet=/usr/local if you installed the exchange and/or
GNUnet to /usr/local in the previous steps.
Depending on the prefixes you specified for the installation and the
distribution you are using, you may have to edit /etc/ld.so.conf, adding
lines for GNUNETPFX/lib/ and EXCHANGEPFX/lib/ and PFX/lib/
(replace the prefixes with the actual paths you used). Afterwards, you should
run ldconfig. Without this step, it is possible that the linker may not
find the installed libraries and launching the Taler merchant backend would
then fail.
FIXME: Instructions for installing taldir
Please note that unlike most packages, if you want to run the make check
command, you should run it only after having done make install. The
latter ensures that necessary binaries are copied to the right place.
In any case, if make check fails, please consider filing a
bug report with the Taler bug tracker.
15.2.2. Installing the directory binary packages on Debian#
To install the GNU Taler Debian packages, first ensure that you have the right Debian distribution. At this time, the packages are built for Debian trixie.
You need to add a file to import the GNU Taler packages. Typically,
this is done by adding a file /etc/apt/sources.list.d/taler.list that
looks like this:
deb [signed-by=/etc/apt/keyrings/taler-systems.gpg] https://deb.taler.net/apt/debian trixie main
Next, you must import the Taler Systems SA public package signing key into your keyring and update the package lists:
# wget -O /etc/apt/keyrings/taler-systems.gpg \
    https://taler.net/taler-systems.gpg
# apt update
Note
You may want to verify the correctness of the Taler Systems SA key out-of-band.
Now your system is ready to install the official GNU Taler binary packages using apt.
To install taler-directory you can now simply run:
# apt install taler-directory
Note that the package does not perform any configuration work except for setting up the various users and the systemd service scripts. You still must configure at least the database, HTTP reverse proxy (typically with TLS certificates) and the terms of service.
15.2.3. Installing the GNU Taler binary packages on Trisquel#
To install the GNU Taler Trisquel packages, first ensure that you have the right Trisquel distribution. Packages are currently available for Trisquel GNU/Linux 10.0. Simply follow the same instructions provided for Ubuntu.
15.2.4. Installing the GNU Taler binary packages on Ubuntu#
To install the GNU Taler Ubuntu packages, first ensure that you have
the right Ubuntu distribution. At this time, the packages are built for
Ubuntu Lunar and Ubuntu Jammy. Make sure to have universe in your
/etc/apt/sources.list.d/ubuntu.sources (after main)
as we depend on some packages from Ubuntu universe.
A typical /etc/apt/sources.list.d/taler.list file for this setup
would look like this for Ubuntu Noble:
deb [signed-by=/etc/apt/keyrings/taler-systems.gpg] https://deb.taler.net/apt/ubuntu/ noble main
Next, you must import the Taler Systems SA public package signing key into your keyring and update the package lists:
# wget -O /etc/apt/keyrings/taler-systems.gpg \
    https://taler.net/taler-systems.gpg
# apt update
Note
You may want to verify the correctness of the Taler Systems key out-of-band.
Now your system is ready to install the official GNU Taler binary packages using apt.
To install the Taler exchange, you can now simply run:
# apt install taler-directory
Note that the package does not perform any configuration work except for setting up the various users and the systemd service scripts. You still must configure at least the database, HTTP reverse proxy (typically with TLS certificates), and the terms of service.
15.2.5. Services, users, groups and file system hierarchy#
The taler-directory package will use several system users to compartmentalize different parts of the system:
taldir-httpd: runs the HTTP daemon with the core business logic.postgres: runs the PostgreSQL database (from postgresql package).www-data: runs the frontend HTTPS service with the TLS keys (from nginx package).
The package will deploy systemd service files in
/usr/lib/systemd/system/ for taler-directory:
taler-directory.service: the business logic with the public REST API.
15.3. Configuration Fundamentals#
This chapter provides fundamental details about the exchange configuration.
The configuration for all Taler components uses a single configuration file
as entry point: /etc/taldir/taldir.conf.
System defaults are automatically loaded from files in
/usr/share/taldir/config.d. These default files should never be modified.
The default configuration taldir.conf configuration file also includes all
configuration files in /etc/taldir/conf.d.
To view the entire configuration annotated with the source of each configuration option, you
can use the taldir-config helper:
[root@exchange-online]# taler-directory-config --help
15.3.1. Configuration format#
All GNU Taler components are designed to possibly share the same configuration files. When installing a GNU Taler component, the installation deploys default values in configuration files located at ${prefix}/share/taler/config.d/ where ${prefix} is the installation prefix. Different components must be installed to the same prefix.
In order to override these defaults, the user can write a custom configuration
file and either pass it to the component at execution time using the -c
option, or name it taler.conf and place it under $HOME/.config/ which is where
components will look by default. Note that the systemd service files pass -c
/etc/taler/taler.conf, thus making /etc/taler/taler.conf
the primary location for the configuration.
A config file is a text file containing sections, and each section contains maps options to their values. Configuration files follow basically the INI syntax:
[section1]
value1 = string
value2 = 23

[section2]
value21 = string
value22 = /path22
Comments start with a hash (#). Throughout the configuration, it is
possible to use $-substitution for options relating to names of files or
directories. It is also possible to provide defaults values for those
variables that are unset, by using the following syntax:
${VAR:-default}. There are two ways a user can set the value
of $-prefixable variables:
by defining them under a
[paths]section:[paths] TALER_DEPLOYMENT_SHARED = ${HOME}/shared-data .. [section-x] path-x = ${TALER_DEPLOYMENT_SHARED}/x
or by setting them in the environment:
$ export VAR=/x
The configuration loader will give precedence to variables set under
[path] over environment variables.
The utility taler-config, which gets installed along with the exchange,
can be used get and set configuration values without directly editing the
configuration file. The option -f is particularly useful to resolve
pathnames, when they use several levels of $-expanded variables. See
taler-config --help.
The repository git://git.taler.net/deployment contains example code
for generating configuration files under deployment/netzbon/.
15.3.2. Fundamental Setup: Address validation#
The service is designed to validate aliases. Possible alias types include:
phone numbers (via SMS)
e-mail addresses (via SMTP)
In principle, additional types of addresses can easily be added by extending the respective HTML and programs to send challenges to the new address type.
To make different types of address validations possible, the Challenger configuration contains two configuration options.
The
ADDRESS_TYPEconfiguration option informs Challenger about the type of address it is expected to validate. It is returned as part of the OAuth 2.0/infoendpoint to the client, and is typically also used when deciding how to render the HTML form for address entry that is shown to the user.The
AUTH_COMMANDconfiguration option specifies which command Challenger should run to send a challenge to an address. The actual address is given to this subcommand as the first argument ($1), while the text with the challenge is passed to standard input. The subcommand should terminate with a status code of 0 on success.
 [challenger]
 ADDRESS_TYPE = email
 AUTH_COMMAND = challenger-send-email.sh
 # ... rest of file ...
Challenger comes with AUTH_COMMAND shell scripts for sending e-mail, SMS
and postal mail. Note that for SMS and postal mail the Challenger scripts use
third party services to actually send the SMS or print and mail the postal
mail. These third parties naturally charge money for their services, and thus
the Challenger administrator will need to add the respective credentials to
the SMS and postal mail scripts before they can function. In any case, these
scripts should be primarily seen as examples on how to write authentication
commands.
Note
We strongly welcome contributions for additional scripts with alternative providers or for new types of addresses.