12.5. Regional Currency Custom Setup Manual#
This manual describes how to setup a regional currency manually. If you want a guided setup you can follow the automated setup manual.
12.5.1. Architecture#
There are several key components needed to operate a regional currency based on GNU Taler and LibEuFin technology:
LibEuFin Nexus: is responsible to drive the master (fiat) bank account both to learn about incoming payments and to send fiat cash-out payments
LibEuFin Bank: offers basic banking operations, e.g. wire transfers, Taler withdrawals, account management, cash-out’s
Taler exchange: server side of Taler operations.
Taler wallet: client side of Taler operations.
Taler merchant backend: abstracts Taler details to the shops.
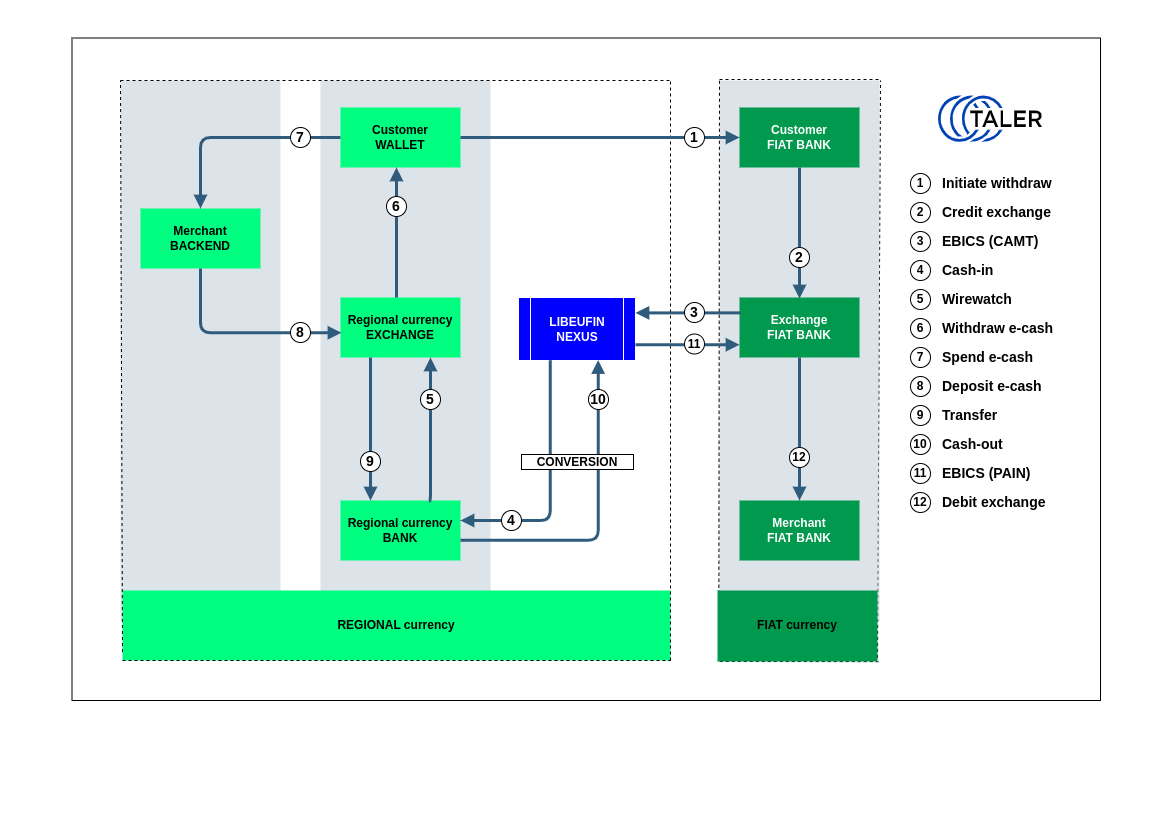
In this model, the regional currency is backed by the fiat currency and users are offered two operations: cash-in to create regional currency starting from fiat money, and cash-out to convert regional currency into fiat currency.
The design assumes that one single unit of regional currency is always backed by one single unit of fiat currency.
12.5.1.1. Cash-in#
One fundamental entity to create the regional currency is the master bank account. The master bank account is hosted at one fiat bank and whenever it receives a valid fiat payment of N units, it triggers the creation of N units of regional currency. Such trigger causes the admin bank account at the regional bank to wire the N units of regional currency to the Taler exchange (regional) bank account. At this point, the Taler exchange is ready to issue the regional coins to the Taler wallet that proves to own them.
Note
Valid fiat payments are those with a Taler-relevant subject that should be generated by a Taler wallet.
12.5.1.2. Cash-out#
Once a regional bank user confirms a cash-out operation of N units, the system sends a regional payment of N units to the admin bank account. This latter triggers then a fiat payment of N units to the fiat bank account owned by the user who initiated the cash-out.
12.5.2. Custom Manual Setup#
You first need to setup the libeufin-bank and integrate it with a Taler exchange.
If you don’t want your regional currency to be backed by a fiat currency, you can stop here.
12.5.2.1. Enabling Currency Conversion#
You need to setup the libeufin-nexus using a bank account at a bank dealing in fiat currency that offers an online banking protocol supported by LibEuFin Nexus.
Next, you have to enable conversion and should ensure that at least one TAN channel for multi-factor authentication is configured.
The following snippet shows how to enable conversion in libeufin-bank configuration:
[libeufin-bank]
ALLOW_CONVERSION = YES
FIAT_CURRENCY = EUR
Make sure to (re)start the libeufin-bank after changing these configuration options:
# systemctl restart libeufin-bank
12.5.2.2. Web-based Configuration#
Now you have to set the conversion rates and the admin debt limit via the bank’s web interface as the admin user.
12.5.2.3. Configuring the Exchange for Conversion#
An exchange that supports currency conversion needs to advertise two bank accounts, one in the regional currency and a second in the fiat currency. The conversion logic ensures that wire transfers in either account are immediately reflected in the other account.
This section explains how to enable currency conversion at the exchange, which is critical for wallets to know how to wire fiat currency to an exchange to obtain regional currency.
You will need to use the taler-exchange-offline tool to inform the
exchange about the fiat bank account that can be used for cash in
operations and also specify the URL for currency conversion. Additionally,
you may also configure restrictions on the bank accounts that may originate
the funds, for example, to prevent international wire transfers that may expose
you to additional compliance risks.
Given the $IBAN of the fiat currency bank account and $NAME as
the (URL-encoded) name of the exchange-account owner, the following
taler-exchange-offline invocation can be used to notify wallets about
the possibility of currency conversion (cash in):
# source config/user.conf
# sudo -u taler-exchange-offline \
  taler-exchange-offline \
    wire-fee now iban "${CURRENCY}":0 "${CURRENCY}":0 \
    enable-account \
      "${CONVERSION_PAYTO}" \
      conversion-url "${PROTO}://bank.$DOMAIN_NAME/conversion-info/" \
      display-hint 10 "CHF" \
      debit-restriction deny \
      credit-restriction \
        regex \
          'payto://iban/.*/CH.*?receiver-name=.*' \
          'Swiss only' \
          '{"de":"nur Schweiz","fr":"Suisse uniquement"}' \
    upload
Here, the $CONVERSION_URL must be set to the base URL of the conversion
endpoint of the bank, which should be
https://bank.$DOMAIN/conversion-info/ in our setup.
The above commands set up the exchange to perform conversion with a restriction to only accept credit transfers from Swiss bank accounts. You may want to configure such restrictions on the bank accounts that may originate funds to prevent international wire transfers that may expose you to additional compliance risks.
You can leave out the “credit-restriction” if you want to allow international inbound wire transfers.
The “debit-restriction” is largely mandatory as in this setup the
taler-exchange-transfer is only configured to deal with the regional
currency bank. Crediting fiat bank accounts must thus be done via the
cash-out functionality of the regional currency bank account.
The “display-hint” gives priority (10) for the fiat cash-in account over the regional currency account in the withdraw dialog of the wallets and labels the account with “CHF”.
Note
The above command adds a second bank account to the exchange. You (or the guided setup script) should have already enabled the regional currency bank account (without any “conversion-url”).
12.5.3. System ON!#
The last step is to enable libeufin-nexus to import incoming bank transactions (cash in) and to trigger outgoing bank transactions (cash out).
First, check that libeufin-nexus is correctly configured by running the following commands:
# sudo -u libeufin-nexus libeufin-nexus ebics-setup
# sudo -u libeufin-nexus libeufin-nexus ebics-fetch --transient
# sudo -u libeufin-nexus libeufin-nexus ebics-submit --transient
If you have old transactions after the date YYYY-MM-DD that you wish to import into the database, run the following command:
# sudo -u libeufin-nexus libeufin-nexus ebics-fetch --transientt --pinned-start YYYY-MM-DD
None of those commands should fail. If they all work, you can enable the services:
# systemctl enable --now libeufin-nexus.target
Now that we know that libeufin-nexus is working correctly, we still need to check that communication with your bank is working properly. We will test this later, at the end of the manual. The system should only be considered functional after a successful cash in and cash out.
12.5.4. Configuring exchange terms#
You can use your own terms of service and privacy policy. You can use the default templates in /usr/share/taler/terms as a guide.
Assuming you have custom terms of service and privacy policy rst teamplte files at TOS_PATH and PRIVACY_PATH, the following commands generate the terms files:
# taler-terms-generator -i "$TOS_PATH"
# taler-terms-generator -i "$PRIVACY_PATH"
You now have to specify the terms file names in the exchange config:
# TERMS_ETAG="$(basename "$TOS_PATH" .rst)"
# PRIVACY_ETAG="$(basename "$PRIVACY_PATH" .rst)"
[exchange]
TERMS_ETAG=${TERMS_ETAG}
PRIVACY_ETAG=${PRIVACY_ETAG}
Make sure to restart taler-exchange after changing these configuration options:
# systemctl restart taler-exchange.target
12.5.4.1. Maintenance#
The taler-exchange-offline commands given above set fees only for the
current year (now). Thus, before January 1st of each year, you must to set
up new fees for the new calendar year. In a regional currency setup, this
typically requires up to three annual settings:
# YEAR=2025               # edit if necessary
# FIAT_CURRENCY=CHF       # edit if necessary
# REGIO_CURRENCY=NETZBON  # edit if necessary
# sudo -u taler-exchange-offline \
    taler-exchange-offline \
      wire-fee "$YEAR" \
        iban "${FIAT_CURRENCY}":0 "${FIAT_CURRENCY}":0 \
      wire-fee "$YEAR" \
        x-taler-bank "${REGIO_CURRENCY}":0 "${REGIO_CURRENCY}":0 \
      global-fee $YEAR \
        "${REGIO_CURRENCY}:0" \
        "${REGIO_CURRENCY}:0" \
        "${REGIO_CURRENCY}:0" \
        4w 6y 4 \
      upload
If the fees are not all zero, simply change the respective place to specify a non-zero fee.
Note
Additionally, the denomination signing keys will only have been
pre-generated for some time, depending on your LOOKAHEAD_SIGN
configuration option. Thus, you may need to periodically run
the “taler-exchange-offline download sign upload” sequence as well!